¶ Introduction
In EMMA's apptracker, you can manage all your campaigns and sources. This way, you will be able to know the exact origin of each of your app's users.
When the campaigns are active and generating data, you will be able to see in a general way how the campaigns are working from this same section.
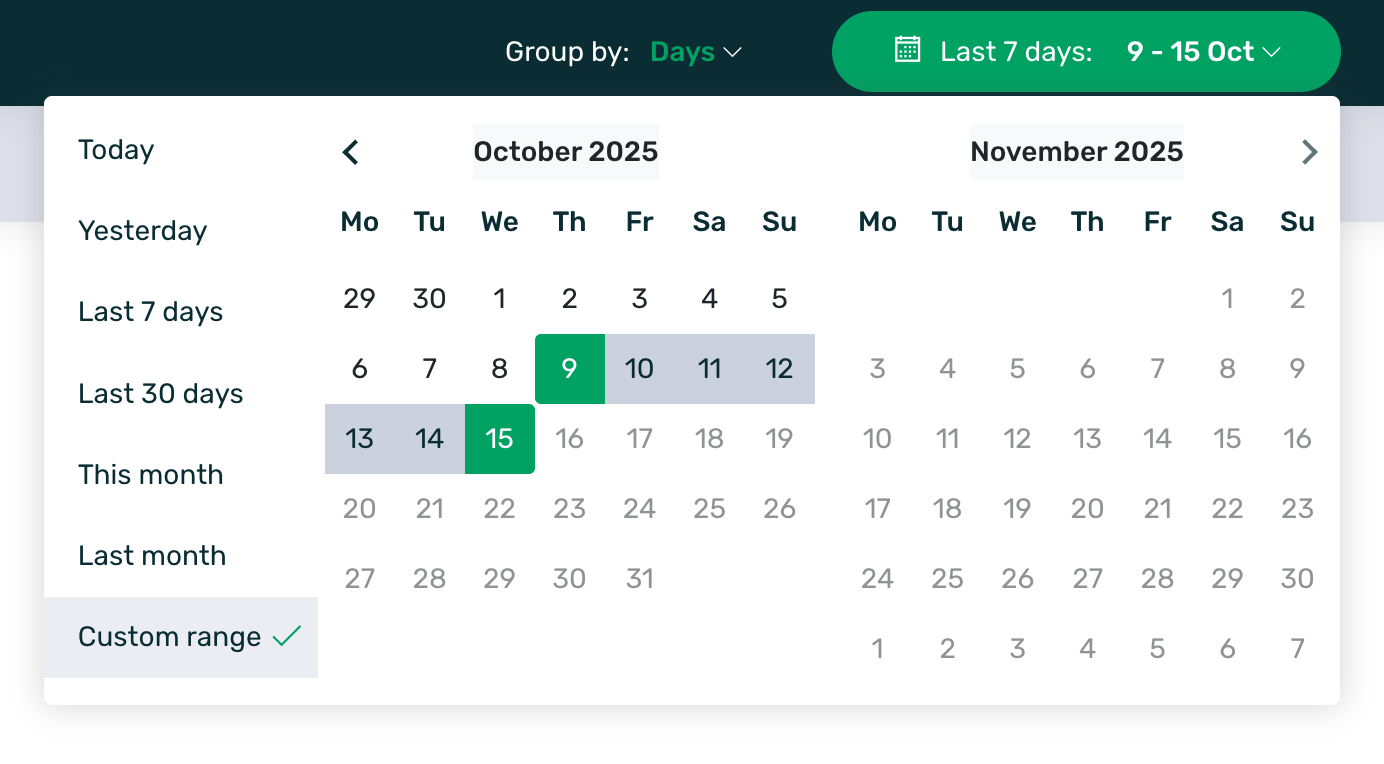
The first thing to do before consulting the data is to select the date period for which you want to process the data. By default, data from the last 7 days are shown. To select a date period, use the date selector at the top right of the screen.
You can then add filters depending on the data you want to query. You can see more information about the filters here.
- Group by campaigns / channels: This grouping allows you to visualize in list mode the source data (powlink) created on the basis of a previously established channel. In this way you can perform an analysis of the data based on the channels you are working with. You can see more information on how to link channels to a source here.
By grouping by channel, you will see the information grouped by each channel and, by clicking on the channel name, you can access a detail screen where you can see all the sources that make up that channel. In this way we will be able to see the data in a general way at channel level, but we will also be able to carry out an analysis of the sources that work best within each channel.
The channel grouping view is read-only. If you want to edit or create new campaigns/sources you must do it in the grouping by campaign view.
- All campaigns / favorite campaigns: This filter shows by default all the campaigns created, but you can modify it to show only those campaigns that you have marked as favorites. You can see more info on how to set favorite campaigns here.
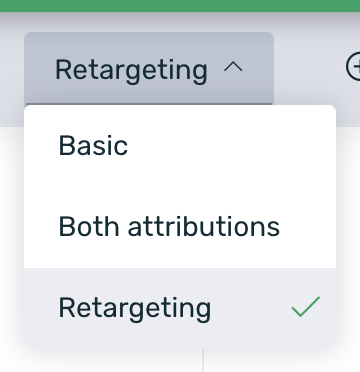
- Basic / Retargeting: This is a fixed and mandatory filter that by default shows Basic campaigns, that means, recruitment campaigns. You can switch to Retargeting to show this type of campaigns or select both options at the same time. This way we can see all the data at a glance. More detailed information on the attribution models available in EMMA can be found at this link.
- Country: This filter allows you to split the data according to the country of origin of the installs.
- Operating system: With this filter we can consult the data based on a specific operating system (Android/iOS).
Once the campaigns have generated activity, you will be able to see, always based on the selected date range and the established filters, the general data of all the campaigns in the main graph.
![]()
This graph shows the following information:
| Clics | Total number of clicks made on all campaigns |
| Cost | Total cost of all campaigns |
| Install | Total installs of all campaigns |
Finally, in the table shown in the second part of the screen you can see in more detail the data acquired by each of the different campaigns in terms of installs and inapp events carried out by users.
When analyzing Apptracker reporting data, the following should be taken into account:
- Clicks and installs tend to show up faster in reporting once they are attributed.
- Inapp events attributed to these campaigns can take up to an hour to be displayed, as the reporting is updated every hour.
In addition, the table is configurable with the KPIs that need to be analyzed. To do so, just click on the top left selector of the table and a drop-down menu with all the available KPIs will be displayed. More info about the available KPIs by clicking here.
![]()
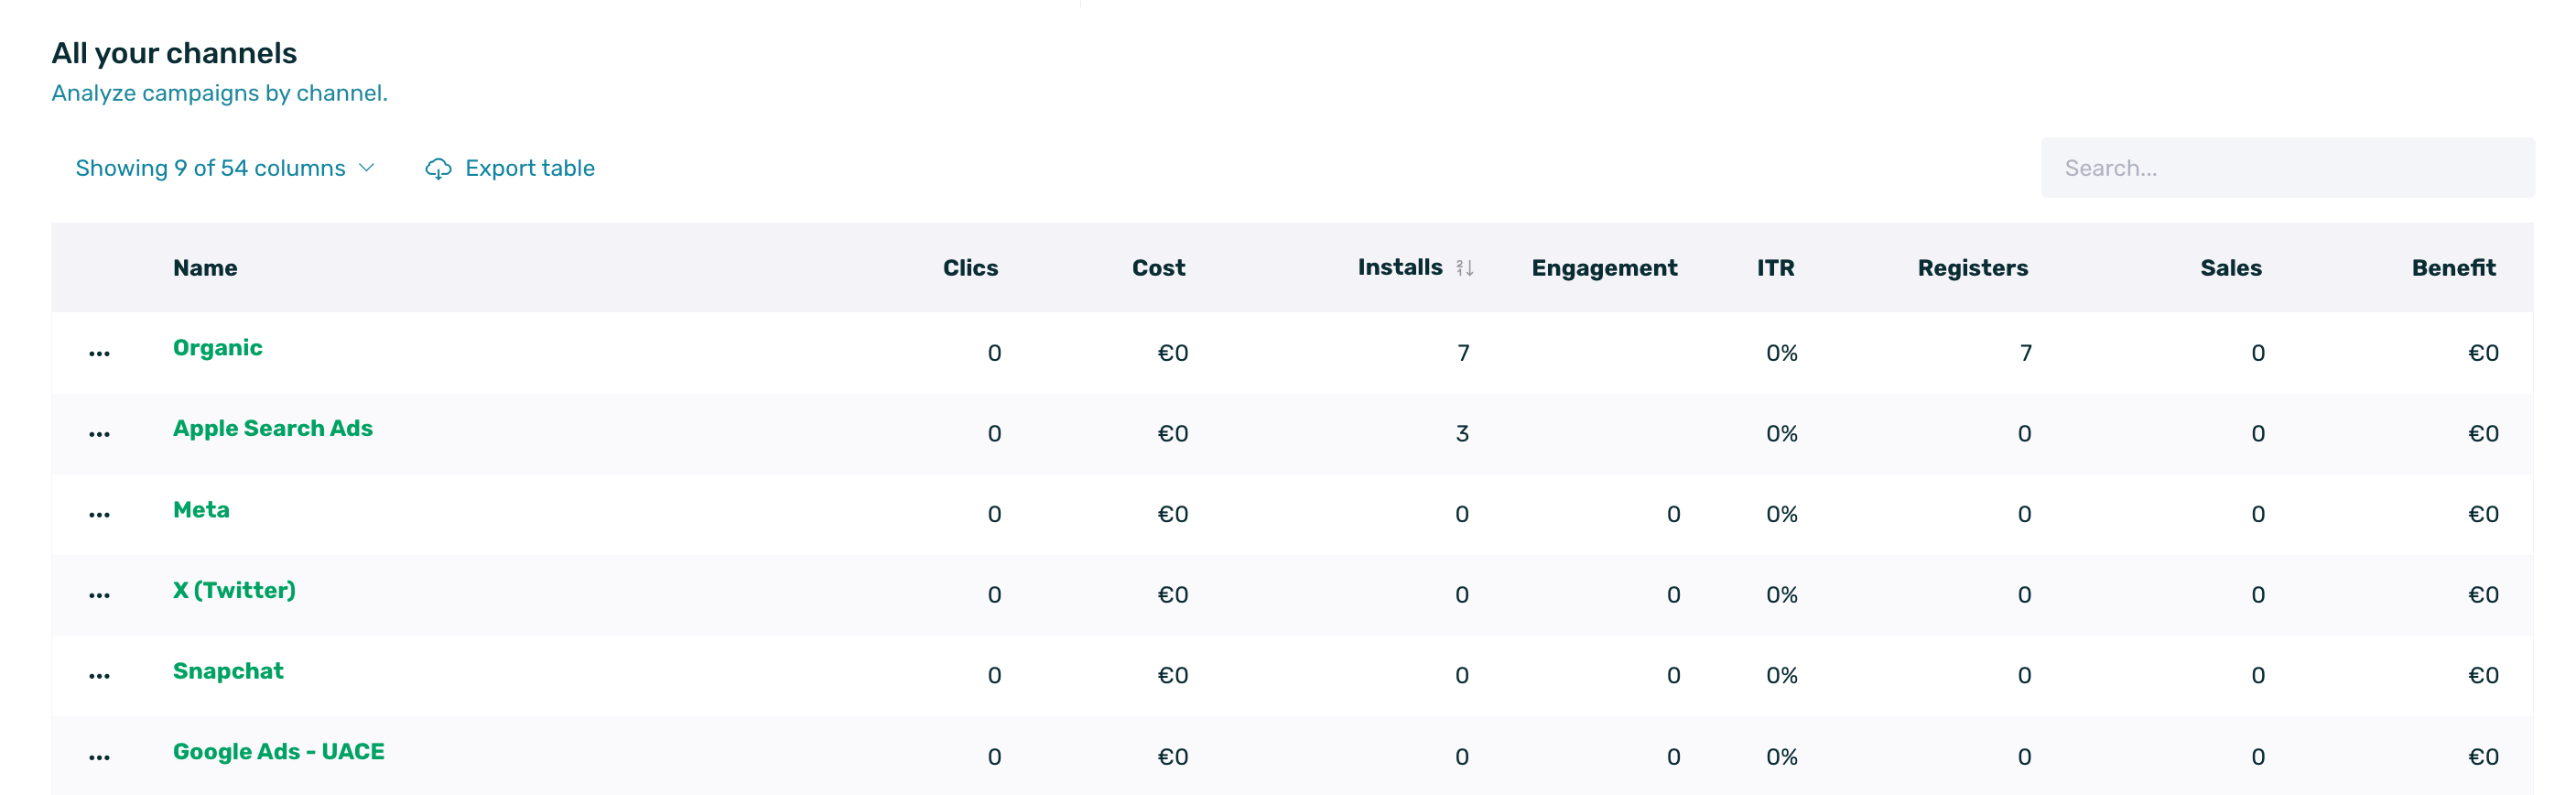
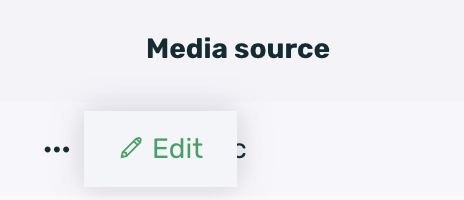
To access the details of the sources of each campaign and know which one is working better and obtaining a better performance, click on the contextual menu (the 3 dots to the left of the campaign name) and select the Sources option.
![]()
Once in the detail of the sources, we will have a line for each source / powlink created and we will be able to see the data corresponding to each one of them. As in the general summary of the campaigns, you can configure the table with the KPIs you want to analyze. More details on the available KPIs here.
¶ Basic and Retargeting campaigns
EMMA offers the possibility to work with two types of tracking links depending on the campaign objectives.
- Basic Campaigns
- Re-Targeting Campaigns
- Re-Targeting Last Click
- Re-Targeting Unique Click
¶ Basic Campaigns
Basic mode campaigns attribute activity from devices that have never had the app and continue to do so for the lifetime of the user without limiting attribution by an attribution window.
The main objective of this type of campaign is to impact users who have never had the app and to know all the activity attributed to the origin of the install event regardless of the time that has passed.
¶ Use cases
Different examples of attribution are detailed below:
1. The device has never had the app and clicks on a basic source:
| The user clicks on a Basic source and the app is installed. | One click and one install are counted in the source report. |
| On day 20 the user opens the app and registers. | A session and register event is counted in the Basic source. |
| On day 380 the user opens the app and makes a purchase. | A session and sale event is counted in the Basic source. |
2. The device already had the app and clicks on a Basic source (source B) different from the source of the install (source A):
| The user clicks on a Basic source other than the source of the install, opens the app and logs in. | A click is counted in the Basic B source and a session and a login in the Basic A source. |
¶ Re-Targeting Campaigns
Re-Targeting campaigns attribute both the activity of devices that have never had the app and those that do have the app during a limited attribution window.
The attribution window establishes the maximum time that can elapse between a click and an event (install or in-app) for that event to be assigned in the Apptracker.
The main objective of this type of campaign is to re-engage users who already have the app installed and thus be able to attribute certain in-app activity after interaction with this type of tracking links.
Within the Re-Targeting campaigns, there are two possible attribution models:
- Re-Targeting Last Click.
- Re-Targeting Unique Click.
¶ Re-Targeting Last Click
Last Click Re-Targeting campaigns are the market standard. This type of campaign allows you to attribute any app event to the last click made by the user within the attribution window. This click must have been made in one of the campaigns and sources created in the Apptracker.
To create a Last Click Re-Targeting campaign follow these steps:
-
Go to the App Preferences section and check that the Unique click option is inactive. If it is not, disable it.

-
Create your campaign in the Apptracker by selecting the Re-Targeting mode.
¶ Re-Targeting Last Click Use Cases
1. The device has never had the app and clicks on a Re-Targeting source with a 30-day attribution window:
| On day 1, the user clicks on a Re-Targeting source and the app is installed. | One click, one engagement and one install are counted in the Re-Targeting source report. |
| On day 30, the user opens the app and registers. | A session and register event is counted in the Re-Targeting source. |
| On the 31st the user opens the app and makes a purchase. | A session and sale event is counted in the user's history* but not in the Re-Targeting source. |
*The user's history is always accessible from the different reporting options in the Behavior section.
2. The device has never had the app and clicks on a Re-Targeting source (source A) with a 30-day attribution window and subsequently clicks on another Re-Targeting source with a 4-day attribution window (source B):
| On day 1, the user clicks on the Re-Targeting A source and the app is installed. | One click, one engagement and one install are counted in the Re-Targeting A source report. |
| On day 2, the user opens the app and registers. | A session and register event is counted in the Re-Targeting A source. |
| On day 3, the user clicks on the Re-Targeting B source, opens the app and performs a purchase. | A click, an engagement, a session and a sale are counted in the report of the Re-Targeting B source. A session and sale event is counted in the user's history* but not in the Re-Targeting A source. |
*The user's history is always accessible from the different reporting options in the Behavior section.
3. The device already had the app and clicks on a Re-Targeting source with a 14-day attribution window:
| On day 1, the user clicks on a Re-Targeting source. | One click and one engagement are counted in the Re-Targeting source report. |
| On day 3, the user opens the app and registers. | A session and register event is counted in the Re-Targeting source as well as in the facility's attribution source (basic or organic). |
| On day 15, the user opens the app and makes a purchase. | A session and sale event is counted in the install attribution source (basic or organic) but not in the Re-Targeting source. |
4. The device already had the app and clicks on a Re-Targeting source with a 2-day attribution window (source A) and subsequently on another Re-Targeting source with a 4-day attribution window (source B):
| On day 1, the user clicks on the Re-Targeting A source and opens the app. | One click, one engagement and one session are counted in the report of source A. A session is counted in the attribution source of the install (basic or organic). |
| On day 3, the user opens the app and registers. | A session and registration event is counted in the facility attribution source (basic or organic) but not in the Re-Targeting A source. |
| On day 4, the user clicks on the Re-Targeting B source, opens the app and performs a purchase. | One click, one engagement, one session and one sale are counted in the report of the Re-Targeting B source. One session and one sale are counted in the install attribution source (basic or organic). |
| On day 7, the user opens the app and logs in. | A session and a login are counted in the Re-Targeting B source as well as in the attribution source of the install (basic or organic). |
| On day 8, the user opens the app and performs a new purchase. | A session and a sale are counted in the install attribution source (basic or organic) but not in the Re-Targeting source. |
¶ Re-Targeting Unique Click
Re-Targeting campaigns in Unique Click mode allow you to attribute only certain app events to each of the campaigns taking into account the last click per campaign within the attribution window. This means that each campaign will have one or more target events and that the attribution will take into account that the conversion is only assigned to the last click of the campaign that has configured that target event.
All the events selected for a Re-Targeting campaign in Unique Click mode will be common to all its sources. The attribution between the different sources of the same campaign will be made taking into account the user's last click.
Remember that events can only be attributed to a single campaign. The same event can never be used for two or more different campaigns.
To create a Re-Targeting campaign in Unique Click mode follow these steps:
-
Go to the App Preferences section and check that the Unique click option is active. If it is not, activate it.

-
Create your campaign in the Apptracker by selecting the Retargeting mode and select the target event(s) of the campaign. The target events will be the only ones assigned to the campaign under this attribution model.
Each time the Re-Targeting attribution mode selector is activated or deactivated, all campaigns currently running in the Apptracker will be stopped and new campaigns will have to be created in the new attribution mode.
¶ Use cases Re-Targeting Unique Click
1. The device has never had the app and clicks on a Re-Targeting feed with a 30-day attribution window of a campaign with the registration event as the target:
| On day 1, the user clicks on a Re-Targeting source and the app is installed. | One click, one engagement and one install are counted in the Re-Targeting source report. |
| On day 30, the user opens the app and performs a registration and a first login. | A register event is counted in the Re-Targeting source. A first login event is counted in the user's history*. |
| On day 31, the user opens the app and makes a purchase. | A sale event is counted in the user's history* but not in the Re-Targeting source. |
*The user's history is always accessible from the different reporting options in the Behavior section.
2. The device has never had the app and clicks on a Re-Targeting source (from campaign A with attributed sale event) with a 30-day attribution window and subsequently clicks on another Re-Targeting source (from campaign B with attributed login event) with 14-day attribution window:
| On day 1, the user clicks on the Re-Targeting source of campaign A and installs the app. | One click, one engagement, and one install are counted in the campaign source A report. |
| On day 2, the user opens the app and registers. | A register event is counted in the user's history*. |
| On day 9, the user clicks on the Re-Targeting source for campaign B. | One click and one engagement is counted in the campaign source B report. |
| On day 23, the user opens the app, performs a purchase and a login. | A sale event is recorded in the Re-Targeting source of campaign A, a login event is recorded in the Re-Targeting source of campaign B. |
| On day 31, the user opens the app, logs in and performs a new purchase. | A sale and login event is recorded in the user's history* but not in the reporting of the source of campaign A or campaign B. |
*The user's history is always accessible from the different reporting options in the Behavior section.
3. The device already had the app and clicks on a Re-Targeting feed with a 14-day attribution window of a campaign with the sale event as the target:
| On day 1, the user clicks on a Re-Targeting source. | One click and one engagement are counted in the source report. |
| On day 3, the user opens the app and registers. | A session and register event is counted in the facility's attribution source and in the user's history*. |
| On day 10, the user opens the app and performs a purchase. | A sale event is recorded in the Re-Targeting source and a session and sale event is recorded in the facility's attribution source and in the user's history*. |
| On day 15, the user opens the app and performs a new purchase. | A session and sale event is counted in the install attribution source and in the user's history* but not in the Re-Targeting source. |
*The user's history is always accessible from the different reporting options in the Behavior section.
4. The device already had the app and clicks on a Re-Targeting source with a 2-day attribution window (source A) and then on another Re-Targeting source with a 4-day attribution window (source B). Both sources belong to a campaign with login and sale events as target:
| On day 1, the user clicks on the Re-Targeting A source, opens the app and logs in. | A click, an engagement and a login are counted in the report of source A. A session is counted in the install attribution source and in the user's history*. |
| On day 3, the user opens the app and performs a purchase. | A session and sale event is counted in the facility's attribution source and in the user's history* but not in the Re-Targeting A source. |
| On day 4, the user clicks on the Re-Targeting B source, opens the app and performs a purchase. | One click, one engagement and one sale are counted in the Re-Targeting B source report. A session and a sale are counted in the install attribution source and in the user's history*. |
| On day 7, the user opens the app and logs in. | A click and login event is counted in the Re-Targeting B source and a session and login event is counted in the facility attribution source and in the user's history* but not in the Re-Targeting A source. |
| On day 9, the user opens the app and performs a login and a new purchase. | A session, login and sale event is counted in the (basic*) install attribution source* or in the user's history* but not in the Re-Targeting source. |
*The user's history is always accessible from the different reporting options in the Behavior section.
¶ Campaign management
In order to know in detail the origin of users, it is necessary to create campaigns that allow us to measure the different sources of traffic. In our Acquisition Campaigns guide you can see in detail how to create, edit, clone and delete acquisition campaigns.
¶ Source management
Once the campaigns are configured, it is necessary to create sources (tracking links) that allow us to know the exact origin of each install. For more information on how to manage media sources, see our Media Sources article.
¶ Favourite campaigns
Thanks to the option of marking campaigns as EMMA favorites, each user will be able to mark the campaigns that interest them as favorites to access their data quickly and easily.
To set favorite campaigns you only have to follow these steps:
-
Login to your EMMA account.
-
Go to Recruitment > Apptracker.
-
Locate the desired campaign, you can search by name through the search engine to facilitate the search.
-
In the context menu, select the Favorite option to mark the campaign.

-
That's it! Repeat this process with all the campaigns you want to set as favorites.
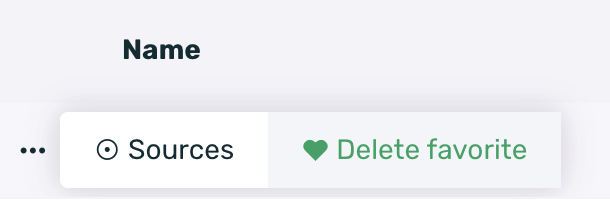
Once the campaign has been set as a favorite, it can be easily differentiated from the others as it will be marked with a heart icon.
![]()
Favorite campaigns work at the user level, so each user with access to EMMA will be able to set their own campaigns as favorites, regardless of what other users have configured.
¶ Viewing favorite campaigns
By default, when accessing Apptracker, all existing campaigns will be displayed, but if you want to display only the campaigns marked as favorites, simply modify the filter and select the Favorites option.
![]()
The option selected in the filter will be maintained in future accesses, so if the Favorites option is selected, the next time the Apptracker is accessed, this selection will be displayed by default.
¶ Delete from favorites
To stop having a campaign marked as a favorite, simply locate the campaign and select the Delete favorite option in the contextual menu.
¶ Rehabilitating the use of Universal Links in iOS
The EMMA powlink works, in the case of iOS as a Universal Link, and in the case of Android as an App Link. That is, the link can detect whether or not the user has the app installed and behave in one way or another based on that information. If you want to know more about powlink and how it works you can see this documentation.
In the case of the iOS operating system, it is possible that the user disables the use of the Universal Link and, in this case the EMMA powlink will not be able to work properly and, if the user has the app installed, instead of being taken to the app, will be redirected to the store.
If we want to re-enable Universal Link on the device, follow these steps:
-
Copy the EMMA powlink, open the iPhone NOTES app and paste the EMMA powlink.
-
Long tap on the powlink until a menu opens and click on the Open option in application name.
In case the option Open in application name does not appear after a long tap on the powlink, it means that there has been some kind of error with the association made by iOS between domain and app. This process is totally unrelated to EMMA.
After performing these two steps, the Universal Links should be reactivated for the corresponding domain and app should open and take the user to the appropriate section in each case.
If necessary, these steps can be repeated as many times as needed to re-enable the Universal Links on the devices.
It is important to remember that if the EMMA powlink has a deeplink linked to it and the Universal Link is disabled, user will be redirected to the store. If you open the app from the store, the deeplink redirection will not take place because the information is lost and the user cannot be redirected. Once the Universal Link is reactivated this flow should no longer occur.
¶ Sending clicks via server to server (S2S)
If you need clicks from your EMMA campaigns to be sent to an external system you can configure a URL/postback through which the clicks will be notified. This configuration is done at the media provider/source level and will affect all sources linked to that provider.
Sending server to server clicks is allowed for the custom provider (default provider when it is not about campaigns with advertising networks) and also for new providers that are created from scratch. To do this, just follow these steps:
-
Login to EMMA.
-
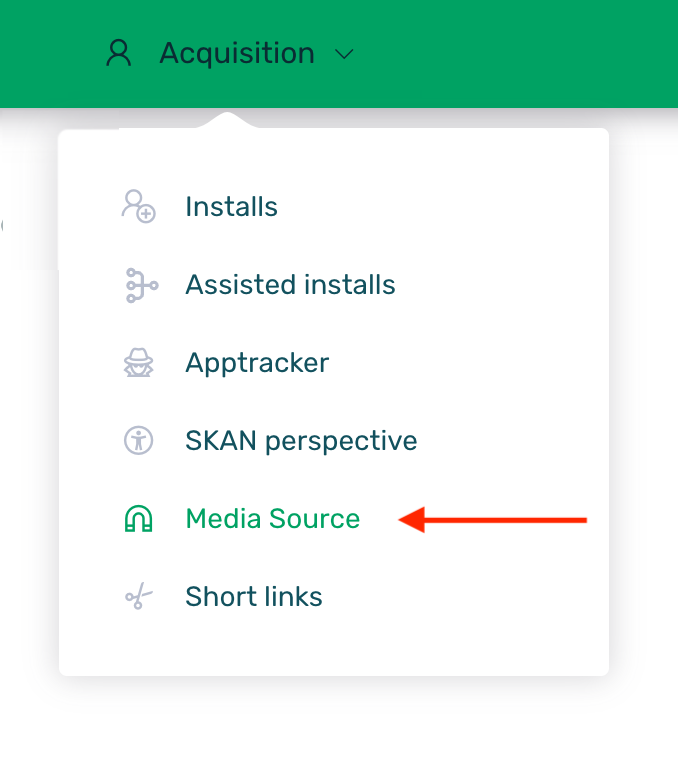
Go to the Acquisition > Media Source section.
-
Click the + New media source button to create a new source/supplier or search and edit the custom source/supplier.

- Go to the Click Postback section and configure postback by which the generated clicks are to be reported.
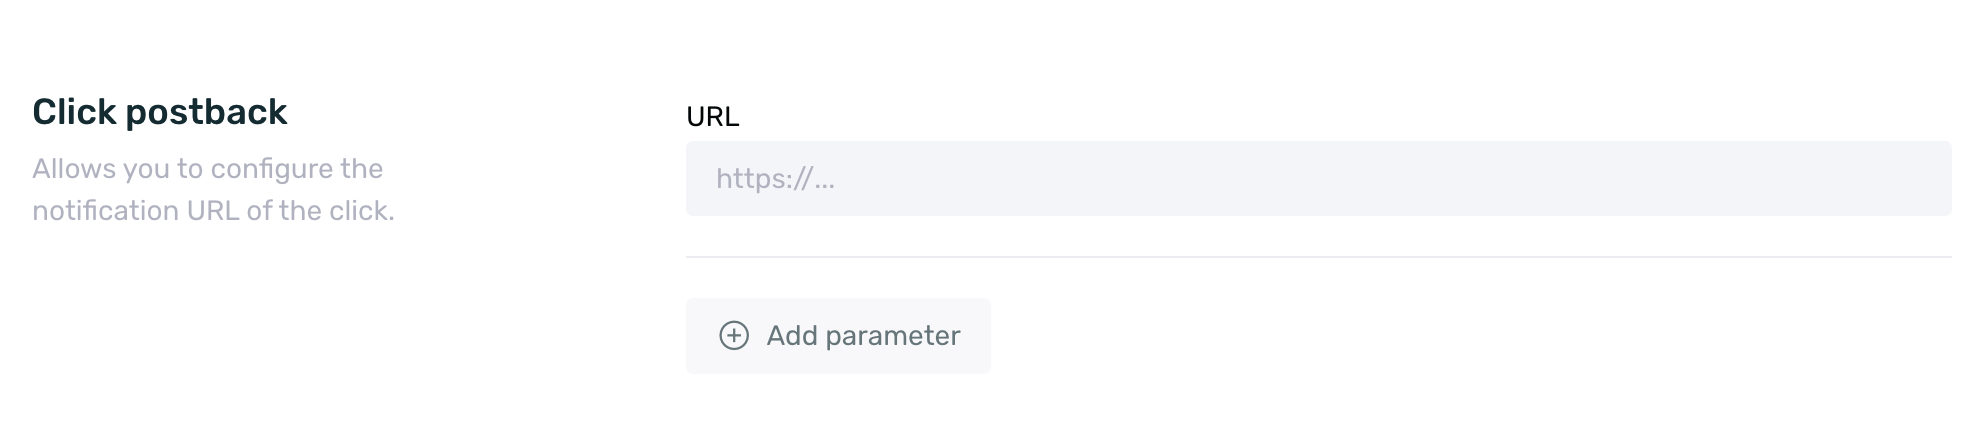
- In the URL field add base url of the postback and the fixed parameters you want.
In case you are going to add different fixed parameters for each powlink created in EMMA there are two options:
Create a new media source/supplier to link to each powlink. Where each media source created will have the fixed parameters corresponding to each campaign.
Create a single universal media source/supplier with common parameters and add at the end of each powlink the specific parameters for each campaign. All parameters attached to the powlink will be propagated to the postback and reported correctly. This would be the option recommended by EMMA.
In this example you can see how to add the fixed parameters to the tracking link created in EMMA:
https://eat.emmasolutions.net?entw=1a763960aebd59fc34c6dd2c390496cc&enlace=1&campaña=inversiones&origen=web¶m1=864
- If you want to add dynamic parameters, click the + Add parameter button and select the appropriate EMMA parameter in the *EMMA Parameter * column. Then, in the Media Source Parameter column, specify the name under which you want to receive that parameter. For example, city - ciudad. This way, the city information will be sent appended to the postback as city=madrid.
https://ejemplopostback.es?ciudad=madrid
The dynamic parameters available for this configuration are:
| EMMA parameter | Meaning |
| click_id | EMMA click identifier. It is an alphanumeric code. |
| provider_id | Supplier identifier in EMMA. It is a numeric code. |
| network_id | Identifier of the source/powlink in EMMA. It is a numeric code. |
| campaign_id | Campaign identifier in EMMA. It is a numeric code. |
| random | Randomly generated identifier. |
| city | Information of the city from which the click was made. |
| country | Information of the country from which the click was made. |
| ip | The ip address from which the click was made. |
| language | Language of the browser from which the click was made. |
| OS | Operating system of the browser from which the click was made. |
- Save the changes.
- Go to the Acquisition > Apptracker section and link the corresponding provider to each powlink. In this guide you can see more info about it.
¶ Self-attributed campaigns
With EMMA you will be able to launch a campaign with the following self-attributed networks:
Click on each of the brackets for more information.
¶ Configuring Powlink and pwlnk (STU)
Before looking in detail at the configuration necessary to use the EMMA powlink, we will explain what the powlink is in order to understand the advantages of its implementation and use, and then we will look in depth at the relevant configuration to be able to use it.
¶ What is Powlink and pwlnk?
Powlink is an EMMA technology that is based on the operation of App Links (Android) and Universal Links (iOS) and allows us to obtain their full potential. With this in mind, we will now look at the different scenarios that Powlink distinguishes:
- The user does not have the App installed on their device. In this case the link will redirect the user to the App Store or Google Play depending on the operating system of the device (iOS / Android respectively).
- The user already has the App installed on their device. In this case, the link will open the App, so that from any other App it is possible to link the contents that we have within our App.
Regarding pwlnk, it is a shortened version of Powlink that shares all its functionalities and features except for its length. Both the classic Powlink and pwlnk can coexist together and you can use one or the other indistinctly depending on whether one or the other is more suited to your specific needs.
If you already had sources in the EMMA Apptracker before configuring the short url, the pwlnk column will default to N/A. The pwlnk will only be shown in those sources created after the short url configuration.
¶ Configuration for using Powlink and pwlnk
In order to enjoy all the benefits of Powlink it is first necessary to configure the following in the App Preferences section:
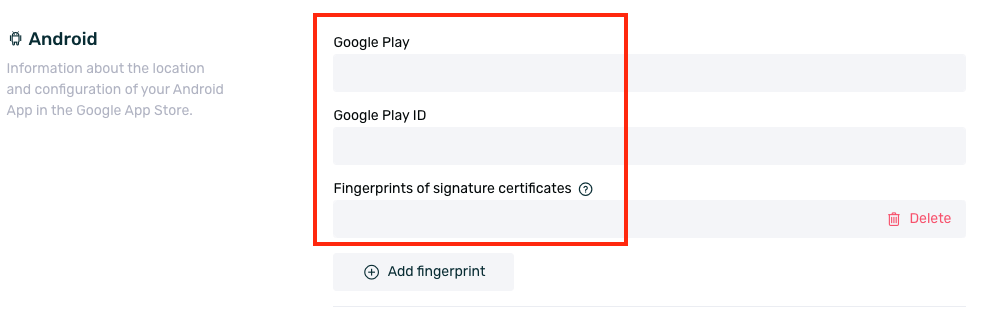
- Google Play ID, **Fingerprints of signature certificates ** and Google Play URL to support Powlink on Android.
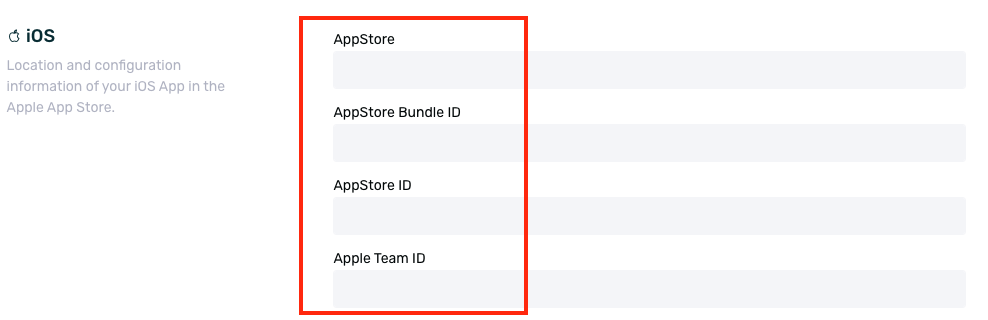
- App Store Bundle ID, App Team ID and AppStore URL for Powlink on iOS.
- Subdomain of powlink.io and pwlnk.io to be use.

Once this configuration is done in your EMMA app, it is necessary that the app is configured to support Powlink and pwlnk. In this guide you will find all the necessary information for the Android app configuration and in this other guide you will find all the info for the iOS app.
¶ Using powlink in your campaigns
When creating or editing a Source (traffic source) for a campaign, we have the Deeplink section, which can be configured for each source we have. If you want to use a landing with Deeplink, you only have to activate the check box. You can see more information about landings with deeplink here.
In this section, we will introduce the destination to which we want to send the user (in case we have deeplinks in our App). As an example, we suggest a page/product type structure. This will be the screen and/or section that will be shown to the user when he/she is redirected to the opening of the App. When saving, this path will be used to generate the Powlink on the powlink.io domain.
Once saved, in the list of sources of the campaign, you will have the url of our Powlink that you can share publicly with your suppliers / media for the measurement of your user acquisition campaigns.

¶ Redirection for non-native browsers
At EMMA, we've been working on a development to ensure broader functionality for AppLink/UniversalLink, aiming to cover as many scenarios as possible. Typically, for an AppLink/UniversalLink to function correctly, a user must click on it, and only the default browsers (Chrome on Android, Safari on iOS) can recognize and handle these links properly. With this development, the operational range of AppLink/UniversalLink has been expanded, allowing it to work even without a direct click (through redirection or by pasting the powlink into a browser).
This enhancement ensures that any powlink with a configured deeplink and set up from EMMA to use a deeplinking landing will exhibit specific behavior depending on the default browser. Below, we detail how it works for each operating system.
However, powlinks without a configured deeplink using a deeplinking landing will continue to function as before. This new flow only applies to powlinks that have a deeplink associated with a deeplinking landing.
¶ Redirection on iOS
In the case of iOS, we will adapt the behavior based on the user's default browser, distinguishing between Safari (the system's native browser) and external browsers such as Chrome.
¶ Safari
If the user has Safari configured as the default browser on his device, the powlink flow will be as follows:
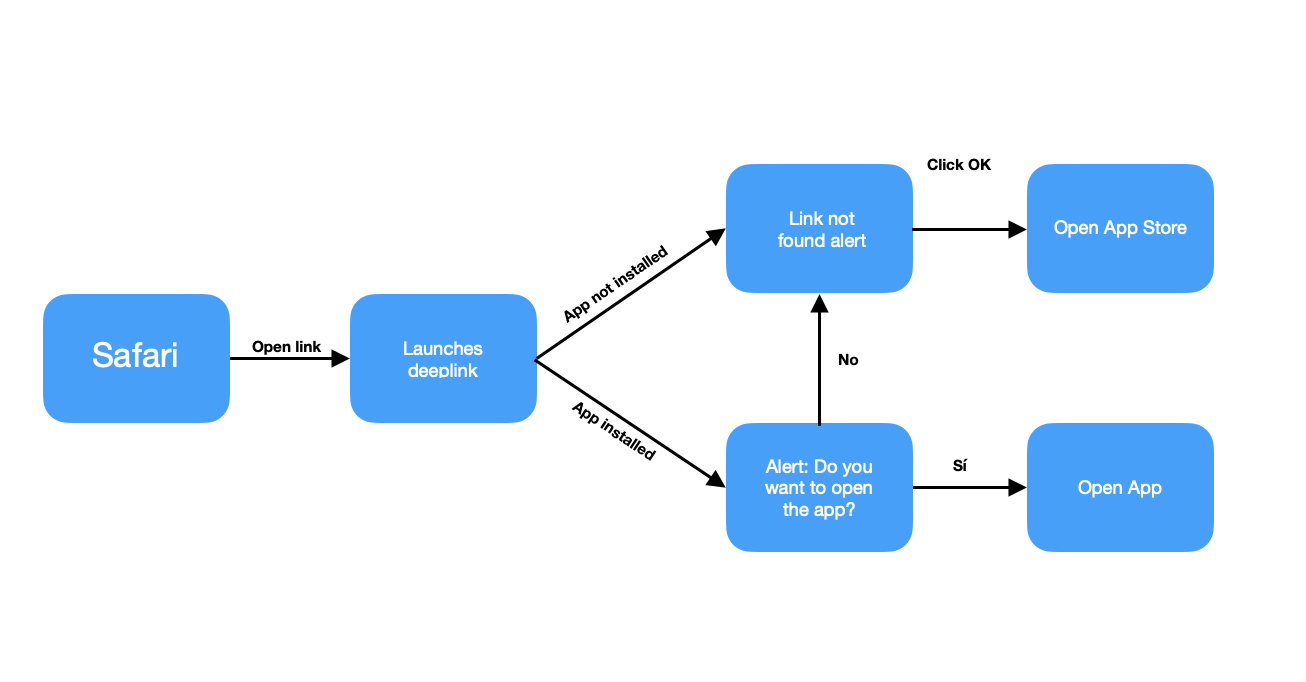
*If you explicitly click on the powlink with a deeplink and the app is installed on your device, the application will open immediately. If the app is not installed, the flow will follow the steps detailed above.
The alerts displayed in the flow, such as “Do you want to open the app?” and “Link not found,” are default Safari behaviors. These are internal to the OS and cannot be removed, as they are native elements over which we have no control.
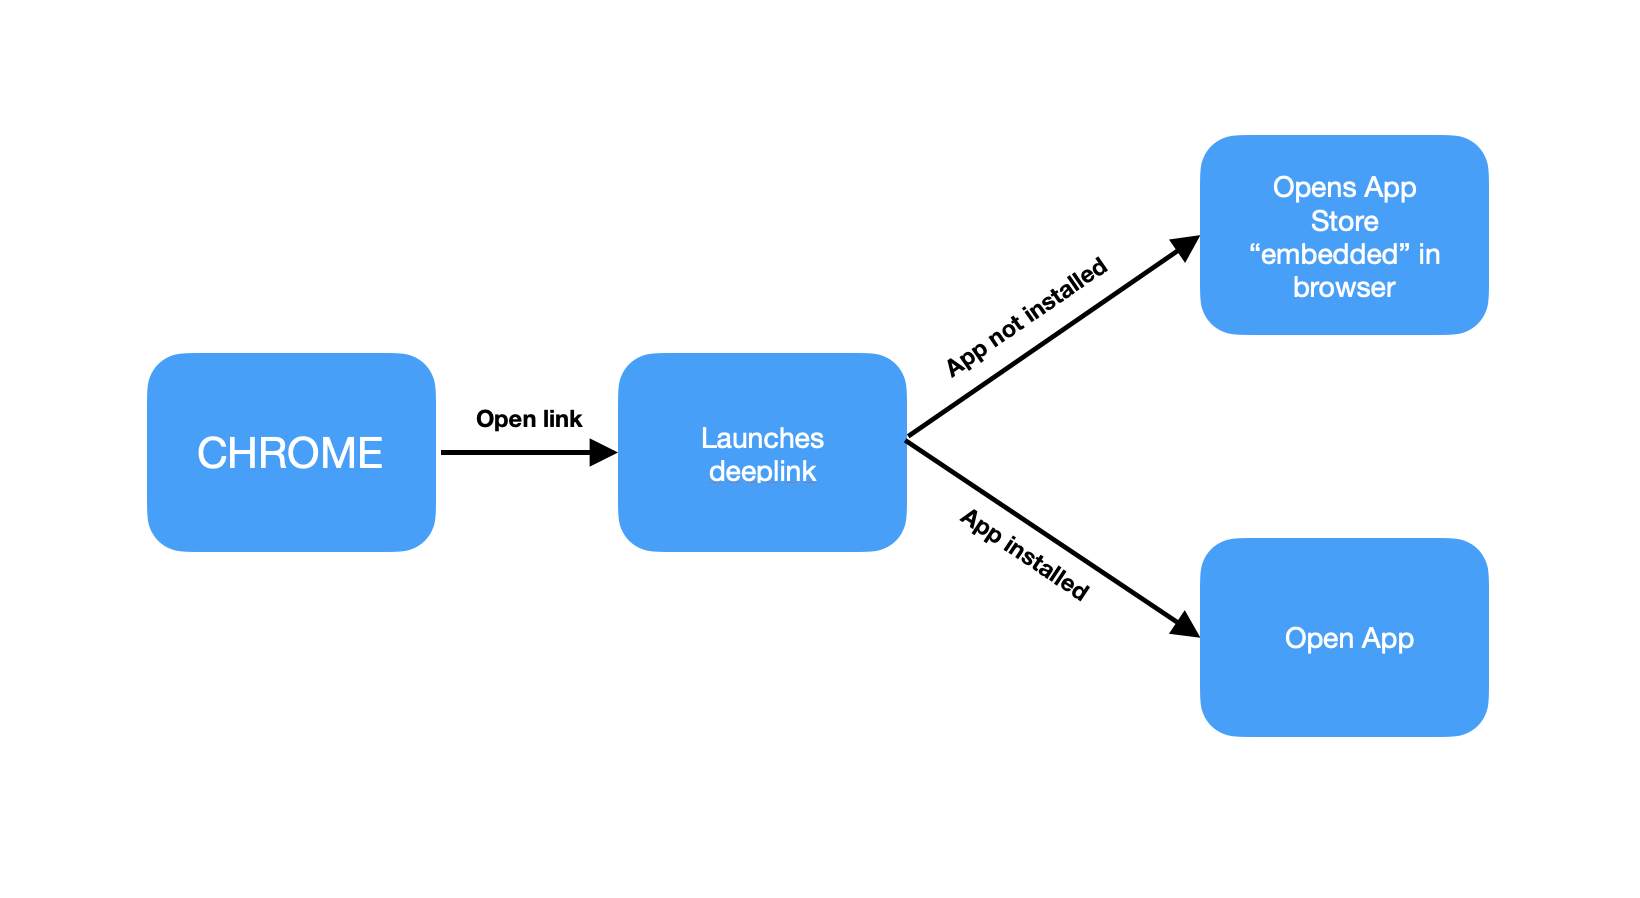
¶ Chrome
If the user has Chrome consigured as the default browser on their device, the powlink flow will (all cases) proceed as follows:
¶ Redirection on Android
As in the case of iOS, we will describe two flows and analyze the behavior of the powlink based on the browser selected by the user as the default browser. In this case, we will look at the flows with the native Chrome browser and with other "external" browsers such as Firefox or Opera.
¶ Chrome
If the user has set Chrome as the default browser on their device, the powlink flow will be as follows:
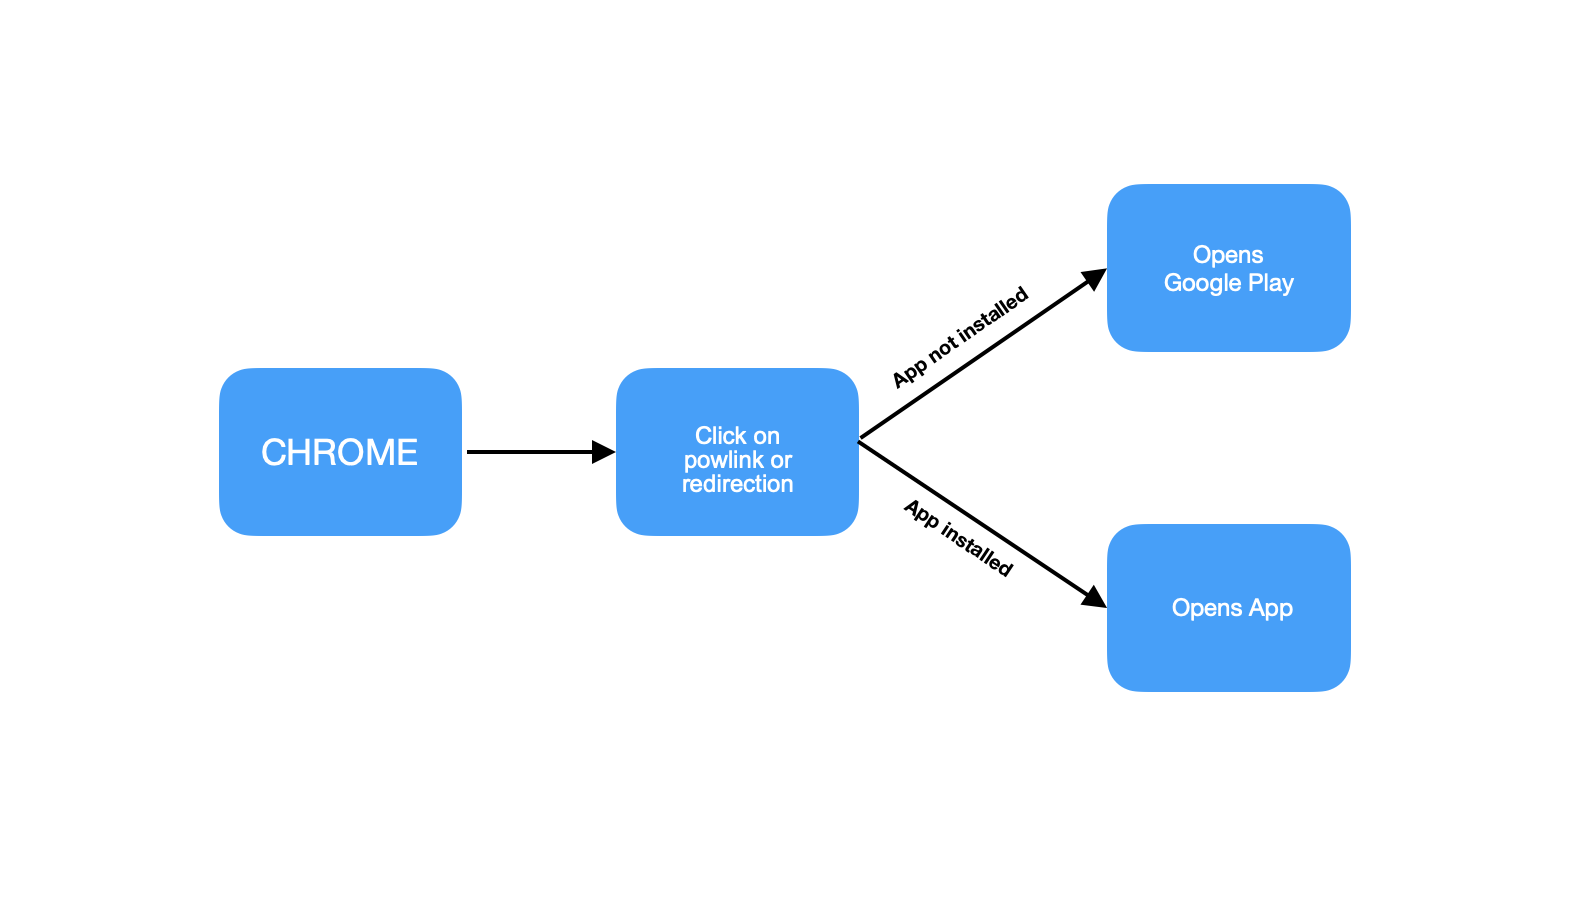
In the case of Chrome, if the URL is manually entered in the browser, it will block the deeplinking and leave the user on the landing page. This is an automatic behavior specific to Chrome over which we have no control, and it cannot be bypassed.
Chrome will only open deeplinks that have been triggered by an action (such as clicking a button or a redirection).
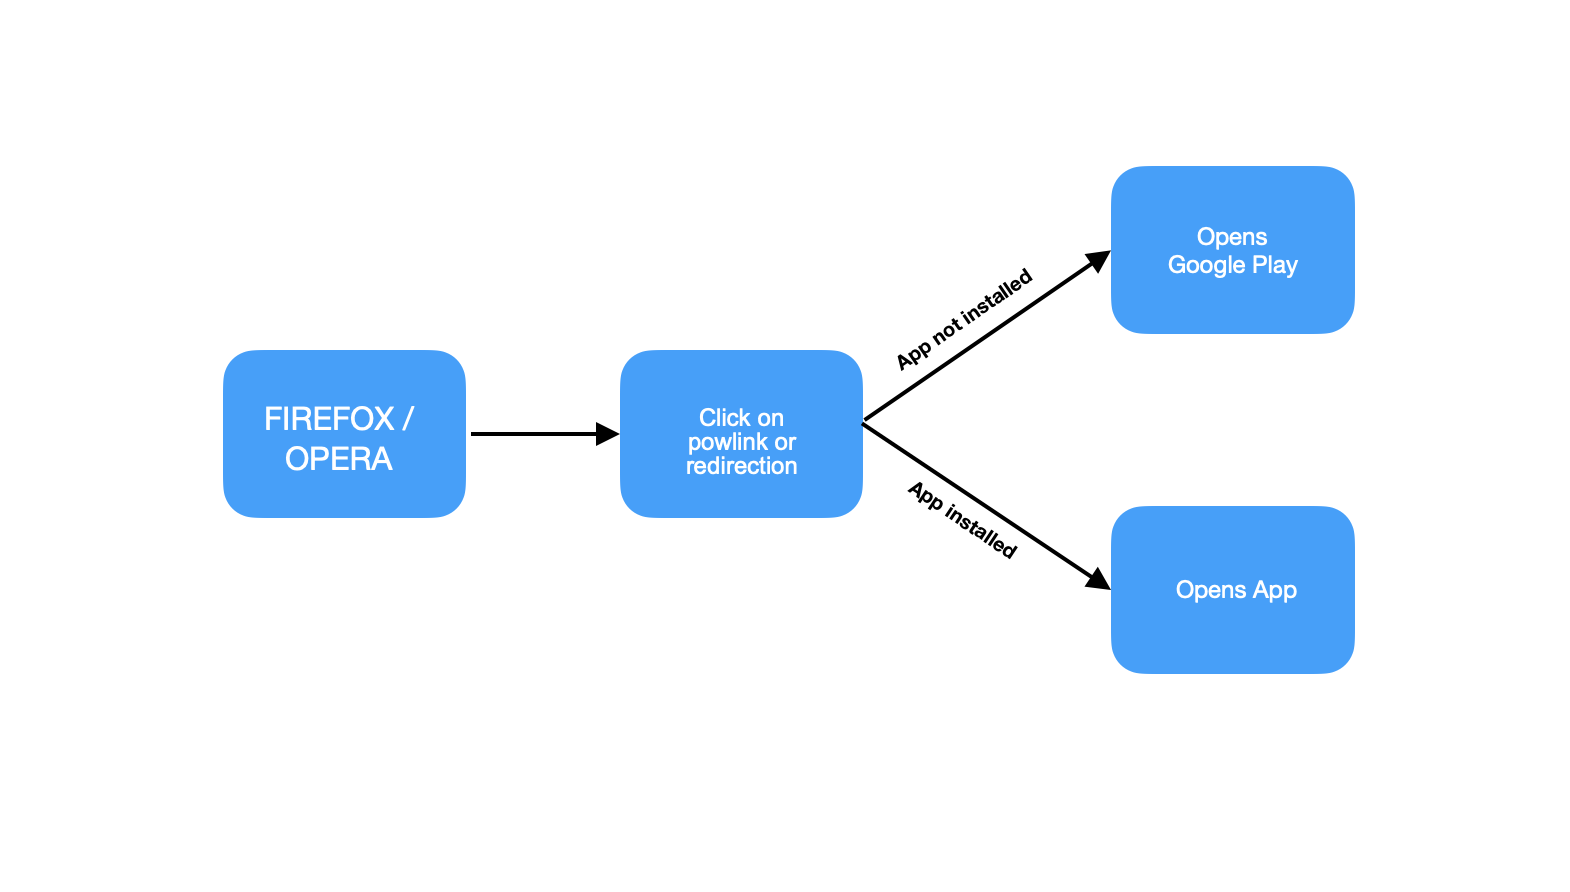
¶ Firefox / Opera
If the user has set Firefox or Opera as the default browser on their device, the powlink flow will be as follows in all cases:
¶ Huawei HMS
Huawei has its own default browser, Huawei Browser, but even with a single browser, we have two possible ways for the powlink to function. The first option is the default one used by EMMA, and the second option requires a minor configuration step to enable AGConnect (App Link) and the creation of a custom landing page with the same logic as EMMA's default landing page.
Let's go over each of the available options and their specifications.
¶ Huawei Browser (default option)
The default option offered by EMMA presents the following flow if the user is using Huawei Browser as their browser:
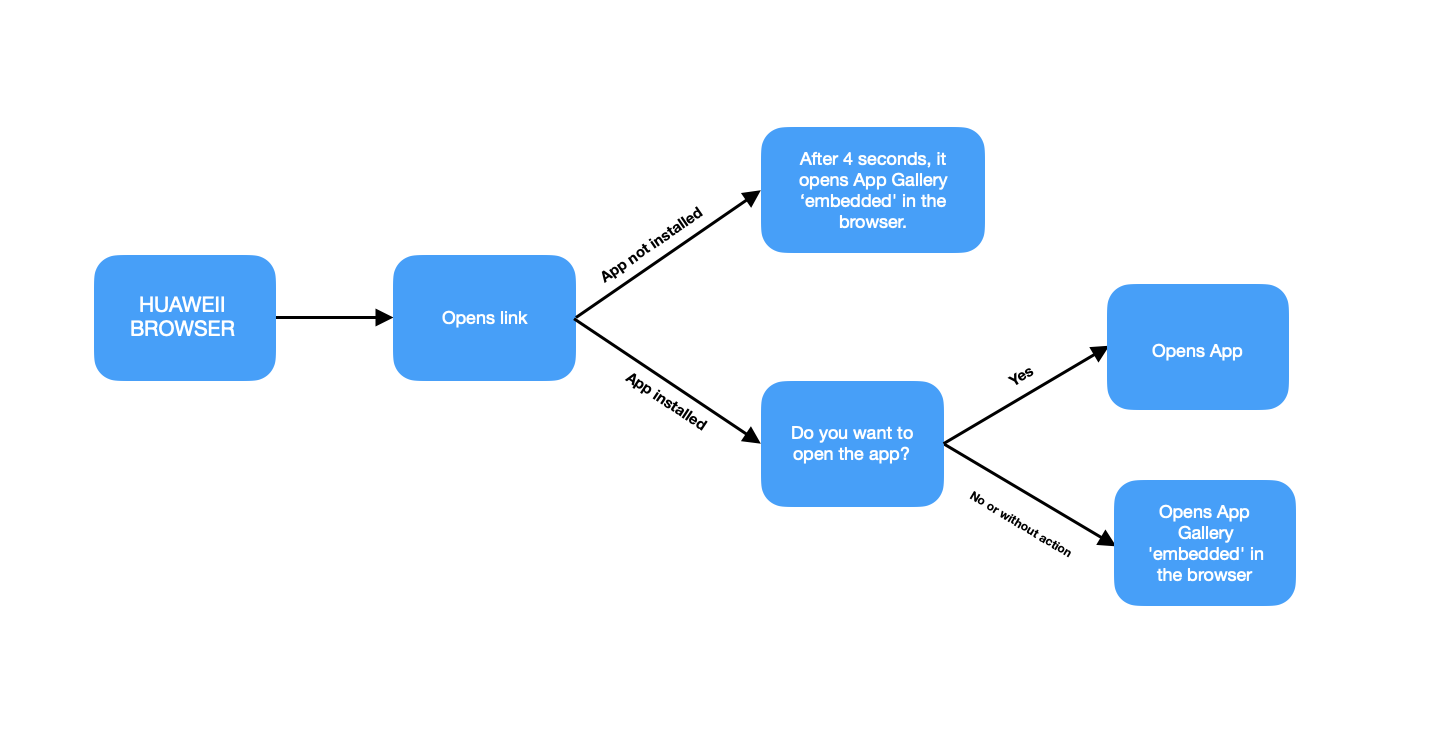
In this case, in the user flow for those who do not have the app installed or do not grant permission to open it when they have it installed, the App Gallery will always open 'embedded' in the browser.
¶ AGConnect link (alternative option)
If we want the App Gallery app to open when the app is not installed, it would be necessary to choose this alternative. To use this alternative, a small configuration will be required, as well as creating a new custom landing page. Below, we can see both requirements in detail.
In this case, the flow will always be as follows:

¶ AGConnect Link configuration
Enabling AGConnect Link for use on the redirect landing page is very simple; you just need to follow two easy steps.
-
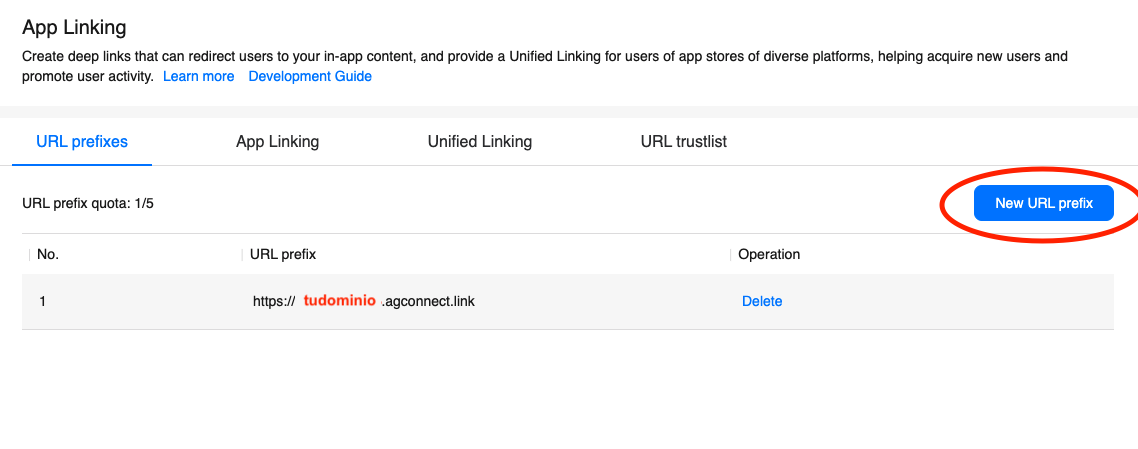
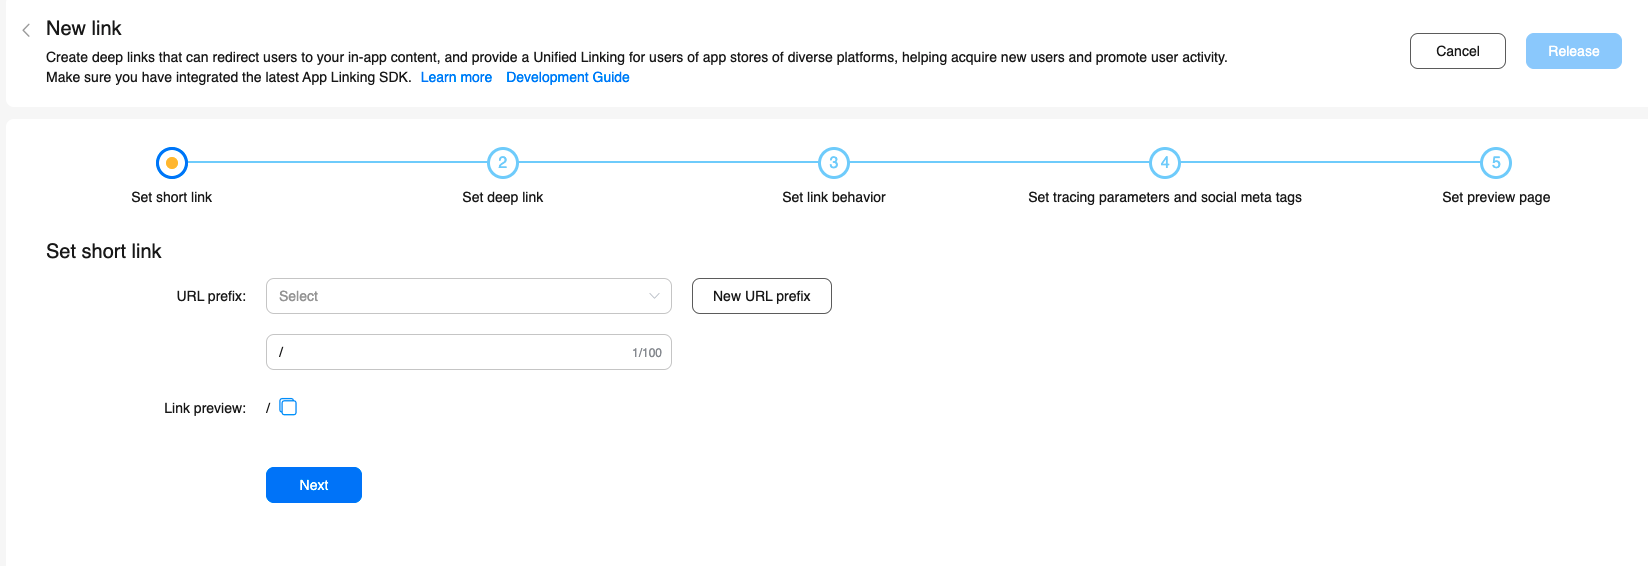
Log in to App Gallery Connect and select the App Linking option.
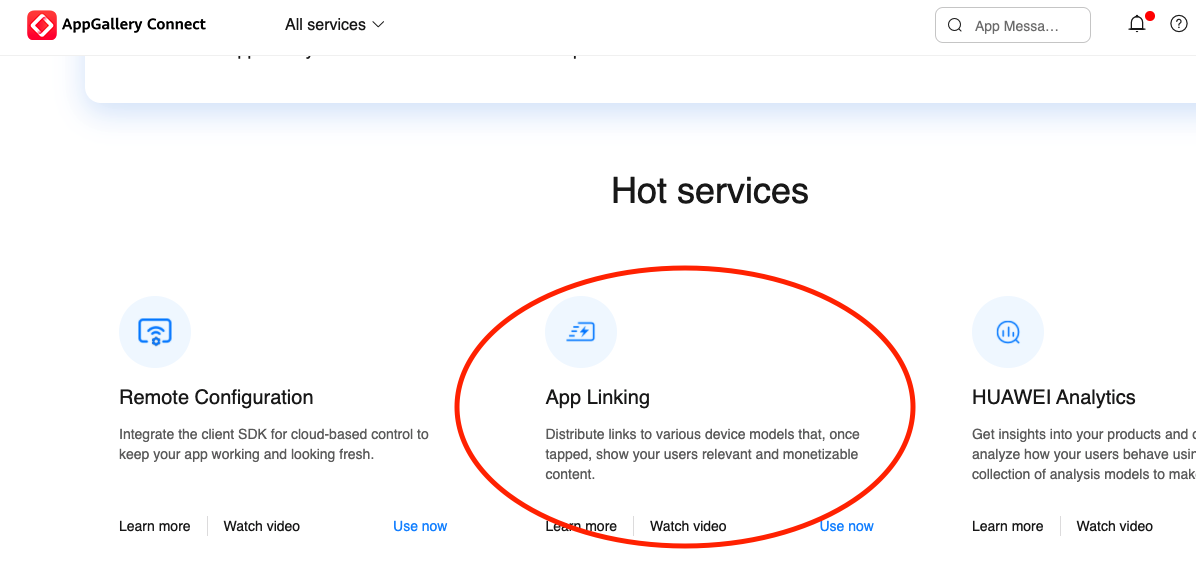
-
Click the New URL prefix button and create a new AGConnect Link domain.
Once this configuration is completed in App Gallery Connect, we need to create a new custom landing page in EMMA using the main code of our landing page (contact us to request the HTML code).
Once you have access to our code, you should perform the following actions:
- Change the useHuaweiAppLink flag from false to true.
- Add the packageName within the landing page in the JavaScript code.
- Add the previously configured AGConnect Link domain in App Gallery Connect within the JavaScript code on the landing page.
¶ Configure a deeplink landing page for powlinks
To see detailed instructions on how to link a deeplink landing page with a powlink, visit our article on Landings.
¶ Create new custom landings
You can find more detailed information on how to create new custom Redirect (Deeplink) landings here
¶ Export your data
EMMA offers the ability to export campaign results if you need them for management purposes. There are two ways to export the data:
- Export table in the campaign summary. This option is located above the campaign summary table on the left.
- Export table in the source summary. This option is located above the source summary table on the left.
In both cases, the system directly downloads a .csv file with the columns selected to be displayed in the table.
The available KPI options and their meanings are:
¶ Campaign Export
| Name | Campaign Name |
| Clicks | Total number of clicks from redirects |
| CPC | Cost per click |
| Cost | Total cost based on the selected payment model (CPC, CPI, or Fixed Cost) |
| Installs | Number of devices attributed to a campaign that have opened the app for the first time |
| CPI | Cost per install |
| ITR | Install Through Rate: number of installs per click (%) |
| Registers | Devices that have performed a registeruser event |
| CPL | Cost per registration or lead |
| Sales | Total number of purchases registered with the trackorder event |
| CPS | Cost per sale |
| Profit | Sale order value |
| Start date | Data measurement start date |
| End date | Data measurement end date |
| Opening | Number of app openings |
| First login | The first time the user has logged in to the app/mobile site |
| Login | Total number of logins made by users |
| Events | Each of the custom events being tracked with our SDK can be added as columns in the reporting |
¶ Source Export
| Name | Source name |
| Powlink | Tracking follow-up link |
| Pwlnk | Short tracking follow-up link |
| QR | QR generated with the tracking follow-up link |
| Clicks | Total number of clicks by redirection |
| CPC | Cost per click |
| Cost | Total cost based on the selected payment model (CPC, CPI, or Fixed Cost). |
| Installs | Number of devices attributed to a source that have opened the app for the first time |
| CPI | Cost per install |
| ITR | Install Through Rate: Number of installs per click (%) |
| Registers | Devices that have triggered a registeruser event |
| CPL | Cost per registration or lead |
| Sales | Total number of purchases recorded with the trackorder event |
| CPS | Cost per sale |
| Profit | Sale order value |
| **Payment model | Selected payment model (CPC, CPI, or Fixed Cost) |
| Provider | Provider you are working with |
| Openings | Number of app openings |
| Firts login | The first time the user has logged in to the app/mobile site |
| Login | Total number of logins made by users |
| Events | Each of the custom events being tracked with our SDK can be added as columns in the reporting |
¶ Campaign tracking without the EMMA SDK
You can achieve real-time conversions in EMMA, even when your application has a different SDK integrated than the EMMA SDK, through the server-to-server pixel. If you need to view installs and/or events of an app that does NOT have the EMMA SDK, you must configure our postbacks in your tracking platform so that each time actions are performed in the app, a notification is sent to EMMA.
¶ Domain
EMMA offers the option to configure three different domains for setting up the postback. You can use any of them interchangeably:
The postback URL format for each domain would look like this:
- https://eat.emmasolutions.net/callback/event/emma_install?aaid={gps_adid}&idfa={idfa}&idfv={idfv}&ecid={emma_click_id}&api_key=&sender=sender_name
- https://powlink.io/callback/event/emma_install?aaid={gps_adid}&idfa={idfa}&idfv={idfv}&ecid={emma_click_id}&api_key=&sender=sender_name
- https://pwlnk.io/callback/event/emma_install?aaid={gps_adid}&idfa={idfa}&idfv={idfv}&ecid={emma_click_id}&api_key=&sender=sender_name
¶ Install Postback
Our global install postback has the following structure:
-
https:///callback/event/emma_install?aaid={gps_adid}&idfa={idfa}&idfv={idfv}&ecid={emma_click_id}&api_key=&sender=sender_name: Set the EMMA domain from the three detailed above.
-
Domain: Choose one of the three EMMA domains detailed earlier.
-
aaid: Parameter to dynamically send the Android Advertising ID (GPS Ad ID).
-
idfa: Parameter to dynamically send the iOS Advertising Identifier (IDFA).
-
idfv: Parameter to dynamically send the Vendor Identifier on iOS devices (IDFV).
-
api_key: Parameter to send the fixed EMMA Key. When creating an account in EMMA, a unique EMMA Key is automatically generated for your app. You can retrieve this unique identifier from the App Preferences section.
-
sender: Parameter to send a fixed sender value, e.g., "MUAK".
¶ Event Postback
If we want to receive events in EMMA, it is first necessary to register those events in the EMMA interface. You can check this guide for detailed instructions on how to create new events. Once the events are created, we will obtain a token linked to each event. This token is the unique identifier for each event.
Below is the event postback to notify these actions to EMMA:
https:///callback/event/?aaid={gps_adid}&idfa={idfa}&idfv={idfv}&api_key=&sender=sender_name
- : Replace this placeholder with the token provided by EMMA when the event is created.
- : Set the EMMA domain from the three detailed above.
- aaid: Parameter to dynamically send the Android Advertising ID (AAID).
- idfa: Parameter to dynamically send the iOS Identifier for Advertisers (IDFA).
- idfv: Parameter to dynamically send the iOS Identifier for Vendors (IDFV).
- api_key: Parameter to statically send the EMMA Key. When you create an account in EMMA, a unique EMMA Key is automatically generated for your app. You can retrieve this unique identifier from the App Preferences section.
- sender: Parameter to statically send the sender, for example, MUAK.
*Notes:
- If the user does not exist, they will be created as organic. If the event is notified for the first time before the user exists and the "ecid" parameter is provided, the system will also attempt to attribute the user to the click.
- The parameters aaid, idfa, idfv, and apikey are optional if the ecid parameter is sent, and the associated click has a user attributed as an install.
¶ Supported Parameters
| Name | Meaning | Example |
| aaid | Android Advertising Identifier | cf6bef2e-50ab-46a9-9583-ada4ab07f113 |
| android_id | Android ID | 9fa7e549c1b1dba59897f3320ea420df |
| idfa | iOS Advertising Identifier | 573DEB13-C34C-457A-9B87-94F85B3602B7 |
| idfv | iOS Vendor Identifier | V-573DEB13-C34C-457A-9B87-94F85B3602B7 |
| ecid | EMMA click ID | 9fa7e549c1b1dba59897f3320ea420df_2017-11-07_09:50:10_609_111 |
| api_key | EMMA App Key | 0051718341426c8c3dd2cdc7e155d44f |
| model | Device model | SM-G965U |
| ip | IP address | 200.98.1.89 |
| country | Country | Spain |
| city | City | Vigo |
| state | Autonomous Community / State | Galicia |
| os_version | Operating System Version | Android 8.0.0 |
| app_version | App Version | 2.5.1 |
| os_build | Operating System Build | R16NW |
| timezone | Time Zone | Europe/Madrid |
| language | ISO Language | es_ES |
| latitude | Latitude | 48.8 |
| longitude | Longitude | 4.3 |
| carrier | Mobile Carrier | Vodafone |
| install_timestamp | unix timestamp in seconds | 1540509909 |
| User Email | emma@emma.io | |
| customer_id | Internal Client ID | EFFXX001 |
| connection_type | Connection Type (WiFi or Mobile Data) | WIFI |
| sender | Sender Name, conditions the argument parser | adjust |
| session_duration | Seconds | 38 |
Additionally, we also have a web pixel for web campaigns.
- Set up the pixel in EMMA for the 3rd Party Tracker:
- http://eat.emmasolutions.net/postback?eid=[eMMa_ID]
- In the click event, EMMA will redirect the user to the 3rd party tracker URL, adding the [eMMa_ID] as a parameter.
- For example: http://www.yoururl.com?eid=[eMMa_ID]
- The variable eid provides the value for the EMMA ID. The 3rd party tracker should return this parameter in the conversion event, as detailed.
-
Set up your EMMA campaign with the link provided by the 3rd party tracker.
Visit our article on how to use the EMMA Apptracker to manage your campaigns. -
Create the different sources or tracking links in your new campaign, entering the required sale ID in the sale ID parameter for the 3rd party.
By default, EMMA sends the eid variable, but this can be replaced by editing the source:
- Use the exid parameter if the conversion will be notified via an EMMA account.
- Use the aid parameter if the conversion will be notified via AppBurn.
- Use the aff_sub parameter if the conversion will be notified via Hasoffers.
- Use the eid parameter (no need to replace) if the conversion will be notified via Appsflyer.
- Contact the 3rd party tracking team for other server-to-server conversion notifications.
¶ Discrepancies - How does EMMA count installs compared to App Store or Google Play?
Sometimes, discrepancies may occur between the data shown by EMMA and the install reports from iTunes App Store or Google Play.
In some cases, EMMA may show fewer installs than those visible in the App Store or Google Play reports, and other times the opposite may happen, where EMMA shows more installs than those displayed in the stores.
Below, we will take a closer look at the main reasons that may cause both scenarios.
- EMMA shows fewer data than the stores
- EMMA shows more data than the stores
¶ EMMA shows fewer data than the stores
The following are the main causes that can lead to EMMA showing fewer data than the App Store and Google Play:
| Cause | App Store Connect / Google Play Console | EMMA | Note |
| Definition of install | Installs are recorded when the app is downloaded to the device, regardless of whether the user opens the app or not. | EMMA records new installs when the user first opens the app (install + first launch). | If a user does not open the app, EMMA will not be able to register the install. |
| Date of install registration | App Store Connect and Google Play Console register the install on the day the app is downloaded. | EMMA registers the install on the day the app is opened for the first time. | It is usually better to extend the time range when comparing EMMA with App Store Connect and Google Play Console. |
| Time Zone | The data is displayed according to the advertiser's time zone. | The data is displayed in the time zone configured in the app preferences. | |
| Reinstall in the defined attribution window (Android) | In some sections, Google Play Console shows 2 unique installs for the same user, regardless of the time elapsed since the first install. In other sections, it shows unique users. This data will be more similar to what is shown in EMMA. |
EMMA does not attribute reinstalls at any time. |
Examples:
- A user installed the app but did not open it. EMMA does not register the install, while App Store Connect and Google Play Console count it as a new install.
- A user downloaded the app and opened it 2 weeks later. App Store Connect and Google Play Console register the install at the time of the download, while EMMA counts the install at the time of the first app launch.
¶ EMMA shows more data than the stores.
Now let's analyze the possible causes that lead to EMMA showing more data than the stores.
| Cause | App Store / Google Play | EMMA |
| Unique install | For each unique user, only one install is recorded, considering: - Uninstalls of the app. - Users with multiple devices. - Device upgrades. |
EMMA records unique installs per device. If an app is deployed without the EMMA SDK and later a new version is uploaded to the stores with the EMMA SDK integrated, EMMA will show a spike in new organic installs. This spike decreases over time as users update the app. This is the main reason why EMMA records more installs than App Store and Google Play. |
| Install on multiple devices | If a user installs the app on multiple devices using the same Apple ID or Google Play account, App Store and Google Play consider it as a single install. | If a user installs the application on multiple devices, EMMA counts each of those installs as a new install. |
| Installs outside of Google Play | Installs not made from Google Play are not counted in Google Play. | EMMA counts any app install, whether it comes from Google Play or not. |
| Filters applied in the Google Play Console | For example, filter Traffic Source: Google Play Search | EMMA cannot differentiate between organic and non-organic devices based on that information. |
| Install based on | Google Play Console counts installs based on unique Google Play accounts. App Store Connect relies on the IDFA to display information about First Downloads. |
In the case of Android, EMMA counts devices based on the GAID/AAID of the device. For iOS, it relies on the IDFV and not on the IDFA as App Store Connect does.* |
With the introduction of the App Tracking Transparency (ATT) framework in 2021, Apple has empowered users to decide whether to allow ad tracking and consent to the collection of the IDFA. Since this consent is given post-install, the market has opted to use the IDFV instead.
The IDFA is a unique device-level identifier that Apple can still access, whereas the IDFV is a provider-level identifier that changes when an app is uninstalled and reinstalled.
This means that, as it is not a unique identifier, every time a user uninstalls and reinstalls the app, EMMA will count it as a new install, while App Store will count it as a single install.
Examples:
-
A user downloaded and opened (installed) the app on their two devices (iPhone and iPad). EMMA counts this as two installs, while the App Store counts it as a single install.
-
A user updated their device, synchronized with their App Store/Google Play account, and opened the app. EMMA counts this as a new organic install, while the App Store and Google Play do not.
-
The app was launched in 2016 without the EMMA SDK. A user downloaded and opened the app. The App Store and Google Play count this user in 2016, while EMMA could not register their install (the SDK was not installed). Later, the app integrates the EMMA SDK (e.g., in April 2017). The user updates the app version and opens it. EMMA registers this user as a new organic install, while the App Store and Google Play do not. This is the primary cause of discrepancies, especially if the app has a large user base from before the install of the EMMA SDK.
-
A user installed the app a year ago and now has changed their Android device and reinstalled the app using the same Google Play account. In Google Play Console, since the same account is being used, it will not count this install as new. However, EMMA will count it as a new install due to the new GAID/AAID.
-
A user installed the app on an iOS device with OS version 14.5 or higher. After some days, they uninstall it and later reinstall it. In this case, App Store Connect will not count the install as new since it is the same IDFA. For EMMA, since we cannot rely on the IDFA and are using the new IDFV, this install will be counted as new.
This does not affect the accuracy of counting non-organic installs. EMMA records a single install per ad click, even if the specific user has multiple devices registered under their App Store/Google Play account.
It is generally better to extend the time range when comparing EMMA with the App Store and Google Play.
The platforms do not measure install in the same way, as each one uses its own KPIs to define what constitutes an install. Therefore, the compared data will not be the same.
You can find more information about non-organic download attribution by EMMA here.
¶ How to conduct attribution tests
Once you have created your acquisition or re-targeting campaigns and your media sources, if you find it necessary, you can run acquisition or engagement tests to check if your campaigns/sources are performing the proper redirects or leading users to the desired section of the app (deeplinking).
That’s why, in this guide, we will explain step by step how to conduct these tests.
¶ Acquisition testing with an EMMA powlink
Before performing any attribution test, it is important to keep the following in mind:
If the device used for the tests has already had the app installed previously, even if the app is uninstalled and reinstalled, that device will not count as an install attributed to the powlink from which the click was made, as it already exists in our database.
In order for the device to be used for multiple attribution tests, it must be added as a test device. Once the device is enabled as a test device, as many attribution tests with powlink as needed can be performed.
¶ Steps for acquisition testing
-
Uninstall the app from the device where the test will be conducted.
-
Log in to the EMMA account.
-
Go to the Acquisition > Apptracker section.

-
Create or search for an already created campaign and go to its sources. If you don't know how to create Apptracker campaigns, you can find more information here.
-
Create or search for the source you want to test. If you don't know how to access the sources of a campaign or how to create campaigns, you can see how to do it here.
-
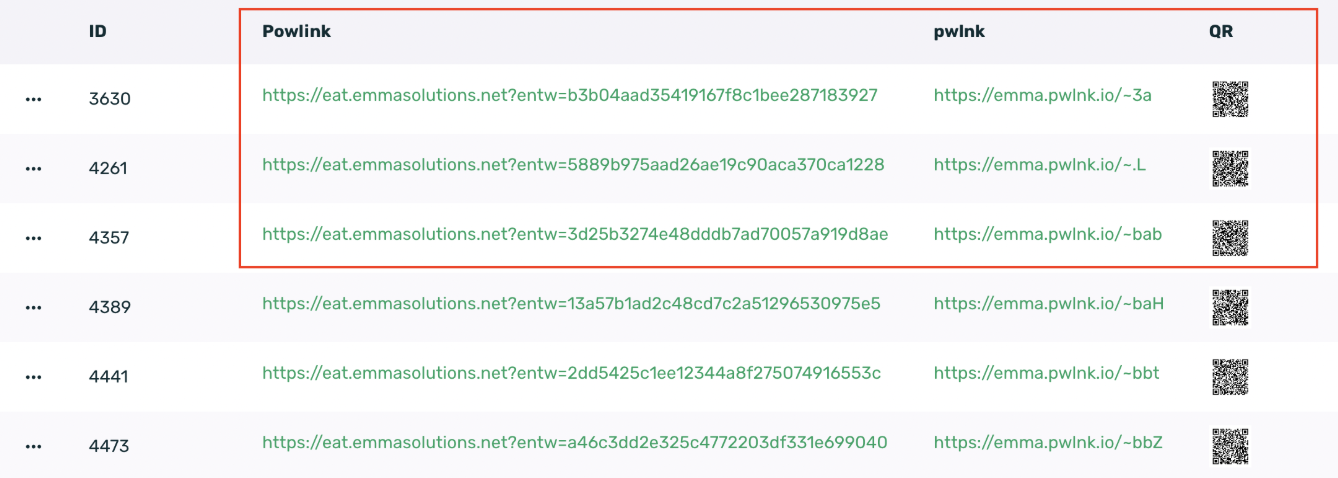
Copy the link that appears in the powlink or pwlnk column and send it by email, for example. Alternatively, download the QR code and scan it to perform the test.
- Go to the mobile device in question, open the email, and click on the sent powlink.
- Install the app.
- Go back to EMMA, to the Captación > Apptracker section.
- Check the data for the campaign where the tests were performed. Keep in mind that the data may take some time to appear in Apptracker, as reporting is not immediate.
If more tests with different links are needed, simply repeat the steps listed here.
It is not possible to conduct campaign tests with the goal of app downloads from self-attributing platforms such as Apple Search Ads, Facebook/Instagram, or Google Ads.
¶ Engagement tests with an EMMA powlink
To conduct engagement tests, the app does not need to be uninstalled from the device where the tests will be performed. In fact, the app must be installed on the device in order to carry out this type of test.
¶ Steps for Engagement Testing
-
Have the app installed on the device. If not already installed, first download and open it to ensure it is registered in EMMA's database.
-
Log in to your EMMA account.
-
Navigate to the Acquisition > Apptracker section.
-
In the filter of the gray bar, change the mode from Basic to Retargeting. If you're unsure how to use this filter level, you can find more information here.
-
Create or find an existing campaign and go to its sources. If you don’t know how to create Apptracker campaigns, you can find more information here.
-
Create or find the source you want to test. If you don’t know how to access the sources of a campaign or how to create campaigns, you can learn how to do it here.
-
Copy the link that appears in the powlink column and send it via email, for example.
- Go to the mobile device in question, open the email, and click on the sent powlink.
- The app should launch, and you can perform the desired in-app events. If a deeplink has been configured, the app should redirect to the corresponding specific section within the app.
- Go back to EMMA, navigate to the Acquisition > Apptracker section.
- Ensure that the Retargeting option is selected in the gray filter bar.
- Review the data for the campaign where the tests were conducted. Keep in mind that the data may take some time to appear in Apptracker as reporting is not immediate.
If you want to carry out more tests with different powlinks, simply repeat the steps listed here.
If the retargeting powlink does not launch the app, the first step is to confirm with the team that integrated the EMMA SDK whether this functionality is implemented in the app and review the implementation to check for any errors.
¶ Use of EMMA Powlinks Without the SDK Integrated
If you do not have the EMMA SDK integrated but want to leverage the functionality of powlinks to direct users to the app, whether to the home page or a specific section within the app, there are two options to achieve this.
Keep in mind that this solution only works to bring the user to the app, but if the SDK is not implemented, installs or any activity cannot be tracked.
¶ Alternative using the deeplink landing page
In this case, it would not be necessary to modify the app's code or its configuration files. It would simply be necessary to activate the Deeplink Redirect Landing for all powlinks.
The deeplink landing page can be the default one provided by EMMA, ready to use, or if needed, a custom one can be developed. You can find more information on this topic here.
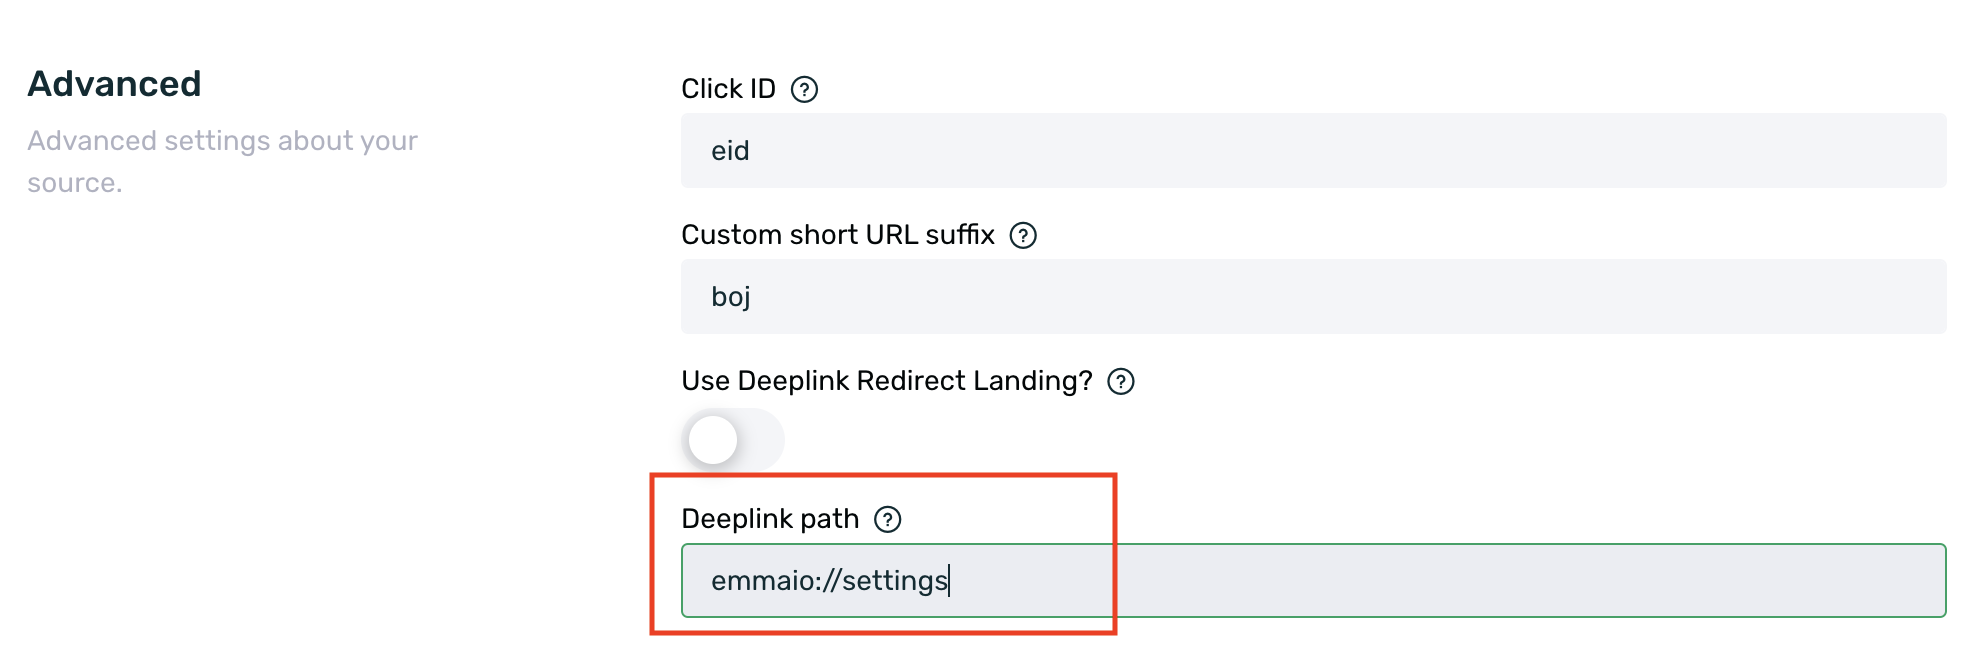
The functionality of this intermediate deeplink landing page is that it launches the basic deeplink to open the app. Therefore, if it follows this basic scheme, no additional configuration will be needed. An example of a basic deeplink scheme would be appscheme://dashboard.
This deeplink would be configured when creating the media source, and the landing page would automatically launch it for the app's opening.
It is essential that a basic deeplink scheme is configured in the app.
To use this functionality, you need to follow these steps:
- Ensure that the app opens through a basic deeplink scheme, for example, appscheme://. If this is the case, you can proceed with the configuration.
- Access your EMMA account and go to Acquisition > Apptracker.
- Create a new campaign or use an existing one.
- From the contextual menu or by clicking on the campaign name, access the Sources screen and create a new source.
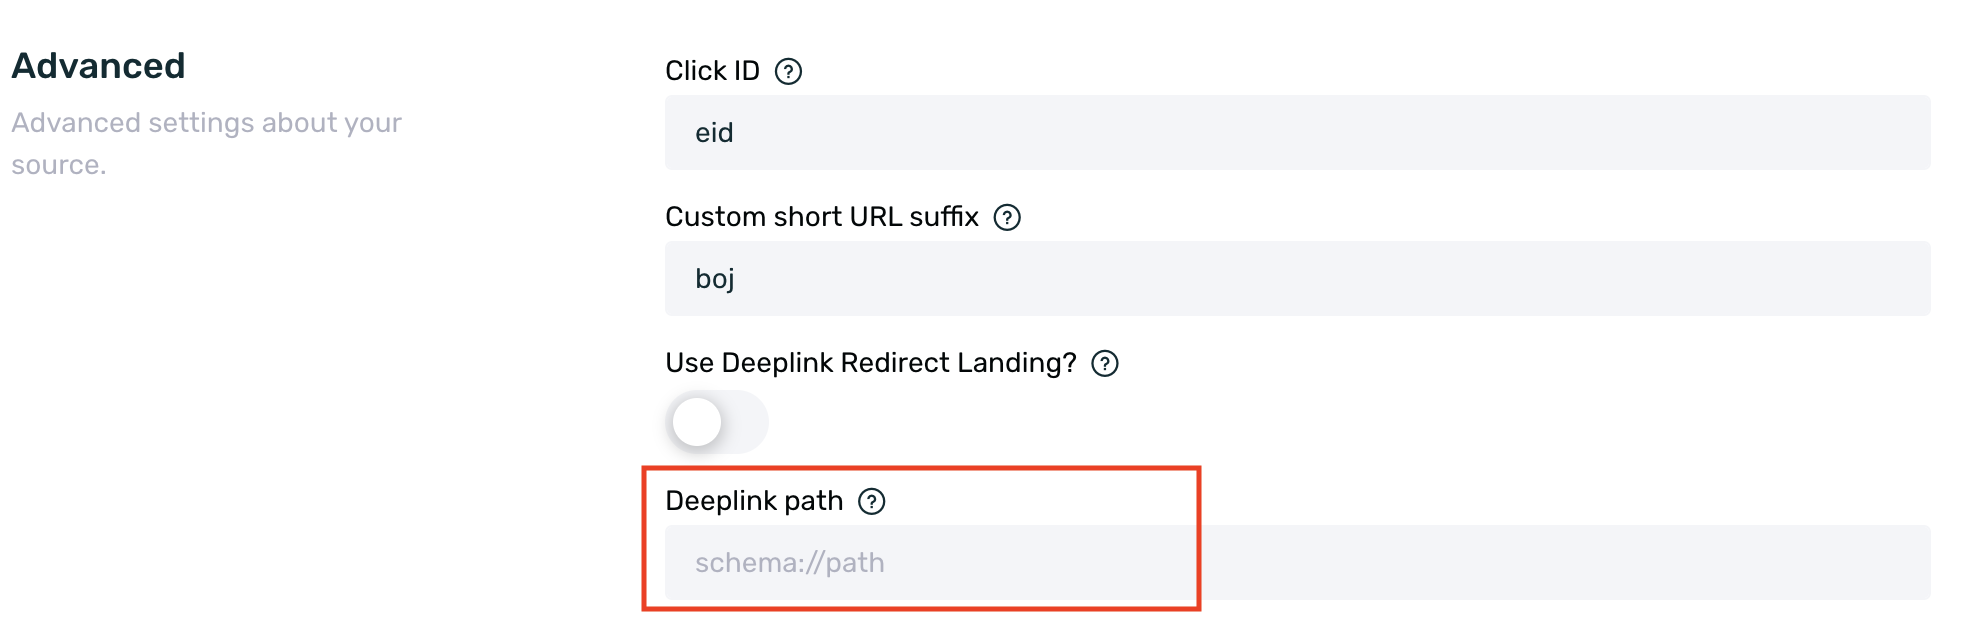
- When creating a new source, ensure you configure the following fields:
5.1. Enable the checkbox Use Deeplink Redirect Landing.
5.2. Set a deeplink in the Deeplink Path field.
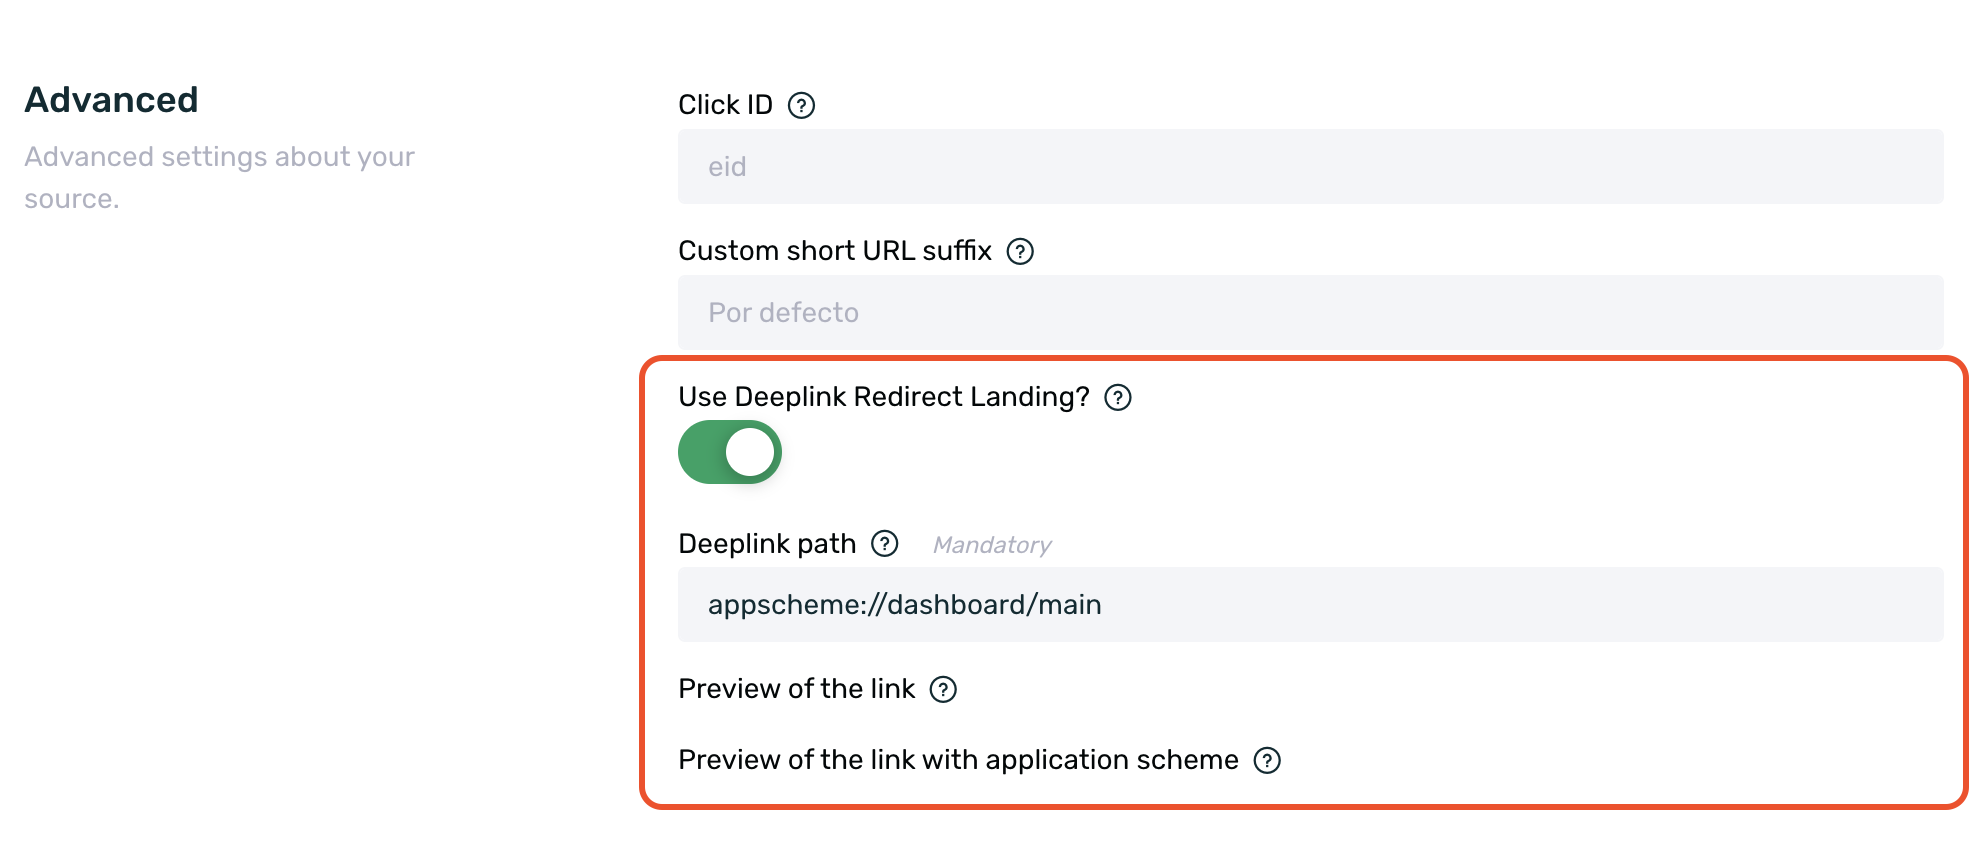
Once the source is created, a Powlink and a Pwlnk are automatically generated. Clicking on that Powlink automatically launches the default intermediate landing page and attempts to open the app through the configured deeplink.
You can find more information about how the intermediate landing page works or how to configure a custom intermediate landing page here.
¶ Configure EMMA's domain as the app's entry point
In this case, the domain https://myapp.powlink.io must be configured as the app's entry point.
To implement this solution, you need to add specific lines of code to the app's configuration files and set up several configurations in the App Preferences section of EMMA. The fields to configure in EMMA are:
- Google Play ID
- Certificate signing fingerprints in SHA-256 format
- Google Play URL
- App Store Bundle ID
- App Team ID used to sign the production app
- App Store URL
You can find more information about these fields here.
At the application level, you would need to:
- Modify the Android app by editing the AndroidManifest.xml to add https://myapp.powlink.io along with the other opening domains.
- Modify the iOS app by adding applinks:myapp.powlink.io in the app's target.
Once the app is in TestFlight, tests can be carried out to validate that the configuration is correct and that any Powlink with the domain https://myapp.powlink.io opens the app.
It is important to note that there are exceptions to opening App Links / Universal Links, as they may not work correctly in all applications and chats.
Once the previous steps are configured and completed, any domain https://myapp.powlink.io (Powlink, Pwlnk, or URL shortener) will open the app.