¶ Create push notifications
EMMA provides the ability to send push notifications to devices that have accepted notifications. Creating these notifications is very simple. Just follow these steps:
-
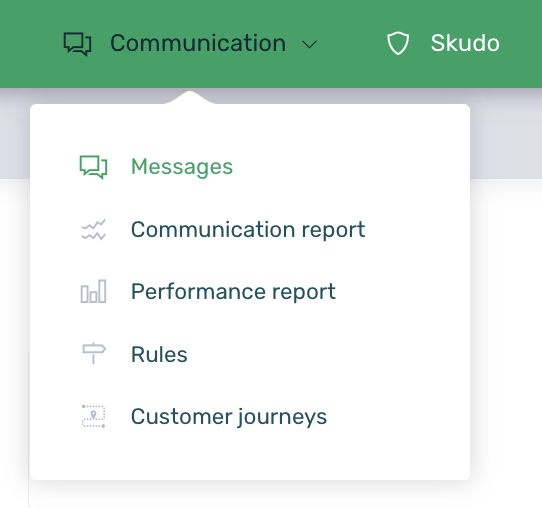
Log in to EMMA and go to Communication > Messages.
-
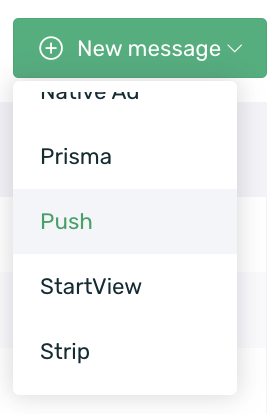
In the + New message button, select the Push format from the list.
The configuration of the push notification is divided into 5 steps, which we will detail below:
- Properties
- Content
- Scheduling
- Target
- Confirmation
¶ Properties
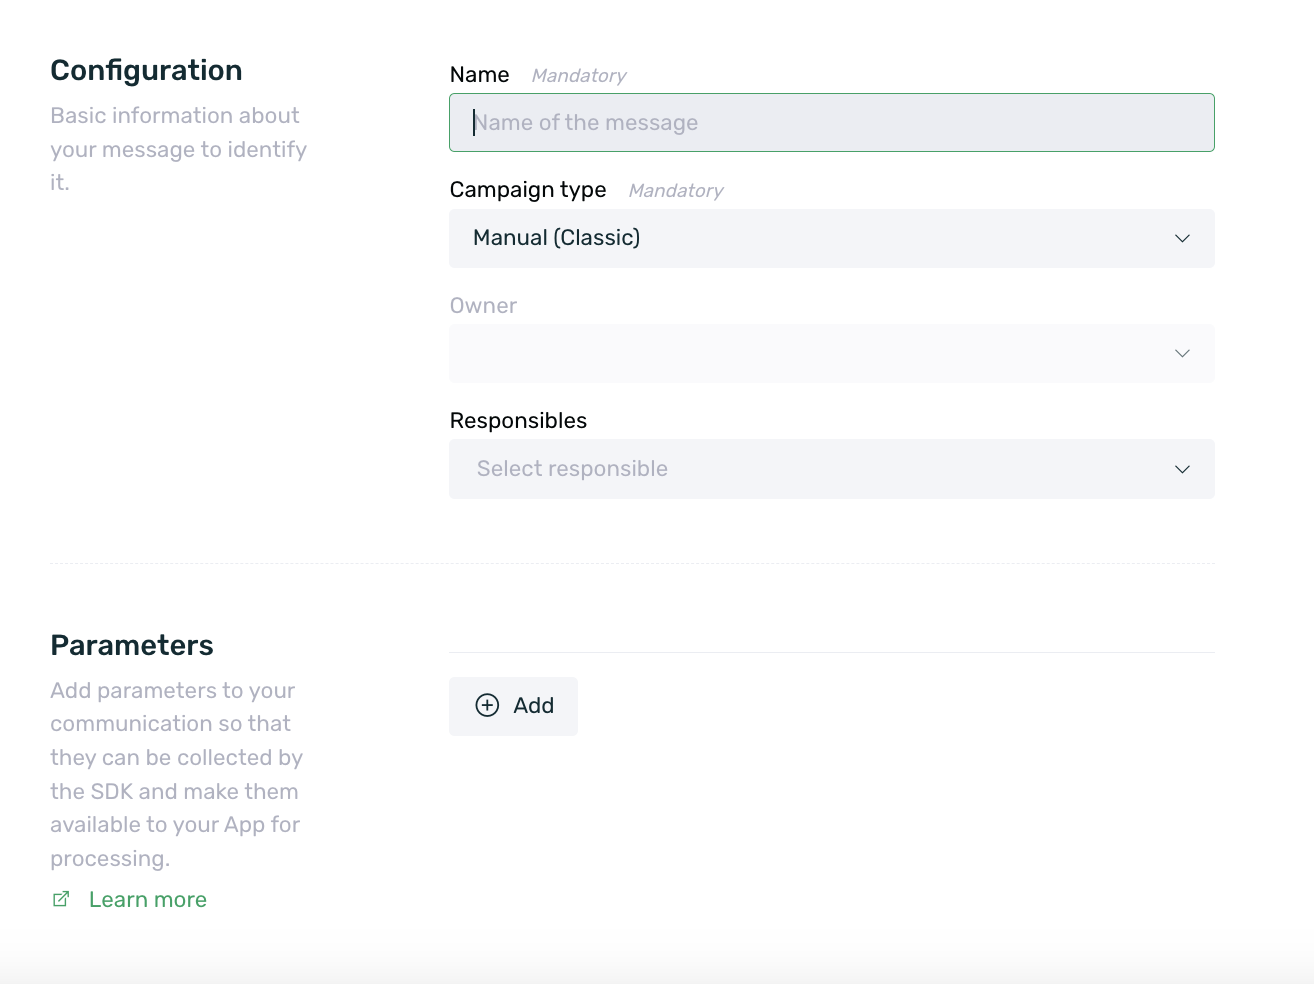
The first step is the general configuration of the campaign, where we will set a name and select the campaign type.
-
Name (required): Set a name for your push campaign. This is an internal name (not visible to users) to easily identify the communication once created.
-
Campaign Type: Select the type of campaign:
- Manual (classic): The notification will be sent on the established date to the designated users.
- Automatic for customer journeys: The notification will be sent only when it is part of a customer journey flow. You can find more information about customer journeys in this article.
-
Owner: This field is automatically filled with the user creating the communication if your account uses campaign pre-validation. If not, you will not see this field. You can find more information about campaign pre-validation here.
-
Responsible: If your account uses campaign pre-validation, select a responsible user from the list to receive notifications about any changes made to the communication. You can find more information about campaign pre-validation here.
-
Parameters: Two types of parameters can be configured:
- Parameters to be collected by the SDK: By clicking the +Add button, you can configure the necessary parameters to be collected by the SDK and made available to the app for further processing. Adding these parameters is completely optional.
- Parameters for filtering in the performance report: If specific communication parameters have been created, they can be added to take effect in the communications to apply filters and groupings in the performance report.
¶ Content
Now it's time to set the content for our push notification.
-
Add A/B Test Variation: If you want to add A/B test variations to the push notification to have multiple versions, you can do so by clicking the Add A/B Test Variation button. For more information about A/B Testing, click here.
-
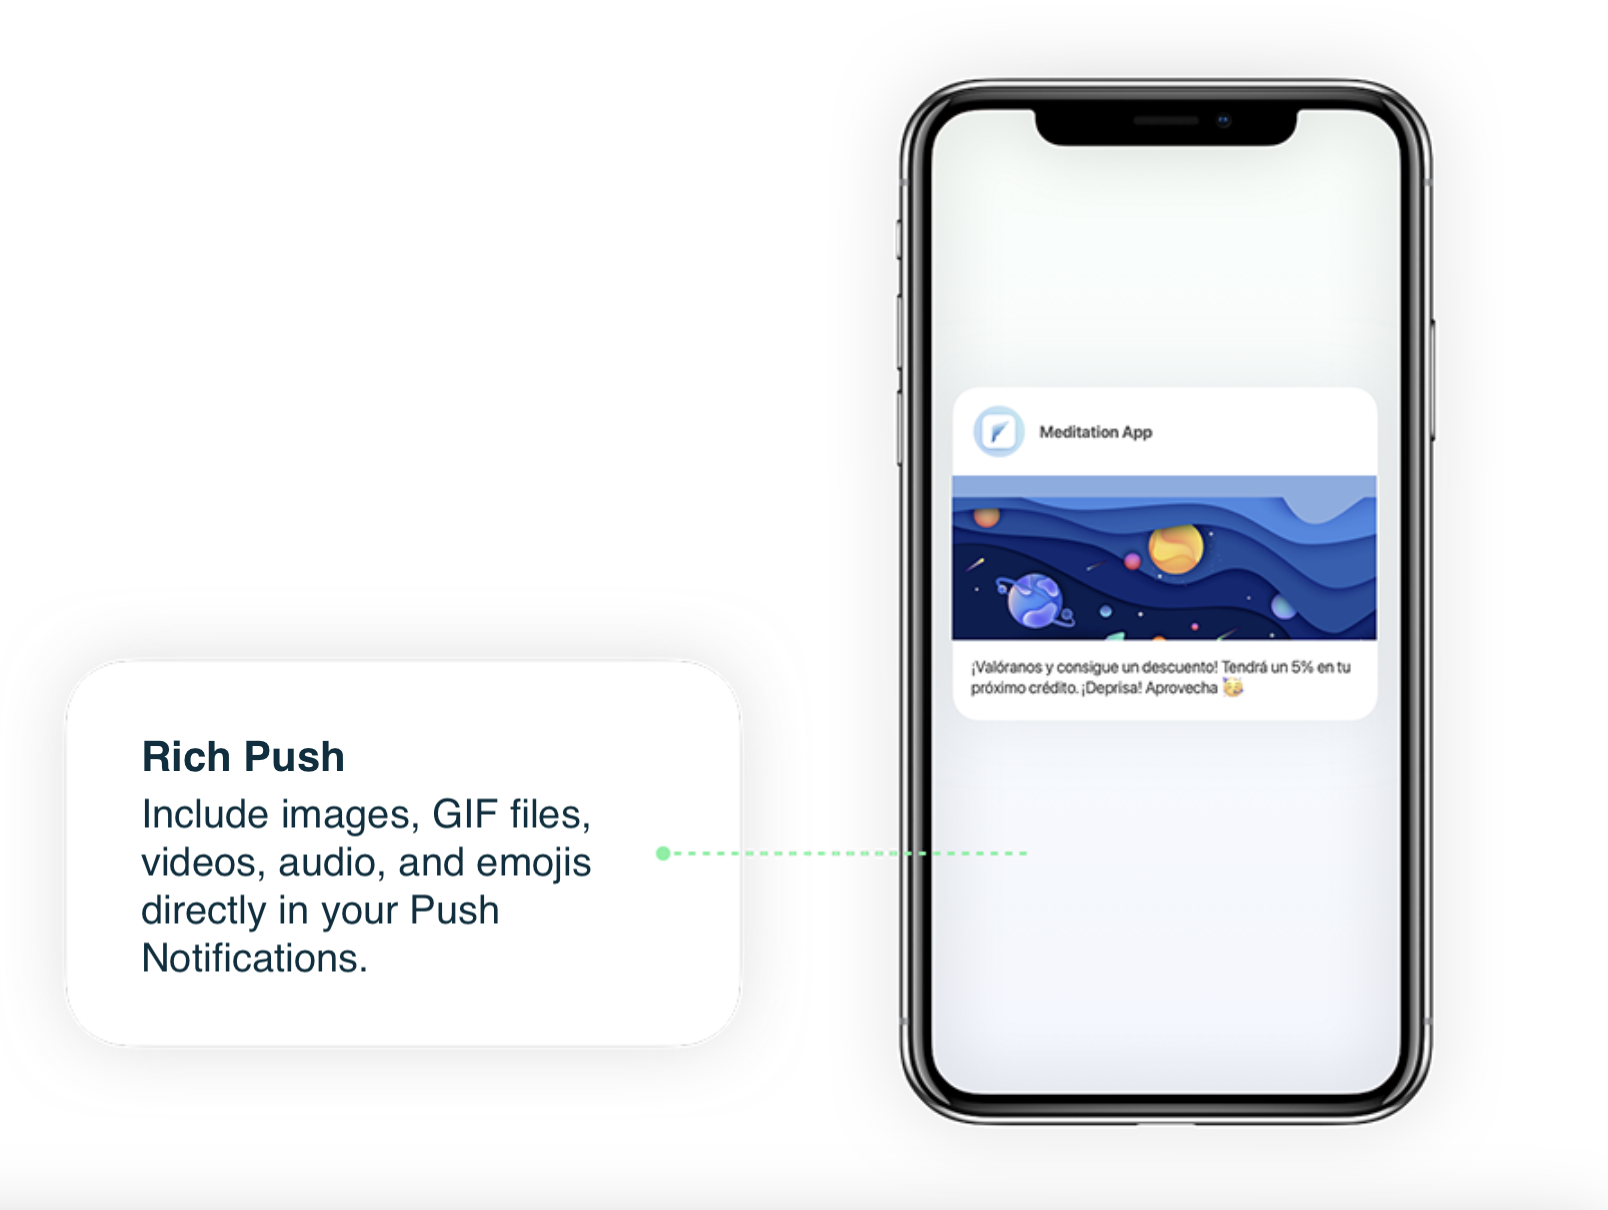
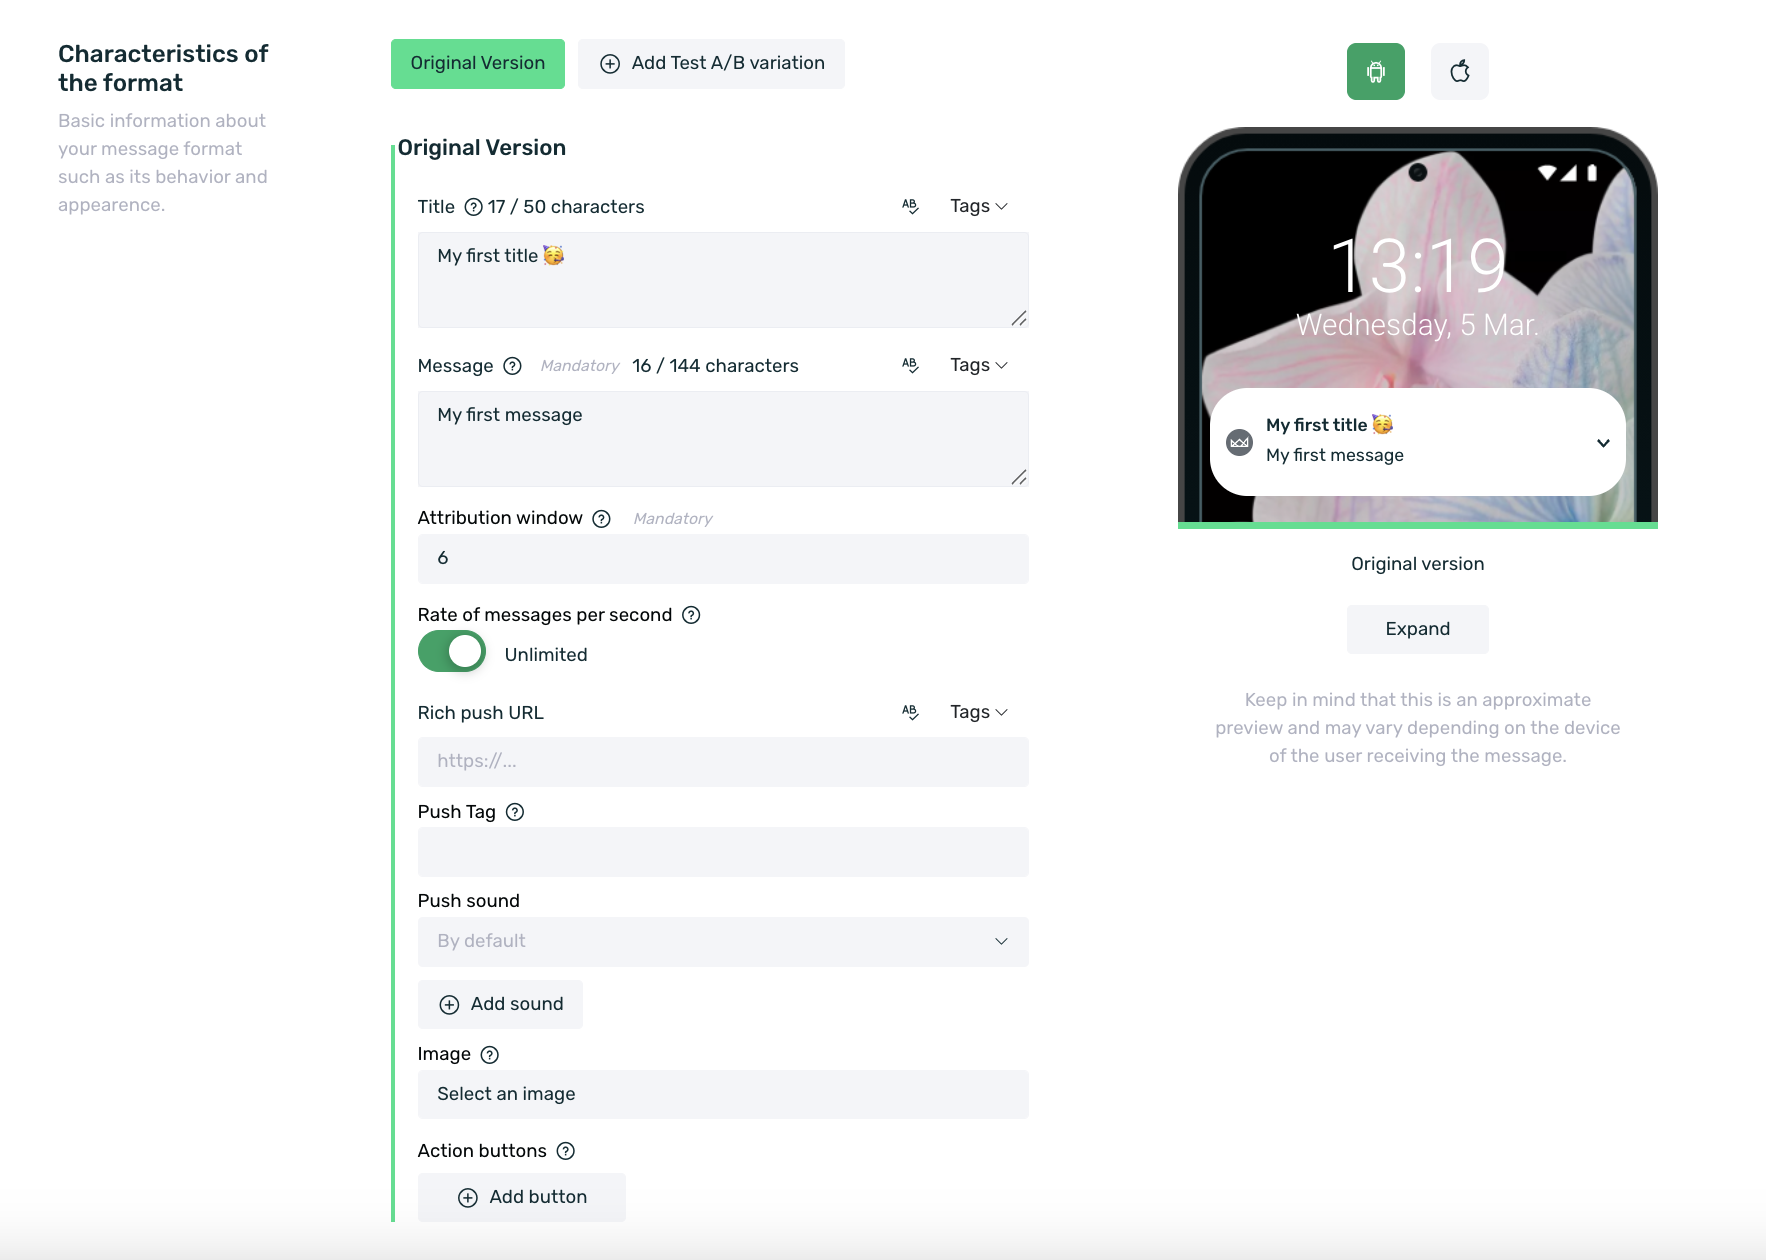
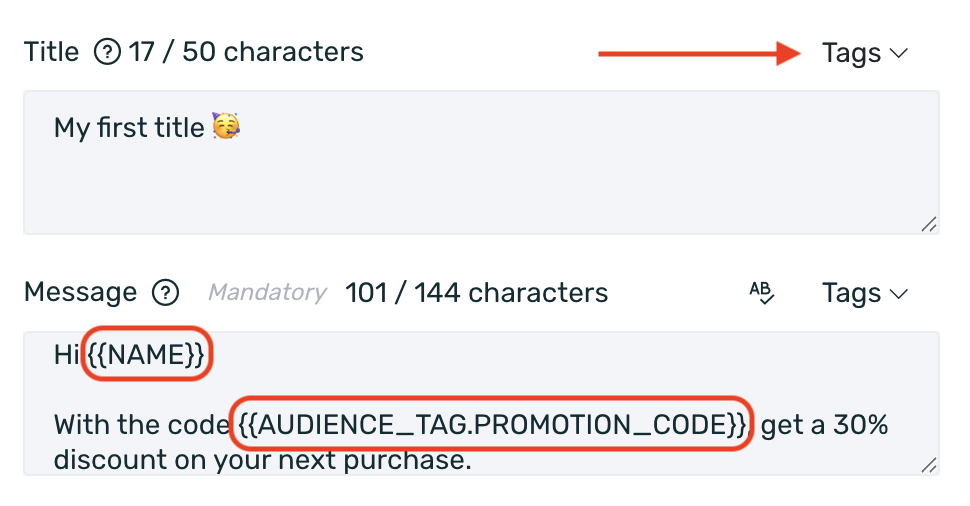
Title: Set a title for your push notification. It can have up to 50 characters, including emojis and tags.
-
Message (required): Write the copy of your push in the Message box. It can have a maximum length of 144 characters and allows the use of emojis. To insert emojis, simply right-click, select the Emojis and Symbols option, and insert the desired emoji, or you can copy from any emoji library and paste it in the message field.
You can also use the text substitution engine to insert the individual value of the tags assigned to your users. To do this, just click the Tags selector that appears above the message box. The list of Tags displayed will depend on the properties your app sends to EMMA. Learn how to send Tags via our iOS and Android SDK.
Users who receive a communication with text composed of the substitution engine variables but have no value assigned for that Tag will only see the text without the variables.
It is important to note that not all emojis can be displayed on all versions of operating systems. If an emoji was introduced, for example, in Android 9, devices with earlier versions will not be able to display that emoji.
-
Attribution window: Configure the Push attribution window that will be activated. The attribution window determines how many times a Push campaign can be assigned if the user interacts with the Push (opens it) and performs an action within the app. By default, this is set to 6 hours, but this field can be modified according to the specific needs of each push communication.
-
Messages per second rate: Allows you to limit the number of push notifications sent per second. If limited, they will be sent at the maximum allowed speed.
-
Rich Push URL: Allows you to customize the redirection upon opening the push. The use of Rich Push URL is not compatible with the Push Tag within the same campaign. This option can also be used to create dynamic URLs using the text substitution engine.
- Rich Push HTTP/HTTPS URL (http://www.yoururl.com/whatever): Displays an interstitial with web content set by the entered URL when the user opens the Push. Follow our integration guides (Push Notifications > Rich Push URL) to integrate this method into your app.
- Rich Push DeepLink URL (scheme://page1): Redirects the user to a specific section within the app when they open the Push. The entire DeepLink URL structure is customizable.
-
Push Tag: Allows interaction after the user opens the Push (e.g., redirecting the user to a specific screen or product link or applying a discount offer). Follow our integration guides (Push Notifications > Push Tag) to integrate this method into your app.
-
Push Sound: Allows the selection of custom notification sounds through sounds integrated into the app. Requires specific integration.
-
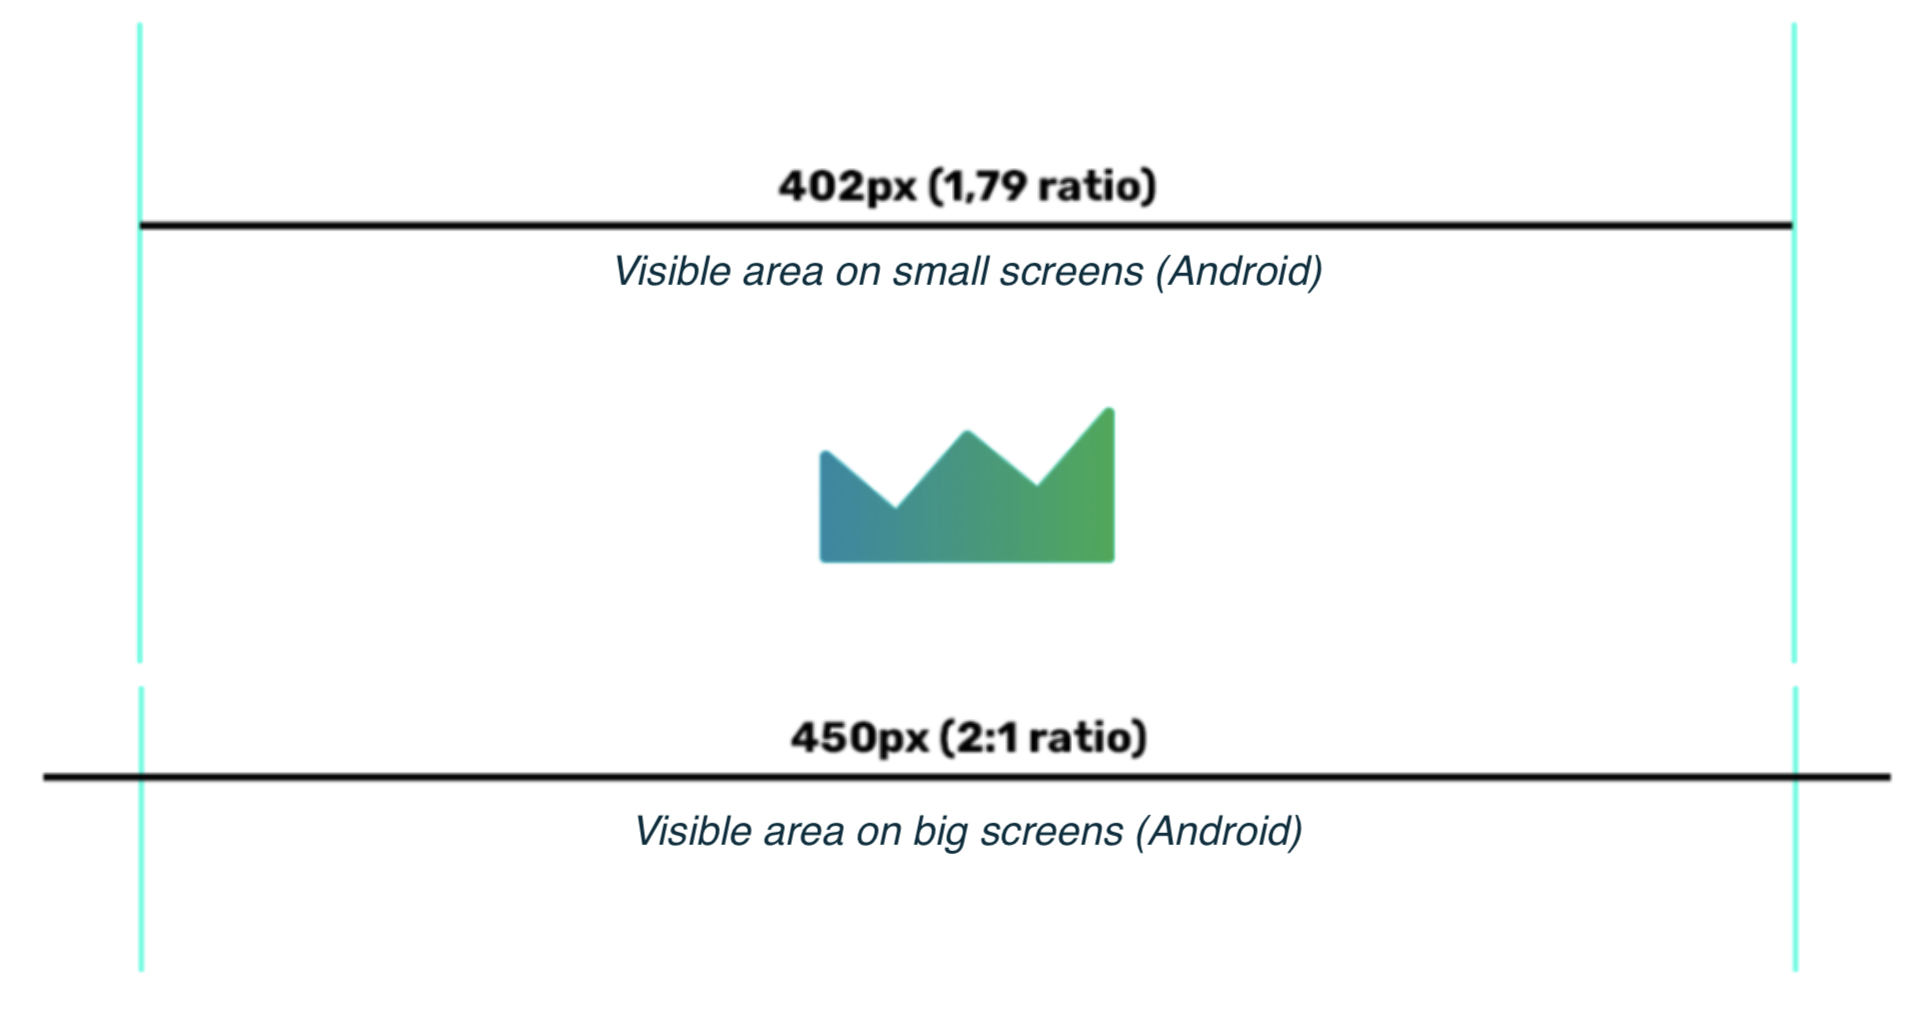
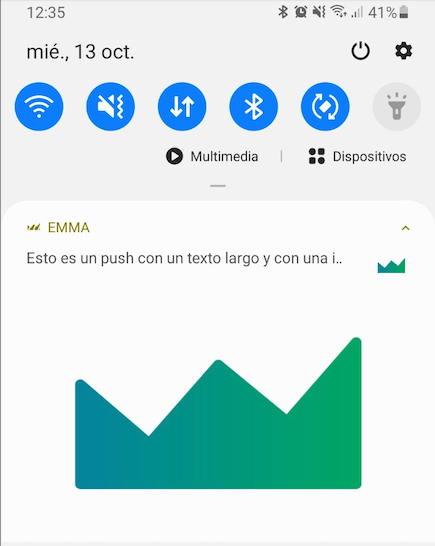
Image: You can attach an image along with the text on iOS and Android devices. Choose the file and select the image (JPG, PNG, or GIF) that will be sent with the Push notification. The minimum recommended size is 450x225px.
Due to Android system limitations unrelated to EMMA, we recommend leaving a small margin around the edges to prevent cuts that may affect the clarity of the graphic message, especially if it contains text. It is crucial to place the relevant content of the image within this safe zone so that Android devices with smaller screens do not crop the image.
It is important to note that if a device has data saving mode and battery saving mode enabled, the configured image will not be displayed on that device. This situation is beyond EMMA's control and occurs specifically due to the saving settings configured on the device.
-
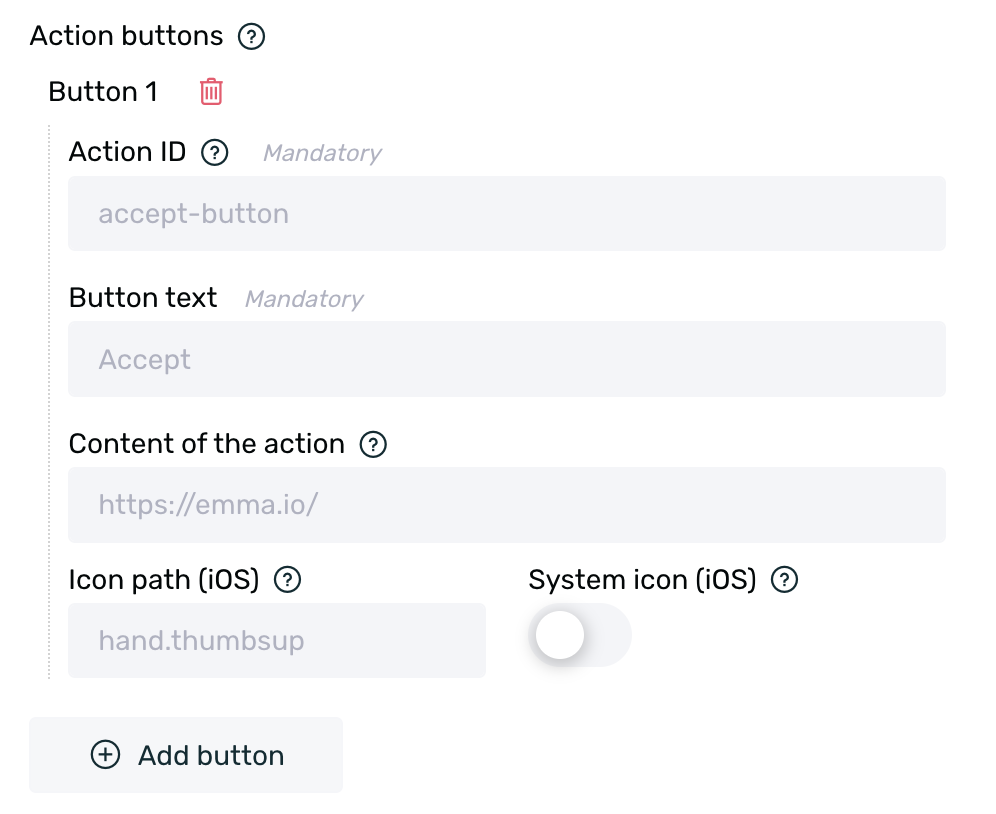
Action buttons: Click the + Add button to add up to 3 action buttons for each push notification. This allows you to redirect users to different sections within your app depending on which button they click. To set this up, simply configure the following steps.
-
Action ID: Set a unique identifier for the action. This ID is used to track button clicks. To do this, create an event in Management > Events (more info here) and enter the event token in this field.
For example, if you create an event called "Accept Button" with the token "button-accept", you should enter "button-accept" in the Action ID field whenever you add an accept button. -
Button text: Set the text that will appear on the button (e.g., "Accept").
-
Action content: Configure the deeplink or URL where you want to redirect the user after clicking the button. You can also leave this field blank, in which case the app will simply open.
-
Icon path: Specify the icon path if the app uses icons. Due to Android system limitations, icons cannot be used on this platform.
-
System icon: Disabled by default. If you are going to use a system icon (only available for iOS), enable this checkbox.
To use push actions, you need to have the SDK updated. The minimum required version for Android is 4.10, and for iOS it is 4.10.1.
To use animated GIFs in push notifications, the minimum SDK version for iOS must be 4.6.2 to support this format. Due to Android OS limitations, the use of animated GIFs is currently not possible on this operating system.
¶ Scheduling
Now it's time to determine when the notification will be sent. It can be sent immediately once the creation is completed, or you can schedule it to be sent on a specific date and time.
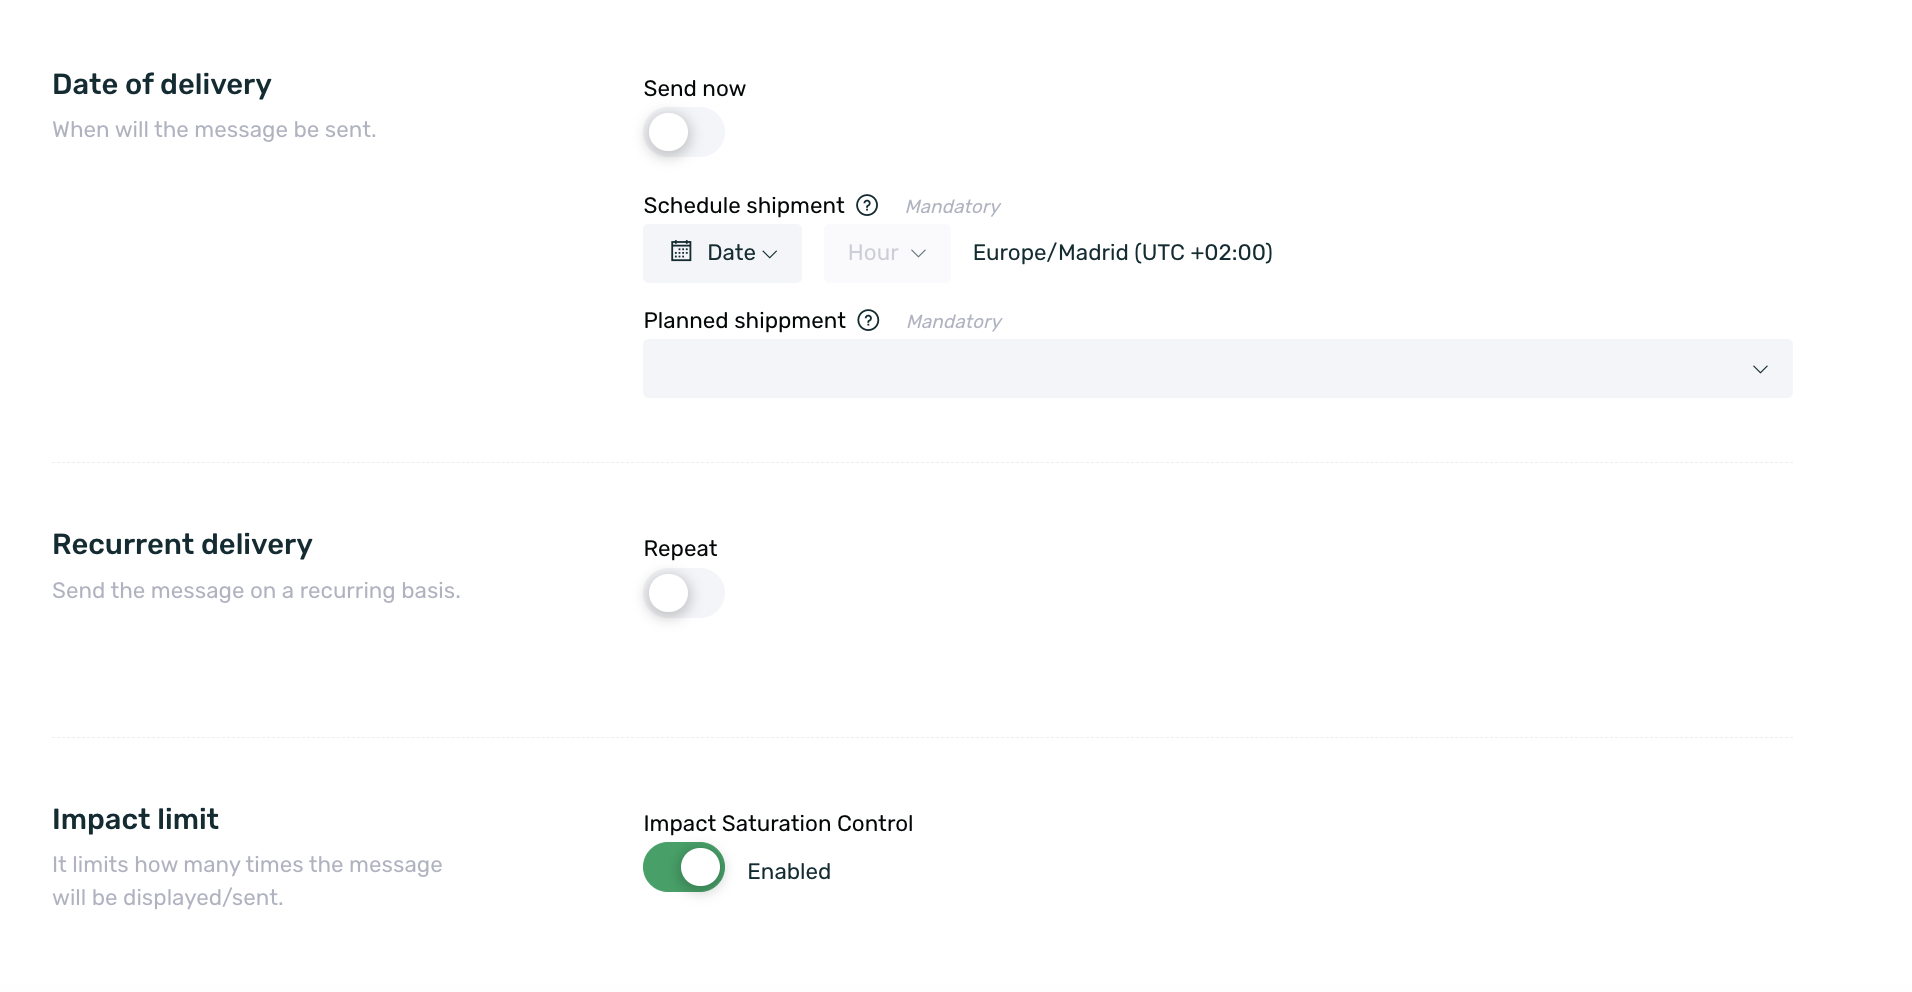
Sending date
- Send Now: If the switch is enabled, the push notification will be sent immediately after its creation is completed. If disabled, scheduling options will be available.
- Schedule Sending: Set a specific date and time for sending the push notification. The scheduled date cannot be earlier than the current date.
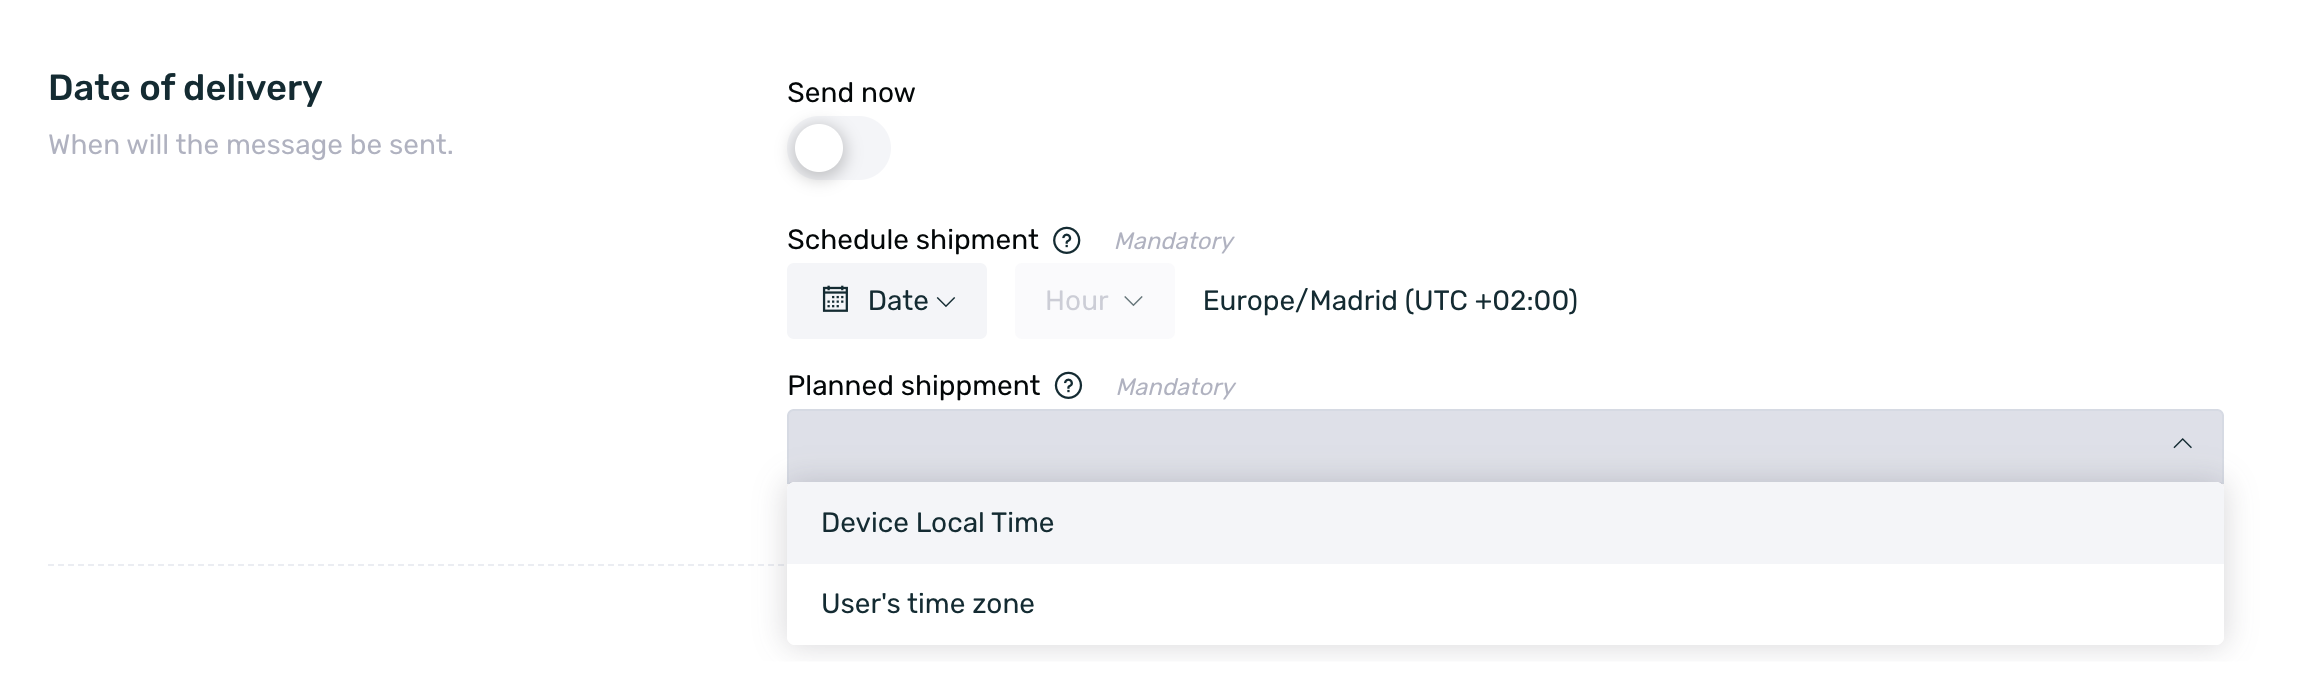
- Planned Sending: Configure the time zone option. You can choose between Device Local Time and User Time Zone.
- Device Local Time: The notification will be sent at different times depending on each country's UTC time zone.
- User Time Zone: The notification will be sent at the same time for all users, regardless of UTC time zones. By default, the User Time Zone is set to CEST (UTC+1 in winter, UTC+2 in summer).
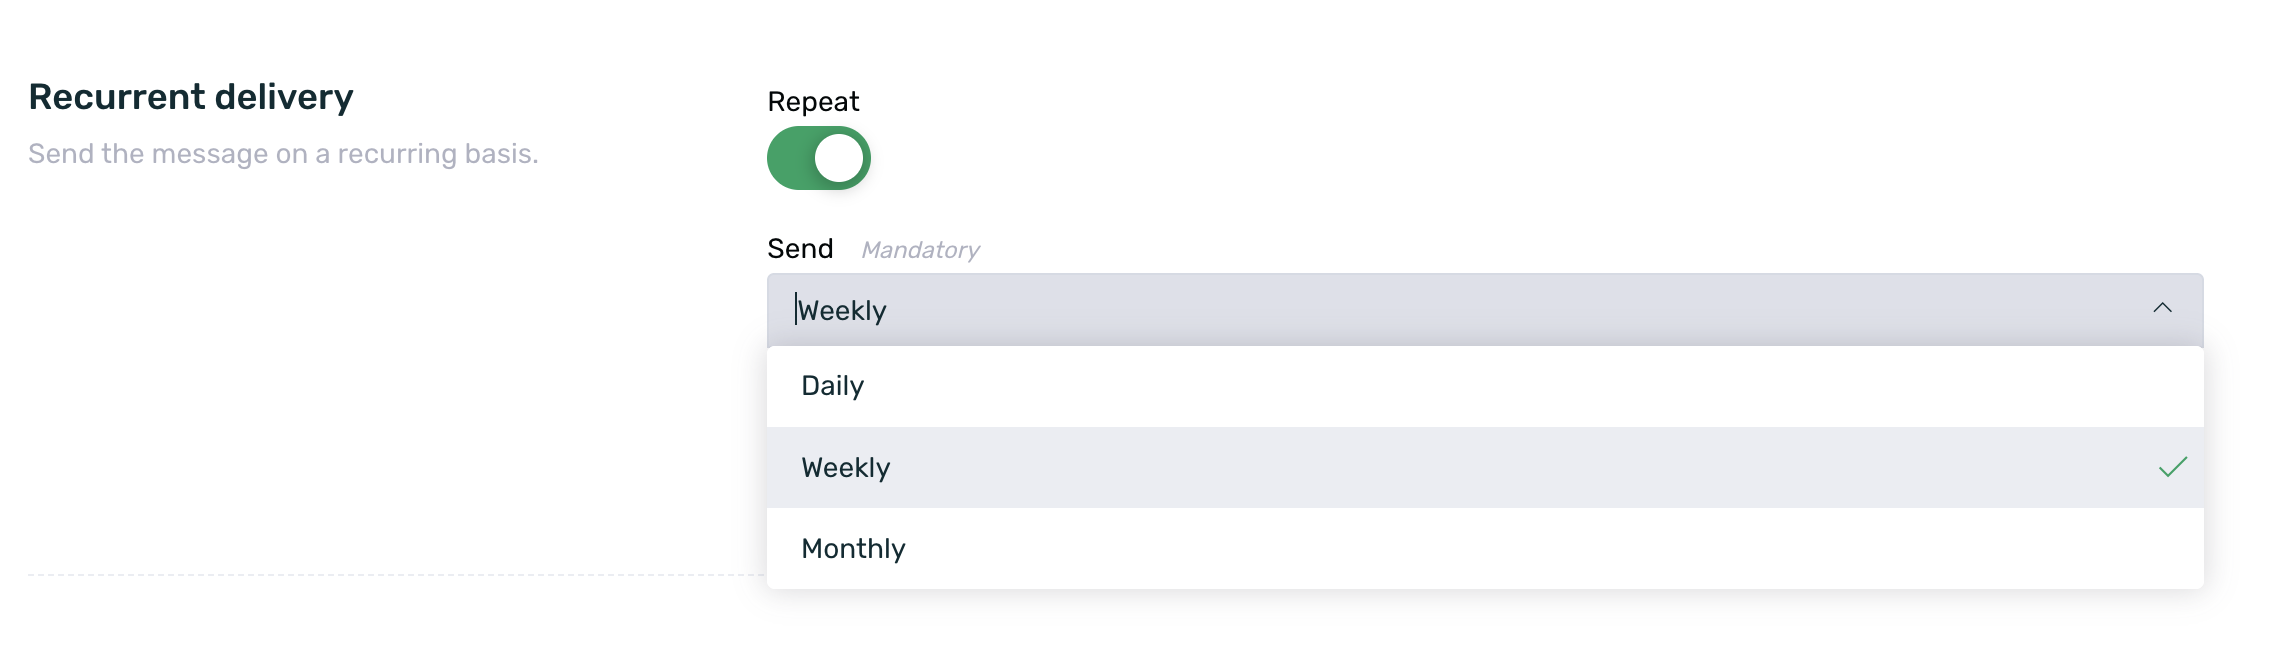
Recurring Sending
- Repeat: If the switch is disabled, it will be a one-time sending. If we want it to be a repetitive sending, we must enable the switch.
- Send: When it is a repetitive sending, we can choose the type of repetition we want:
- Daily: The push will be sent every day at the set time, starting from the first sending.
- Weekly: The push will be sent weekly on the selected days at the set time, starting from the first sending.
- Monthly: The push will be sent monthly on a specific day at the set time, starting from the first sending.
- Day(s) of the month/week to send: If we have selected Weekly or Monthly sending, we need to set the days we want the push to be sent.
- Weekdays: For a weekly sending, we can choose one or more days from the options Monday, Tuesday, Wednesday, Thursday, Friday, Saturday, and Sunday.
- Day of the month: For a monthly sending, we can select a day between the 1st and 31st.
Impact Limit
Push notifications can have daily, weekly, and monthly limits, where, for example, we can specify that each device can only receive one push notification per day and four per week. You can find more information about this here.
This configuration is made at the device level and affects ALL push notifications configured in EMMA. However, thanks to the Impact saturation control check, we can determine whether the push notifications meet the established capping.
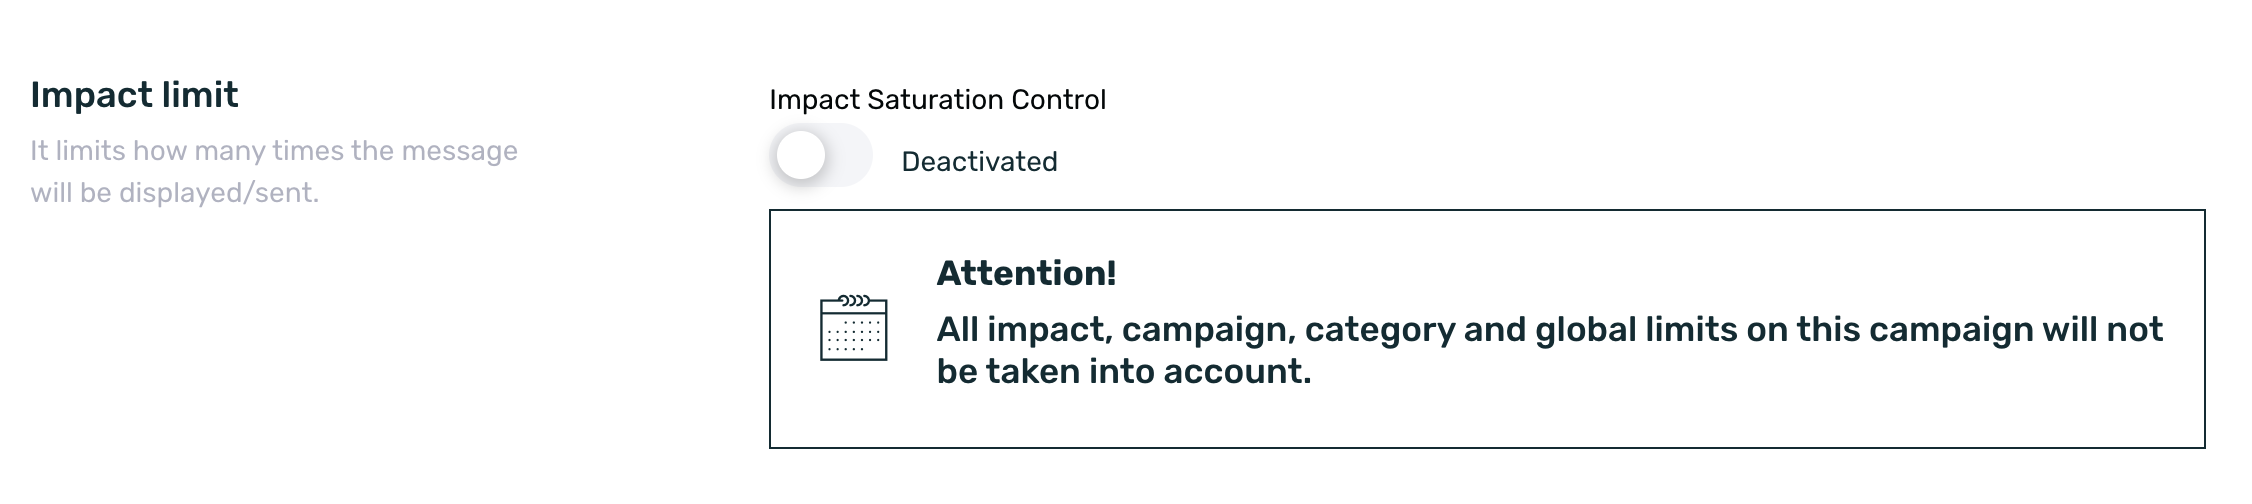
- If the check is enabled, the configured impact limits will be taken into account and applied. In this case, if the user has already reached the capping, they will not receive the push notification.
- If the check is disabled, the configured impacts will be ignored and not considered. In this case, even if the user has already reached the capping, the push will still be delivered.
¶ Target
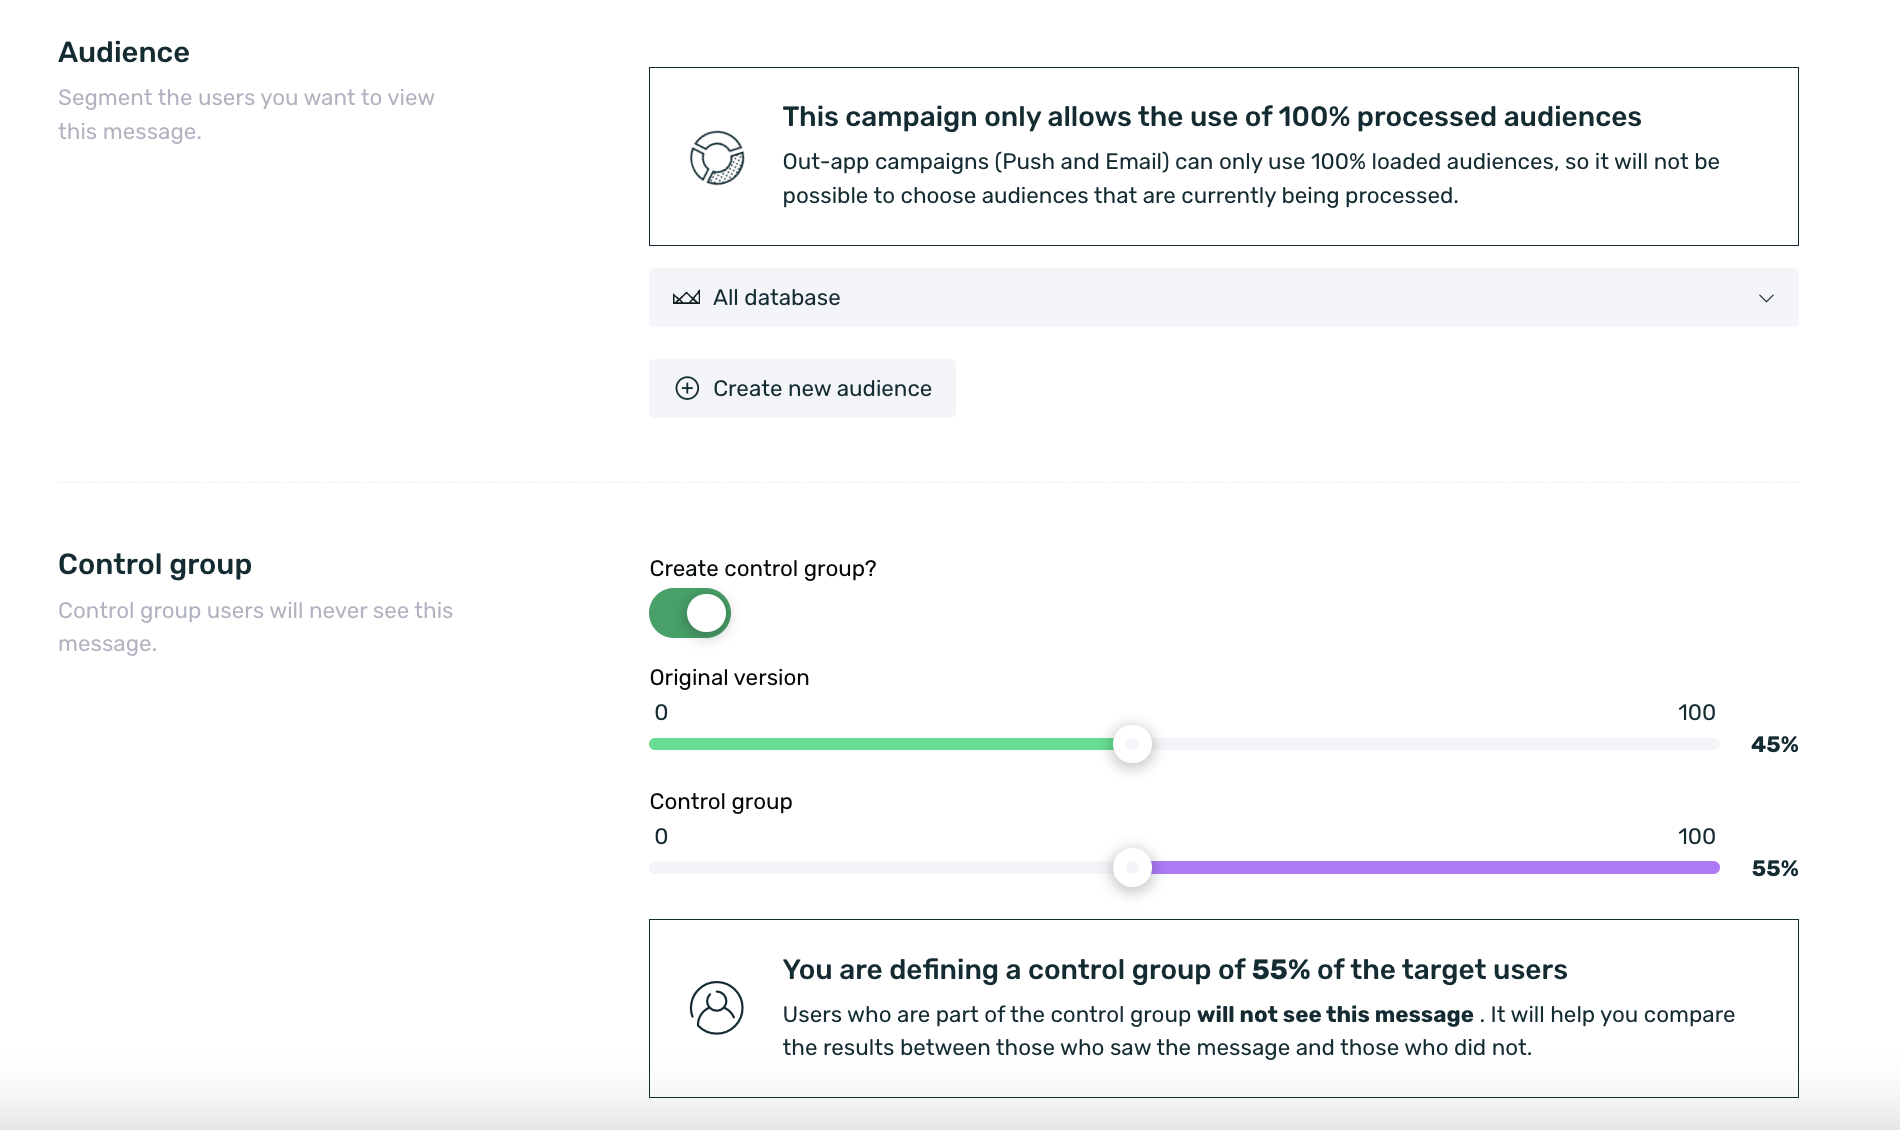
Finally, we must establish the target audience we want to receive the push notification. To do this, we must select an audience from the available list.
If the audience list is empty, it means there are no available audiences to use for push notifications, or you haven't created any audiences yet. You can find more information on how to create audiences in this guide.
Once you have selected the desired audience, click the Next button to finish creating the push notification.
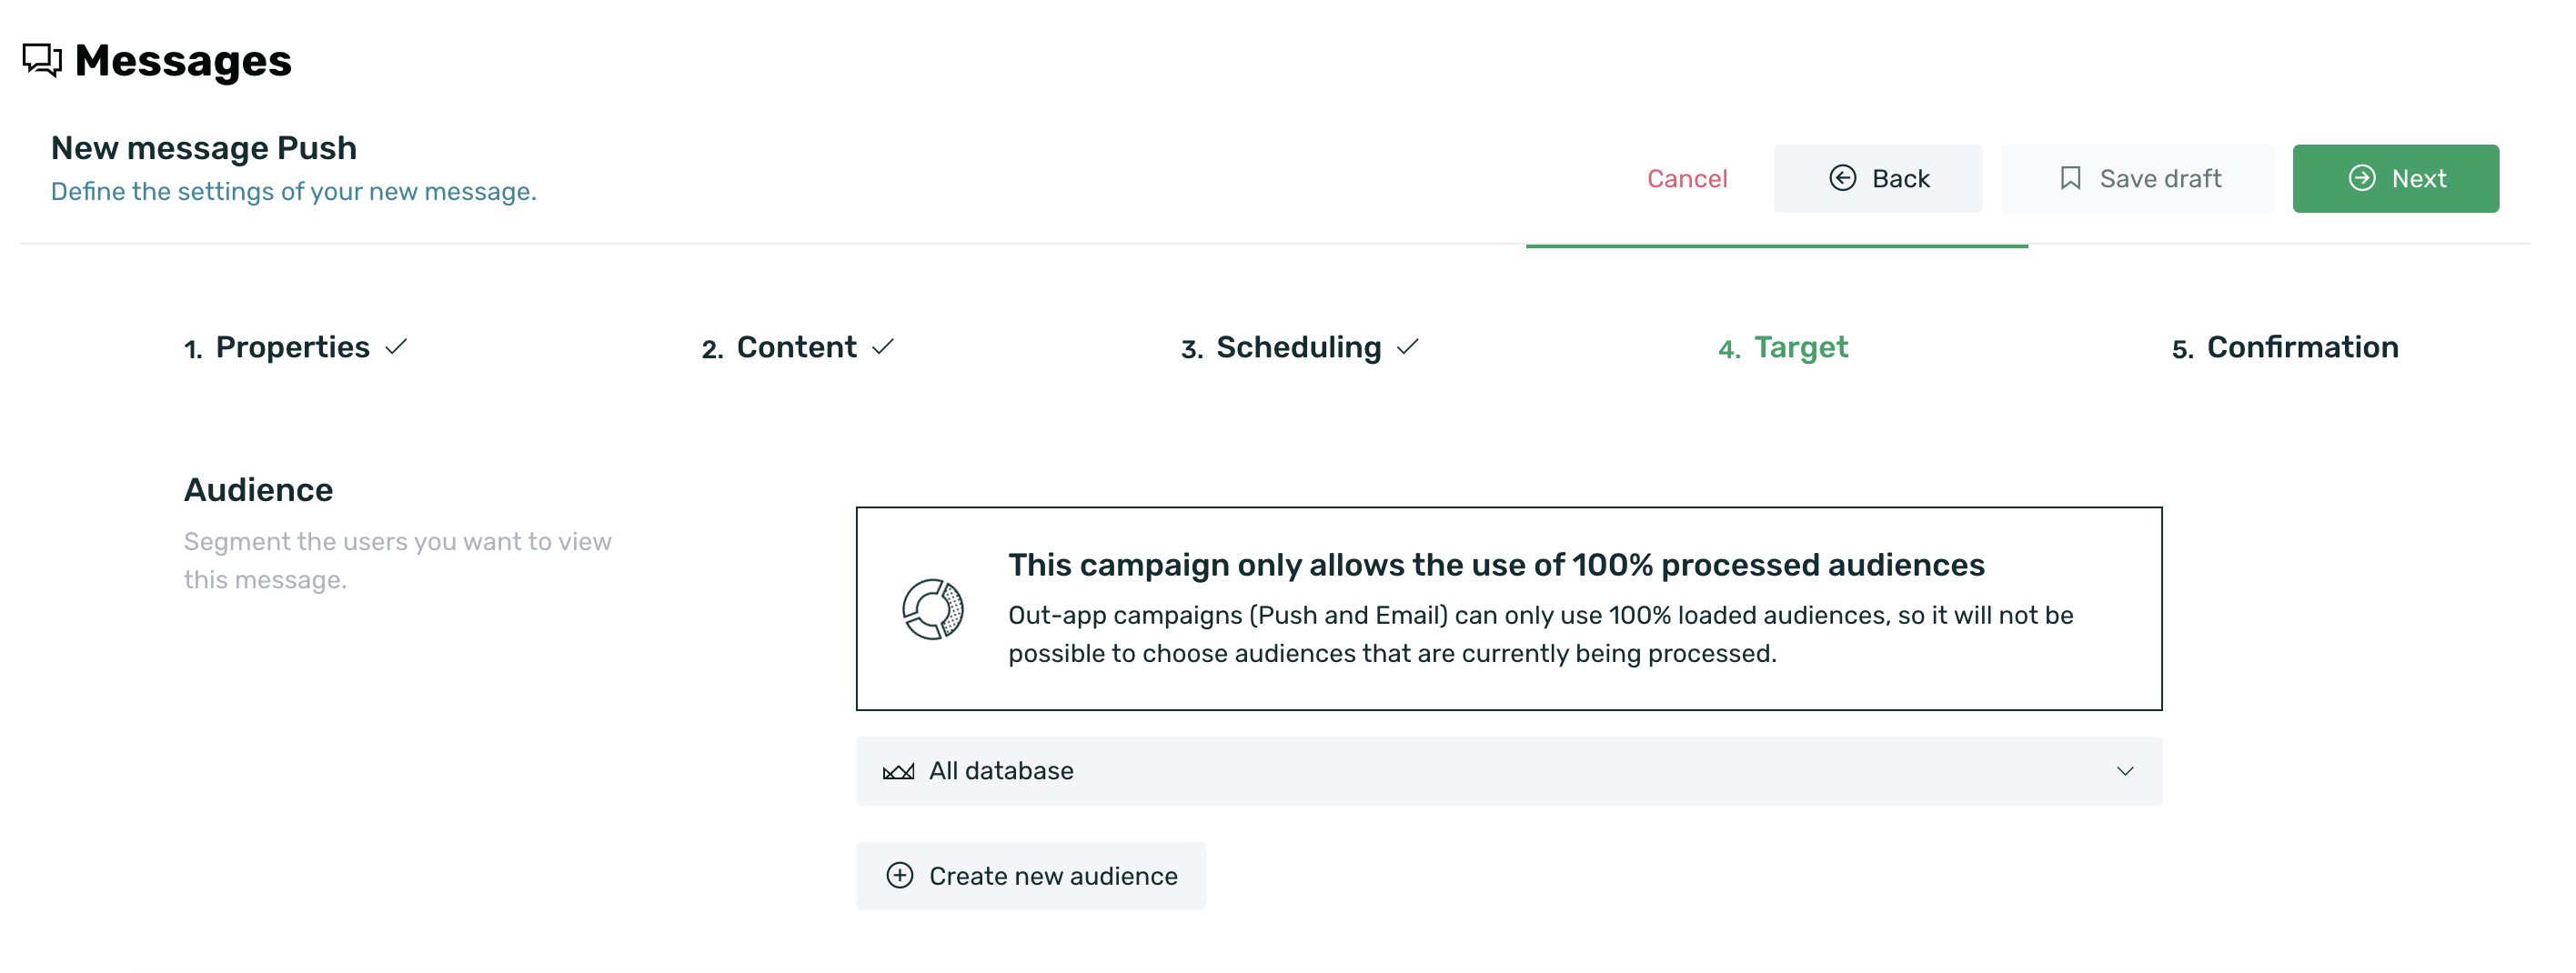
Please note that in push notifications, you can only use audiences that are 100% processed.
If you have created A/B test variations, a section will automatically appear below the segmentation to configure the percentage of users who will see each piece. Additionally, you can also set up a control group, which is fully compatible. You just need to assign a percentage of users for each of the available options.
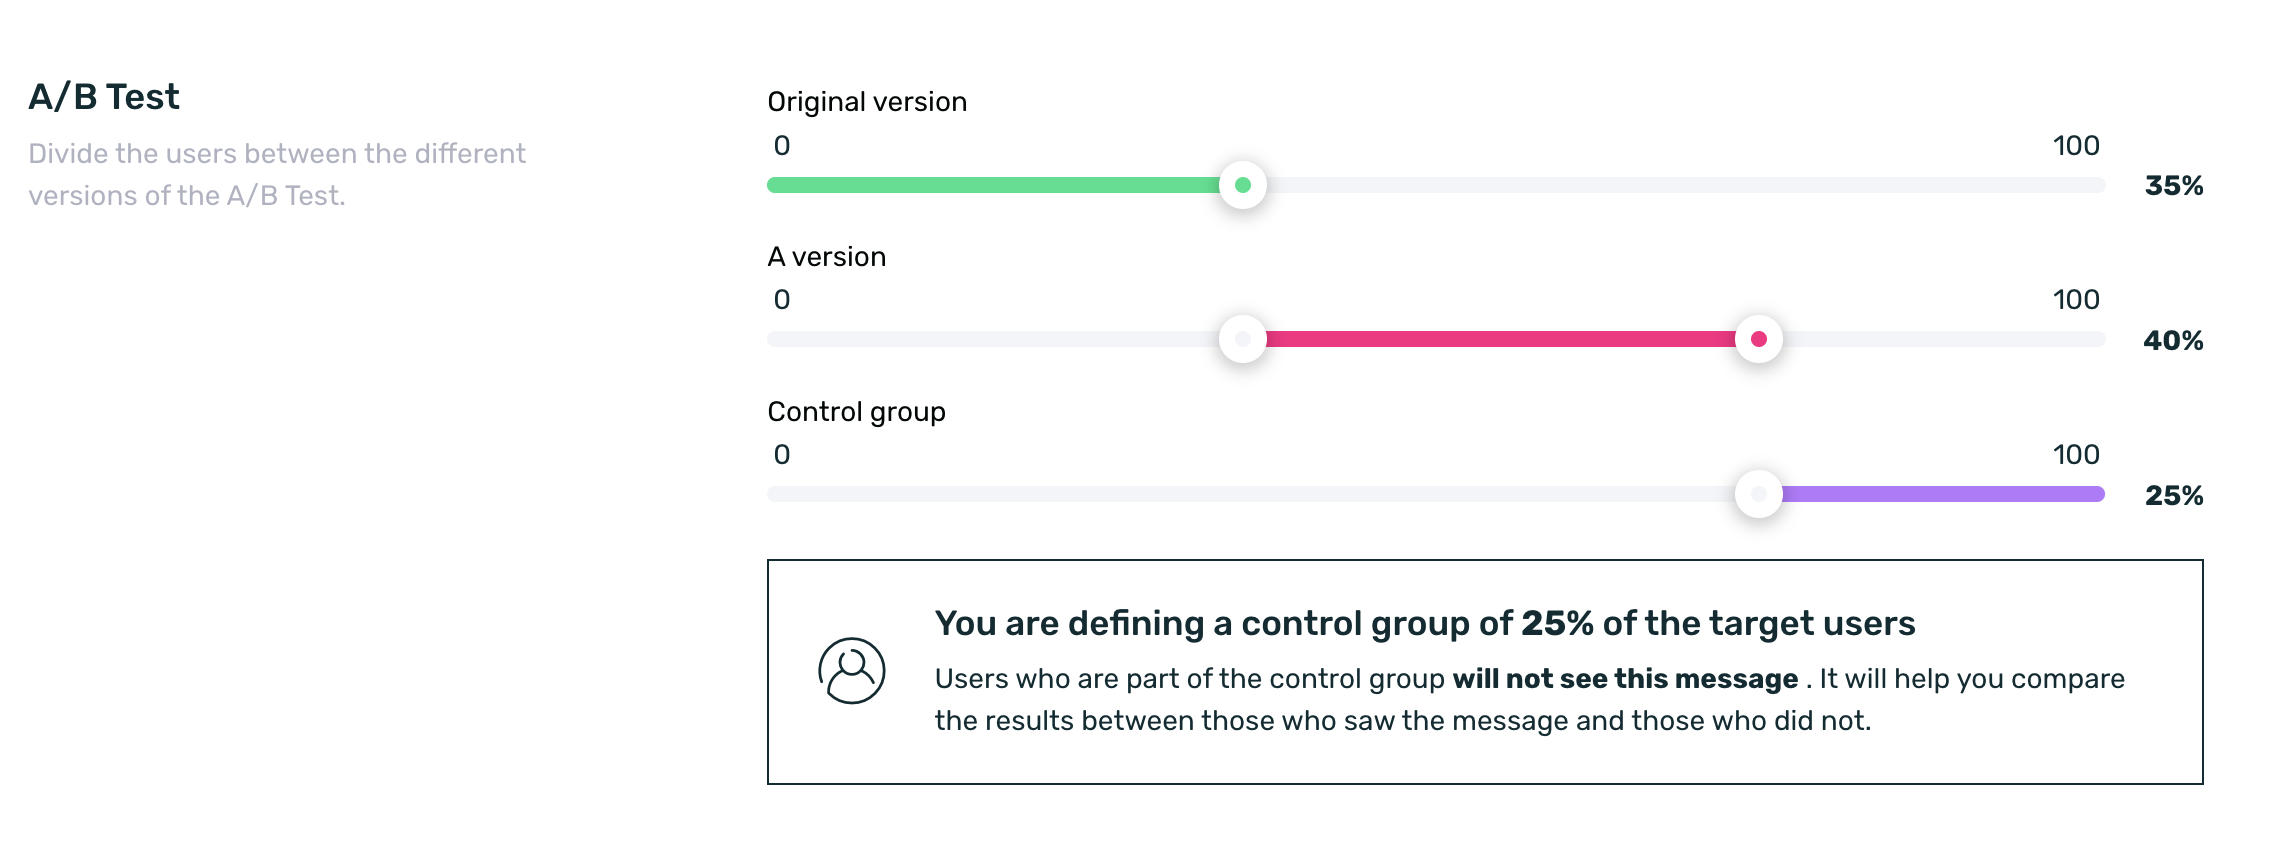
If there are no A/B test variations, we can still set up a control group. To do this, simply enable the control group checkbox and set the percentage of users who we do NOT want to receive the communication. For more information about Control Group, visit our guide on this topic.
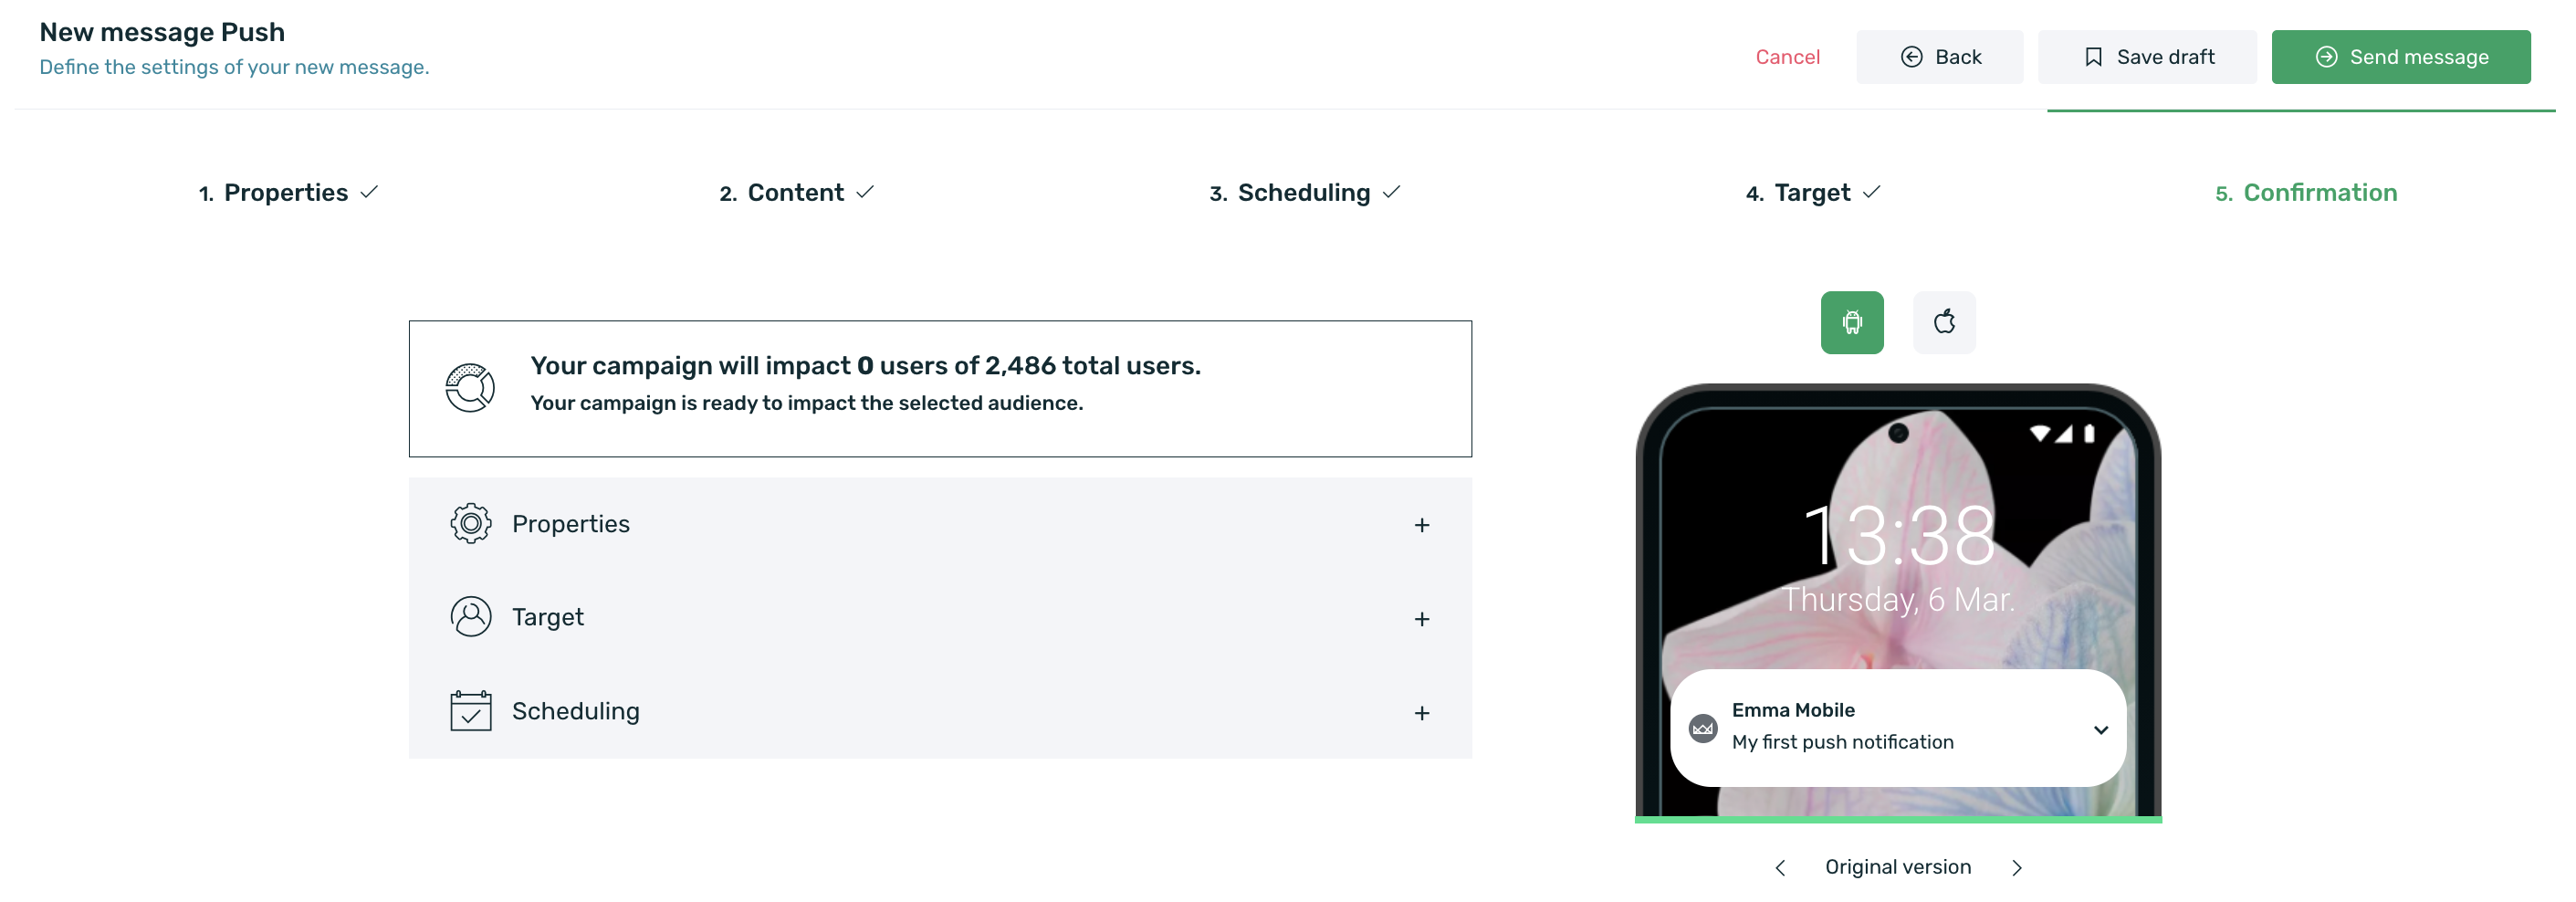
¶ Confirmation
Finally, we arrive at the confirmation screen for the communication, where we can see the number of active devices for the push notification sending. EMMA will show the following information as a result of the audience:
- Devices: total devices that have or have ever had the app installed.
- Total devices: devices included in the segmentation criteria that have at some point tracked a valid token. This does not mean that, at the time of sending the push, the active devices for the push have notifications enabled.
- Users already impacted: active devices for the push, but who will not be impacted due to having a limit on impacts applied. This information refers to the moment when the communication is being created, but it does not mean that, if it’s a scheduled push, these users won’t receive it at the time of sending. To customize your impact limit, follow these instructions.
Additionally, a summary of all the configuration made in the previous steps will also be visible. Once you have reviewed all the configurations, you can proceed to send the message by clicking the Send Message button.
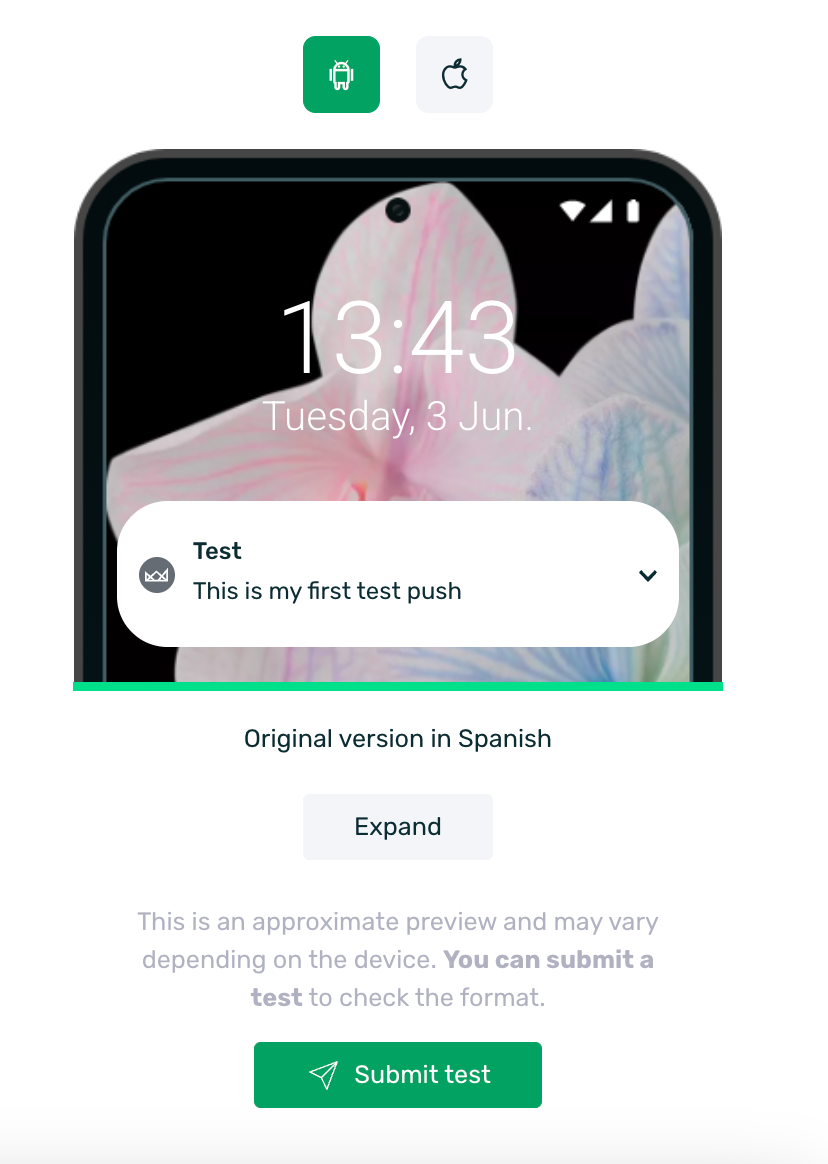
¶ Test push
With EMMA, you can send a test push to validate its correct configuration and functionality before launching it to the final audience.
To do so, simply follow these steps:
-
Click on the Submit test button displayed below the preview in step 2. Content of the push creation process.
-
In the Submit test pop-up that opens next, in the Audience dropdown selector, you must select the desired test audience to send the push.
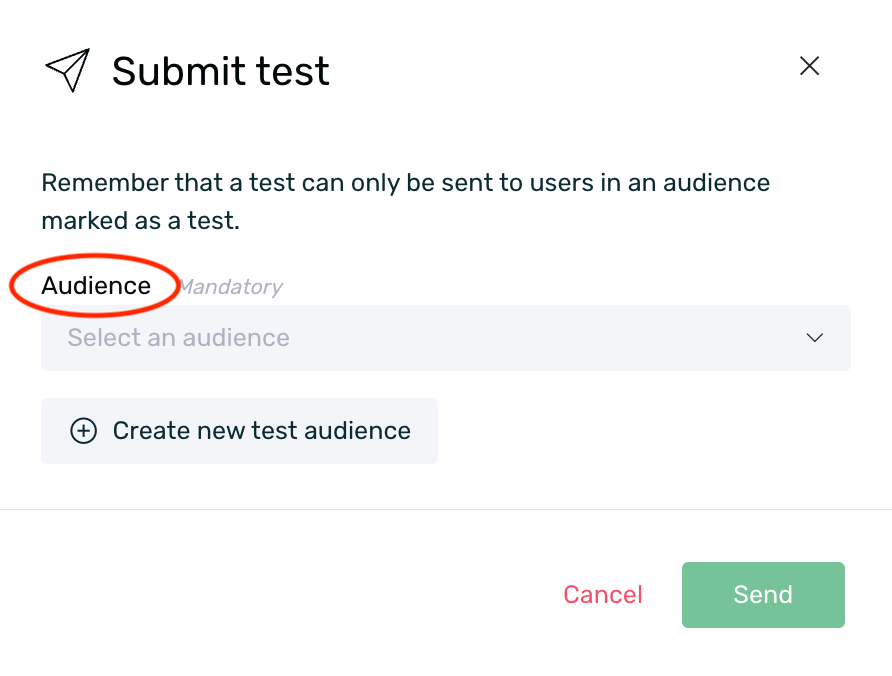
-
If it's a push without language configuration or A/B test, simply click the Send button to send the test to the corresponding users.
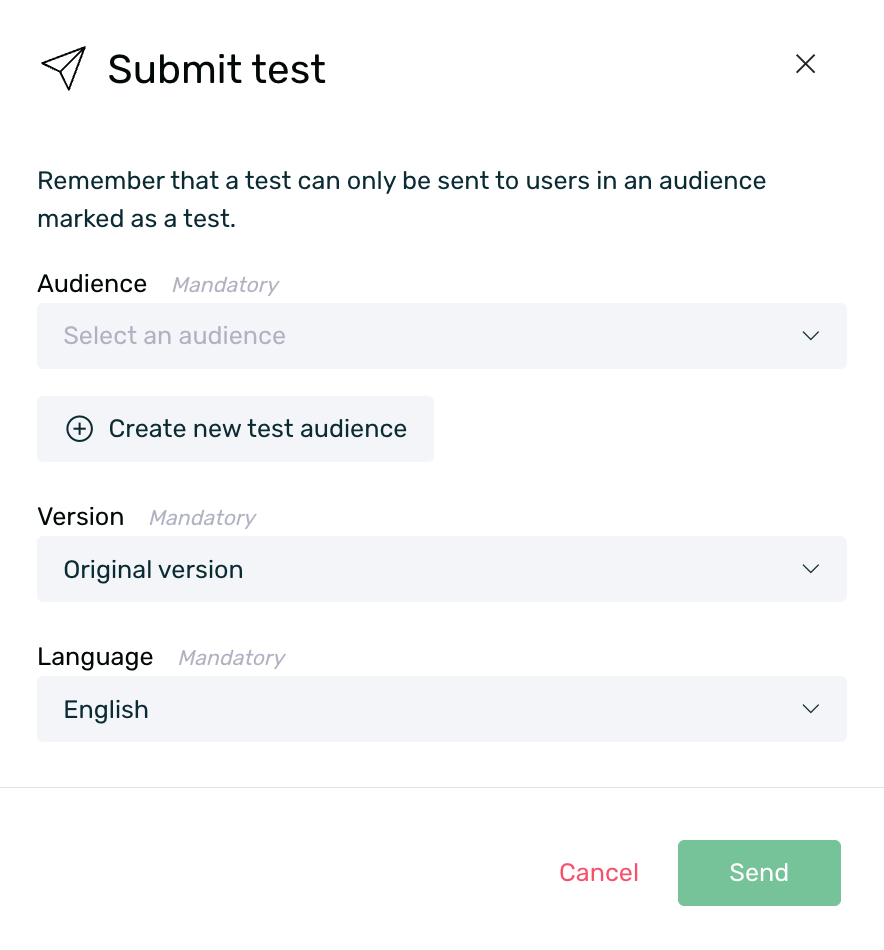
-
If it's a push with language configuration and/or A/B test:
- A/B Test: In the selector named Version, you must select which of the configured versions you want to send for validation.
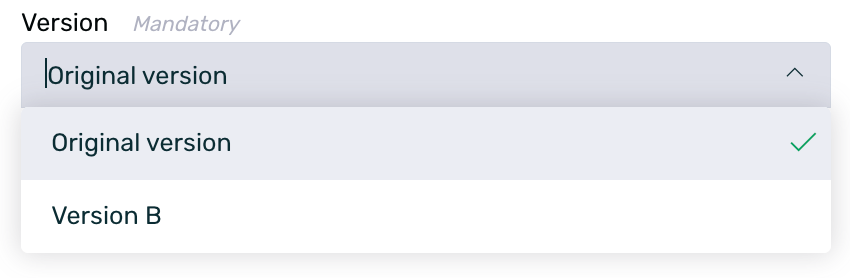
- A/B Test: In the selector named Version, you must select which of the configured versions you want to send for validation.
-
Language: In the selector named Language, you must select which of the configured languages you want to send for validation.
Test pushes can only be sent to audiences marked as Test. You can find more information about how to create this type of audience here.
It’s important to note that these notifications will not appear in the Communications Report or the Performance Report, and you can perform as many tests as needed before sending the push to the final audience.
¶ Campaign statuses
Once you have created your campaigns, they can be in one state or another, depending on the characteristics they meet. The possible states in which a communication can be found are:
-
Active: Your campaign has started, it is active, and is being shown to the corresponding users.
-
Approved: This state only applies if the pre-validation system for campaigns is in use. More info on this here. It means the campaign has been approved and is awaiting its final launch. While the campaign is in this state, it is not visible to any users.
-
Deleted: The campaign has been deleted.
-
Draft: The campaign has been saved as a draft. In this state, it is not shown to any users and can be recovered at any time to be launched.
-
Finished: The campaign has finished because the set end date has been reached. In this state, no users can view it.
-
Paused: The campaign is paused and is not being shown to any users.
-
Cancelled/Interrupted: This status indicates that the delivery was manually stopped before being completed.
-
Listed: This state only applies to automatic campaigns and means the campaign is ready to be used in a rule or customer path. In this state, the communication is not being shown to any users.
-
Scheduled: The communication is waiting to reach the set start date to be activated and start showing to users.
-
Sending: This dynamic status indicates that notifications are being delivered at that moment. It automatically updates according to the progress of the delivery. In recurring campaigns, it alternates between Active and Sending with each execution.
-
Testing: This state only applies if the pre-validation system for campaigns is in use. More info on this here. It means the campaign is in test mode and is being shown to users who meet the established segment.
-
To be validated: This state only applies if the pre-validation system for campaigns is in use. More info on this here. It means the campaign has been created and is awaiting validation and approval before being launched. While the campaign is in this state, it is not visible to any users.
¶ Edit, pause, stop, clone, or delete push notifications
¶ Edit Push Notifications
You can edit all push notifications except those that are in the following states:
Finished
Deleted
To edit your push campaigns, follow these steps:
-
Go to the summary table on the Communication > Messages screen. Hover your mouse over the contextual menu of the desired communication and click on the Edit option.

-
Modify the fields of the campaign you wish to change and complete the editing process of the communication. Click on the Send message button.

- Next, accept the edit by clicking the Save button in the confirmation pop-up to apply the changes made to your communication.

In the following table, you can check which fields can be modified depending on the status of your communication.
| Status | What can be modified |
|---|---|
| Repeat Mode | All fields can be modified except for the Control group |
| Rules Mode | Only Message and Rich push URL fields can be modified |
| Waiting | All fields can be modified |
¶ Pause push notifications
It is important to note that you can only Pause push notifications that are in the Scheduled state with a recurrence (daily, weekly, or monthly). To pause them, you need to do the following:
- Go to the summary table on the Communication > Messages screen, hover over the contextual menu of the desired communication and click on the Pause option.
The Push notification will immediately change to the Paused state.
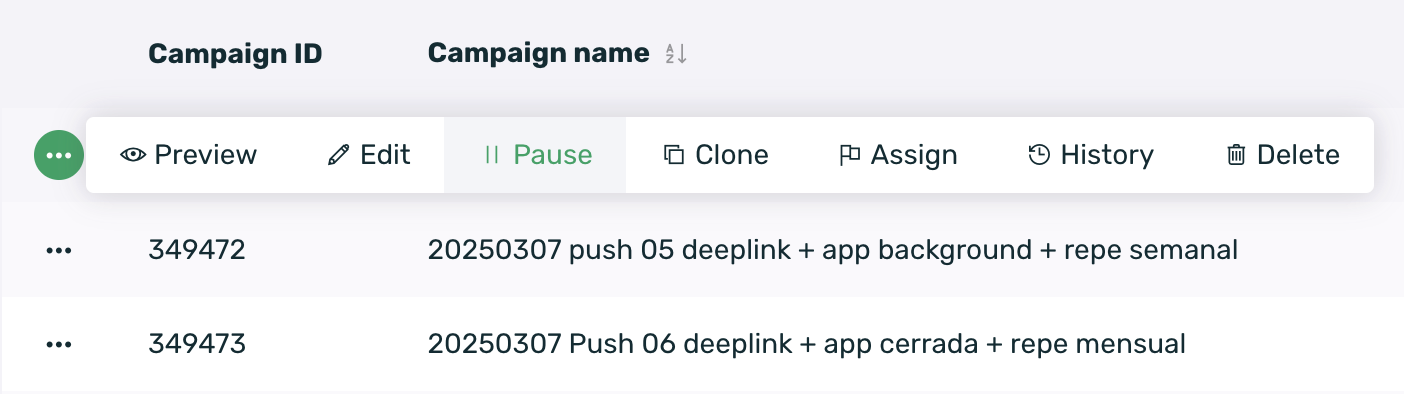
If you want to reactivate the campaign, you must click the Launch button from the contextual menu again.

¶ Stop push notifications
In some cases, it may be necessary to immediately halt the sending of a push notification, either due to an error in the content or because the mass delivery is affecting the app’s performance. To address this need, EMMA provides the Stop option.
When a push campaign is in the Sending state, you will see the Stop button available in the communication’s contextual menu.
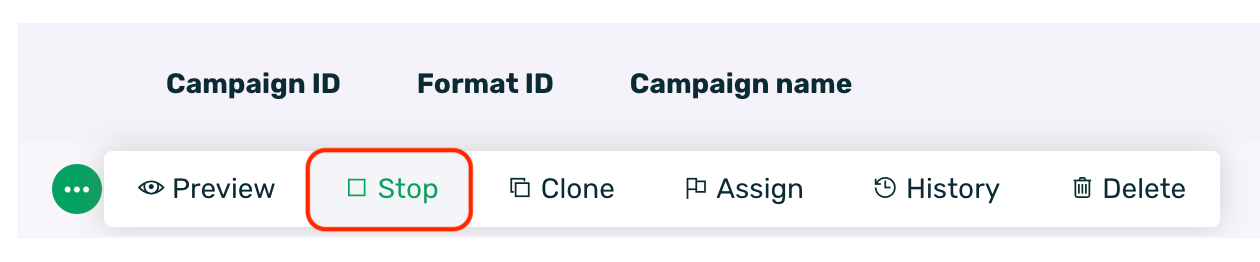
When you click on it, a confirmation message will be displayed:
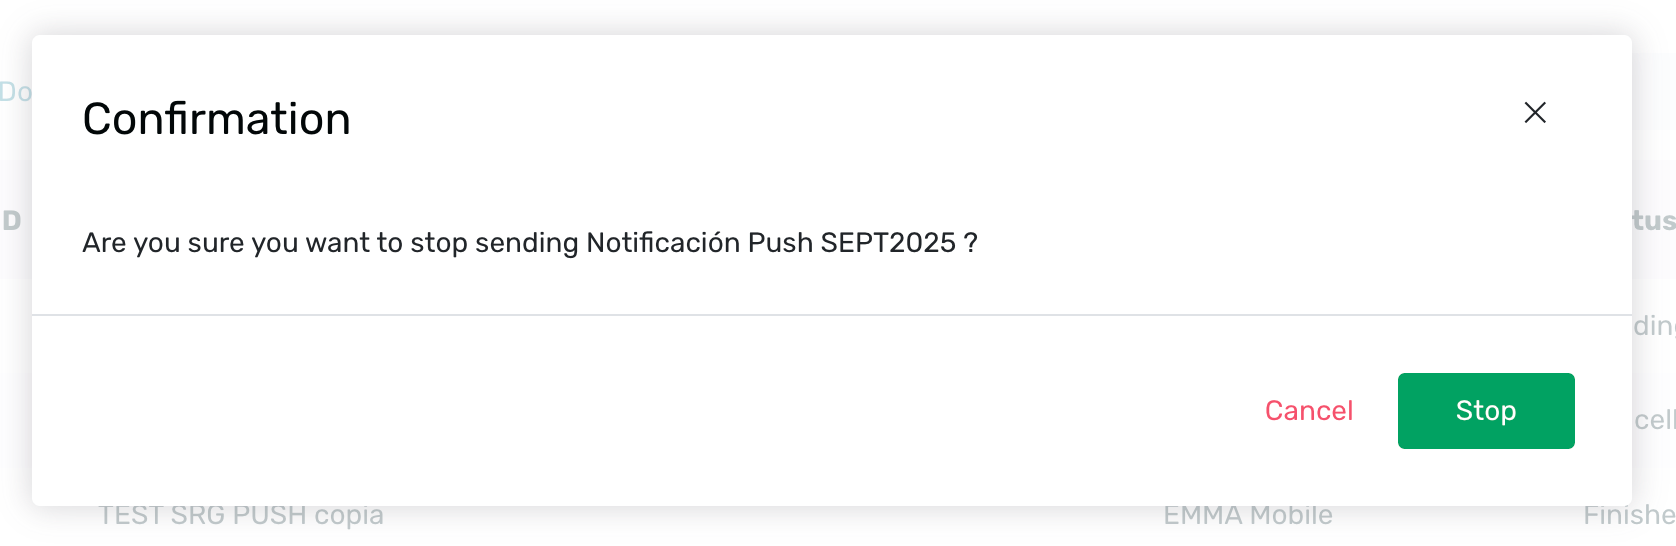
Once the action is confirmed, the delivery will stop as quickly as possible. However, keep in mind that if 95% of the audience has already received the notification, the communication cannot be stopped.
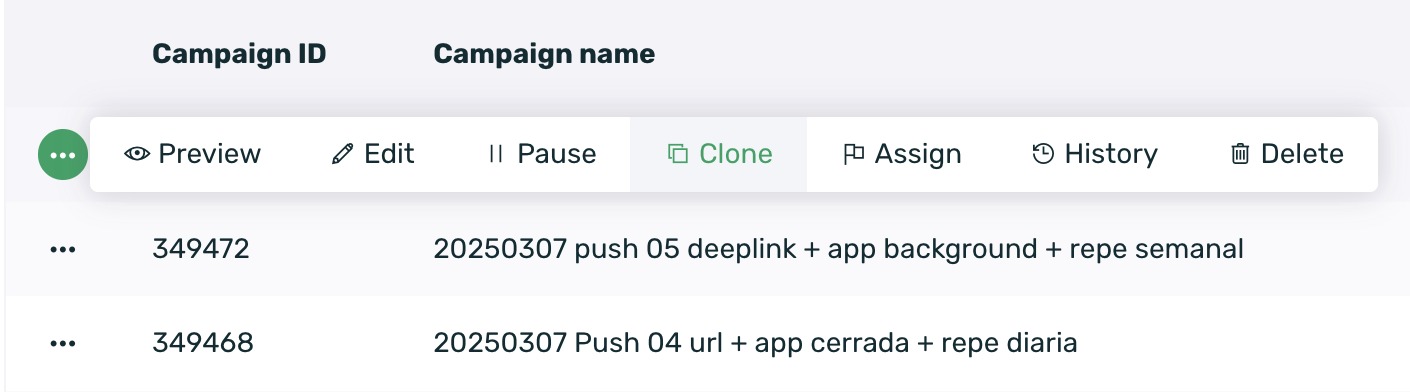
¶ Clone push notifications
You can clone any push notification regardless of its current status. Keep in mind that once you clone the campaign, the push form will display the cloned campaign's configuration except for the scheduling date fields.
To clone a push notification, simply follow these steps:
-
Click Clone from the contextual menu of the push notification you wish to duplicate.
-
Modify the necessary information and complete the push notification creation process. Click the Send Message button.
-
Next, confirm the push notification submission by clicking the Save Message button in the confirmation pop-up.
And that's it, your push notification has been successfully cloned and sent.
¶ Delete push notifications
If you want to delete a scheduled push notification, follow these steps:
-
Go to the summary table on the Communication > Messages screen, hover over the contextual menu of the desired notification and click on the Delete option.
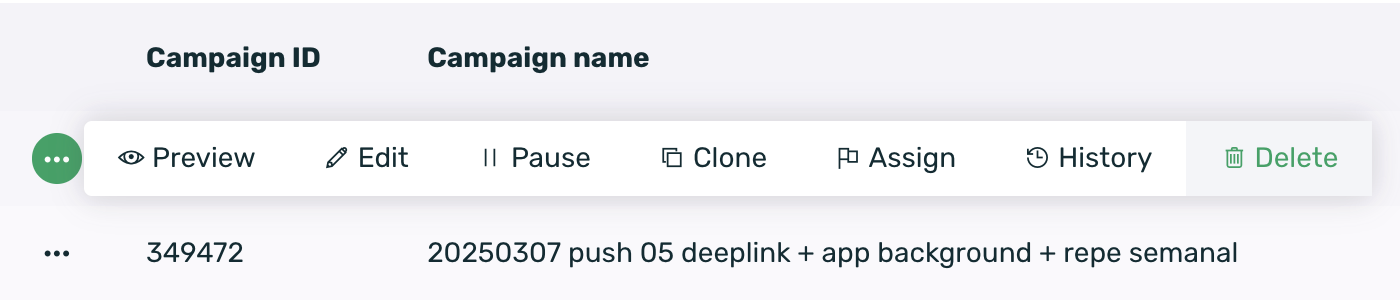
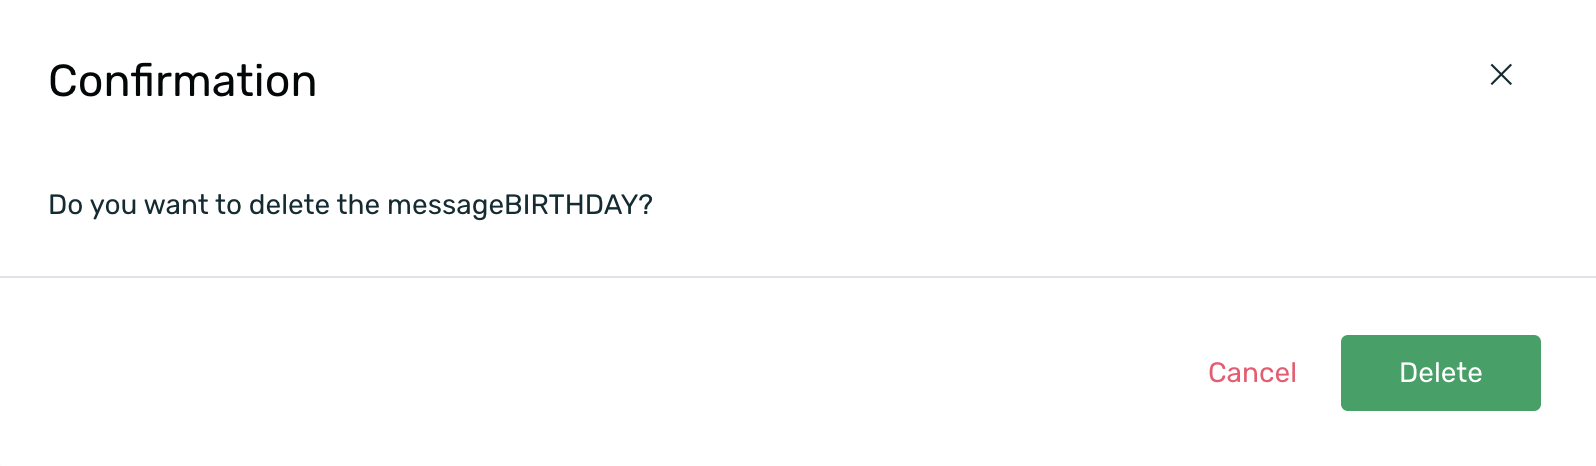
-
Approve the message to confirm the deletion action.
Only Push notifications that have not yet started sending or those in repeat mode can be deleted.
¶ Limit the impact for push notifications
If you plan to target multiple user segments or send a large number of push notifications, it is recommended to set a frequency limit to avoid overloading users. For more information on how to configure this impact limit, click here.
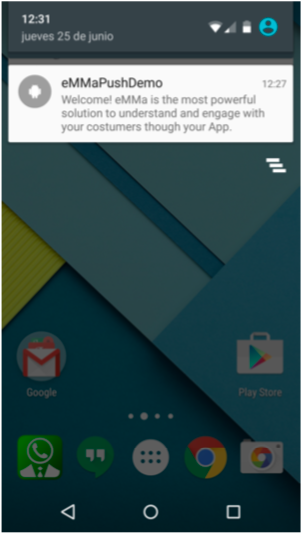
¶ About push notification text on Android
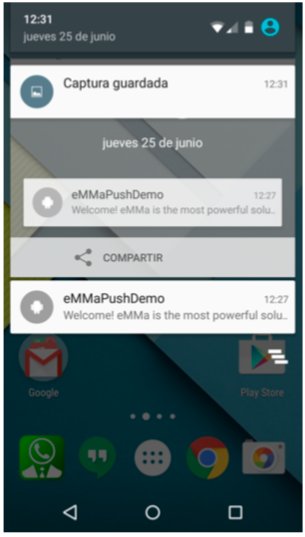
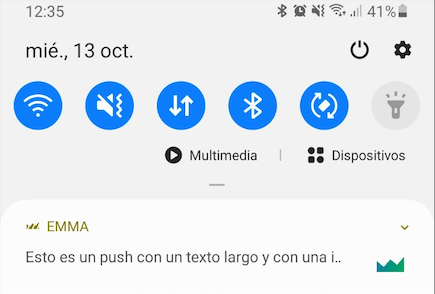
By default, Android devices display the full text programmed in EMMA:
However, if there are multiple pending notifications in the device's notification list, the Push notification text is shortened:
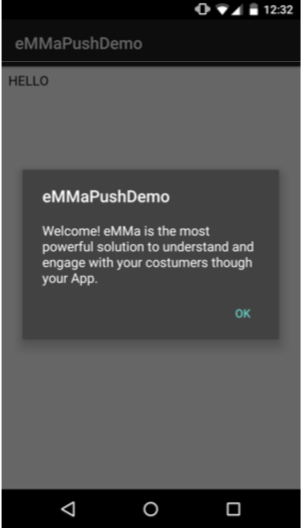
If you want to display a pop-up window with the full text when the user is redirected to the app through a Push notification, you must integrate the value "false" in the Custom Dialog to enable it.
Additionally, when configuring a push notification with an image, due to operating system limitations, if the text is too long and does not fit in the available space, it will not be displayed in full but rather truncated.
¶ Double Notification on iOS Devices
Are you experiencing issues with receiving Push notifications on your iOS devices?
If this is the case and you're receiving duplicated notifications across all your iOS devices, it's likely due to multiple registrations of notifications in your AppDelegate. To resolve this, you need to make the necessary modifications to ensure there is a single registration for notifications, which can either be the one from EMMA or a custom one.
Option 1. Use EMMA SDK:
There are two ways to do this:
A) Add [eMMa startPushSystem:launchOptions] in the AppDelegate.
B) Add [eMMa starteMMaSession:@”key” withOptions:launchOptions] in the AppDelegate. Once done, add [eMMa startPushSystem:NULL] anywhere in the App.
Option 2. Do not use EMMA SDK:
A) Add [eMMa starteMMaSession:@”key” withOptions:launchOptions] in the AppDelegate.
B) Perform a custom notification registration.
IMPORTANT:
If you're using Option 2. Not using EMMA SDK, make sure to review your code and verify that you are not using the EMMA startPushSystem method. It must be removed if it's being used for this option 2.
¶ Enable Push Notifications for Android
To use EMMA's push notifications, in addition to the necessary SDK integration for both Android and iOS, you will need to obtain a JSON certificate for Android and configure it in the EMMA panel.
¶ Creating the project in Firebase and obtaining the certificate
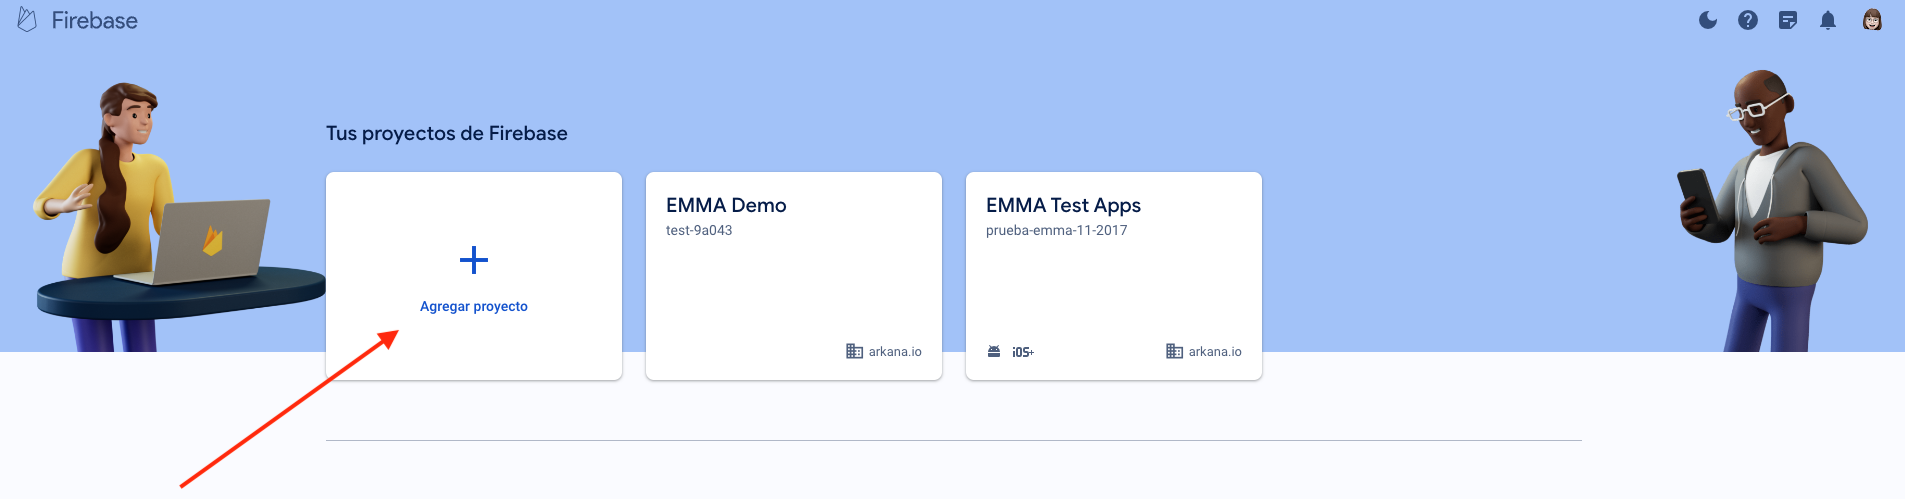
¶ Create a Firebase project
To create a new project in Firebase, once inside the platform, simply click on the Add Project button and follow the instructions in the panel.
If you already have an existing project, you can skip this step.
¶ Enable Firebase Cloud Messaging API (V1)
If you have created a new project, this should be enabled by default, so you can skip this step.
If you are using an existing project, follow these steps:
- Go to the project settings and select Project Settings.
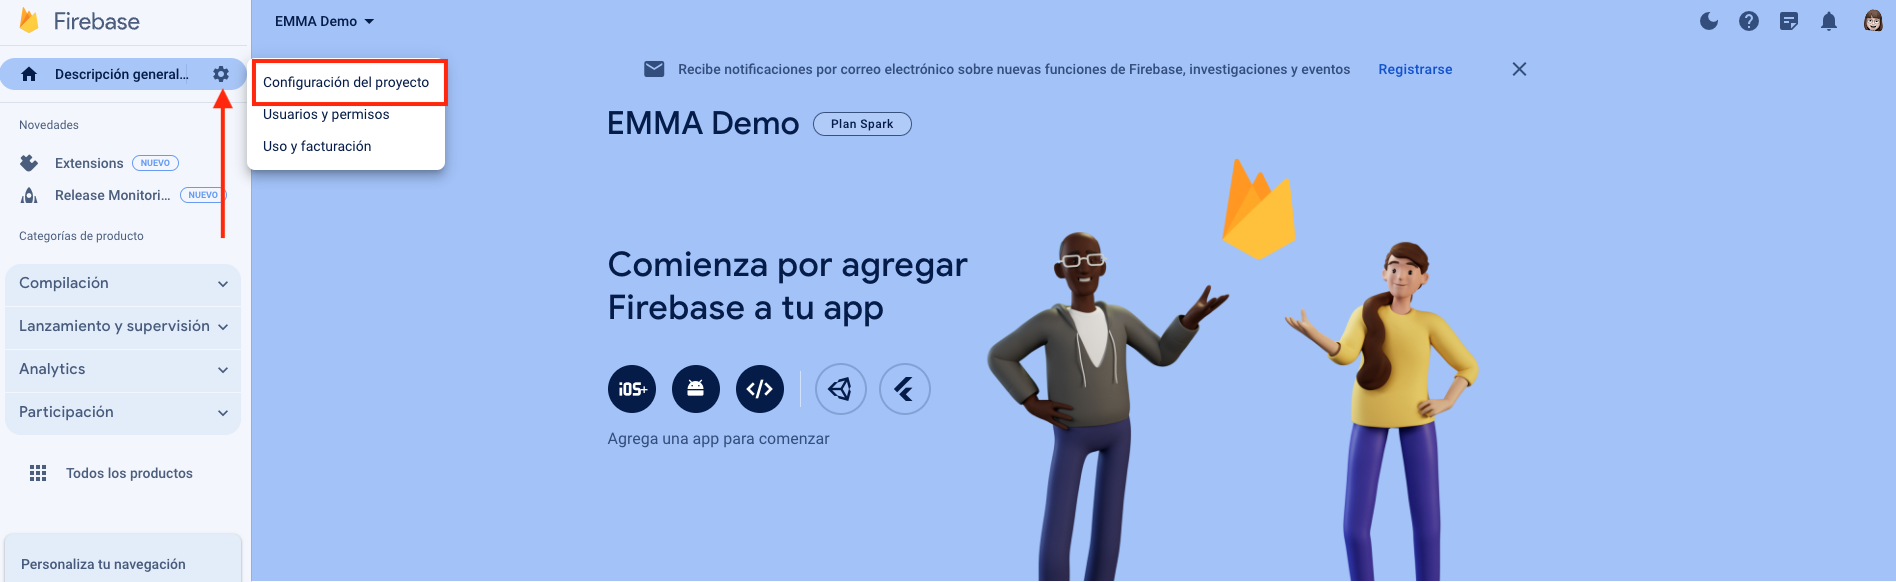
- Then, in the tab, select the Cloud Messaging option.

If Firebase Cloud Messaging API (V1) is disabled, click on the hamburger menu and select Manage the API in the Google Cloud Console.
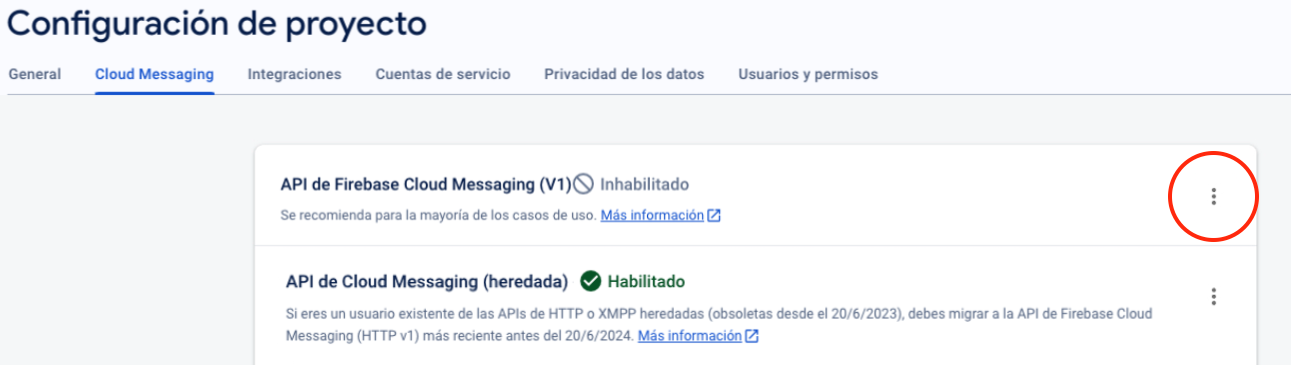
Then, click on the Enable button. 
Please note that this action may take a few minutes to propagate to Firebase systems.
¶ Generate a Private Key JSON File
To generate a private key JSON file, follow these steps:
- Go to the Service Accounts section.

- Click on the Generate New Private Key button located at the bottom of the page.
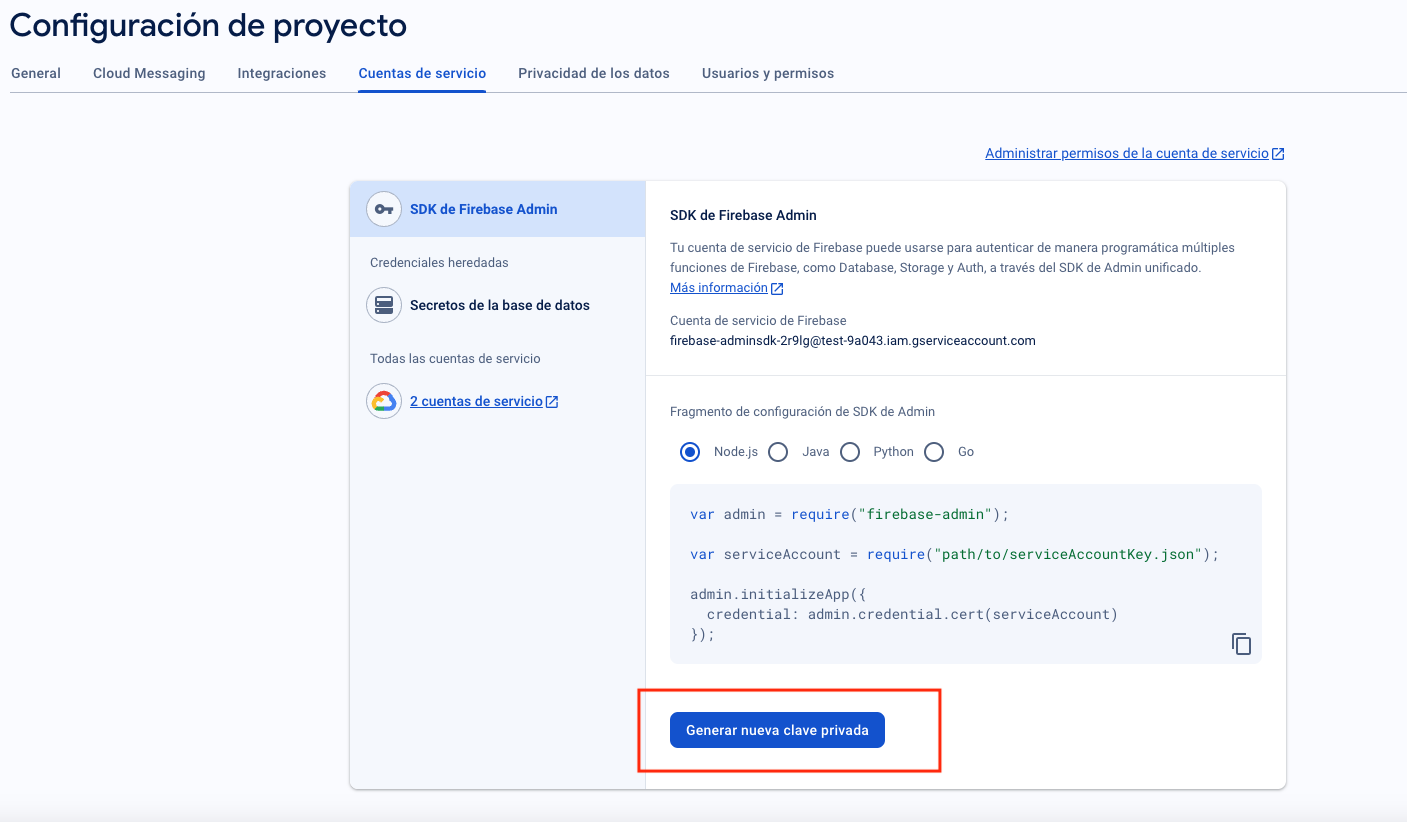
- A pop-up window will immediately appear with a notification. Click on the Generate Key button.
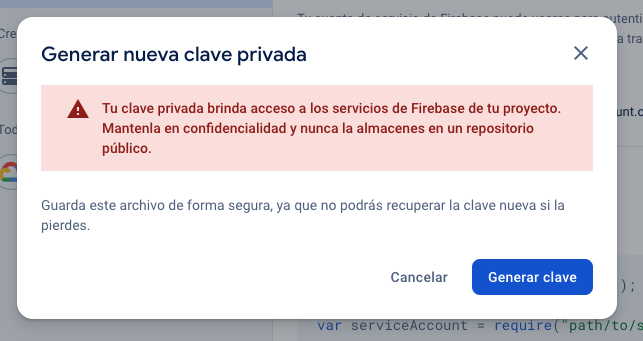
- Save the certificate, as you will need it later to configure it in EMMA.
¶ Configuration in EMMA
Once the Firebase project is created and the JSON certificate is obtained, it needs to be configured in EMMA. To do this, simply follow these steps:
-
Log in to EMMA and go to App Preferences.
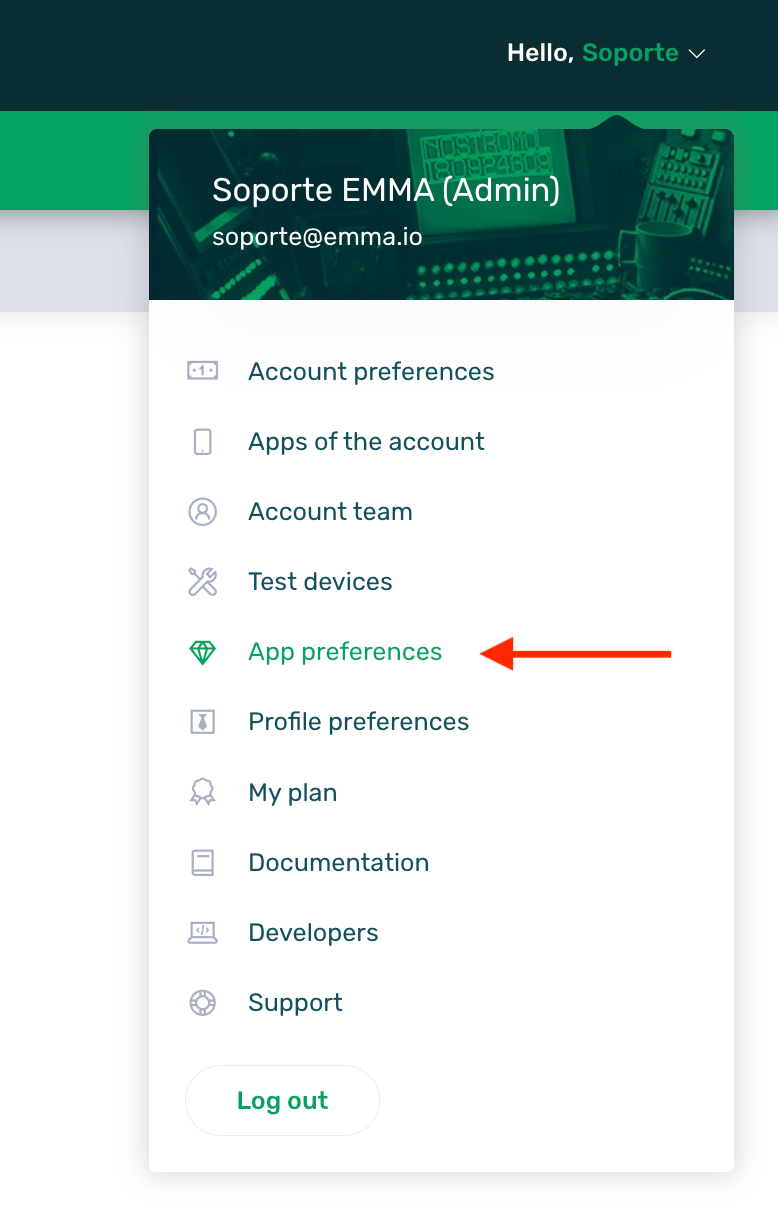
-
Search for the Android configuration and upload the JSON certificate previously obtained in the Firebase Services Account JSON field.
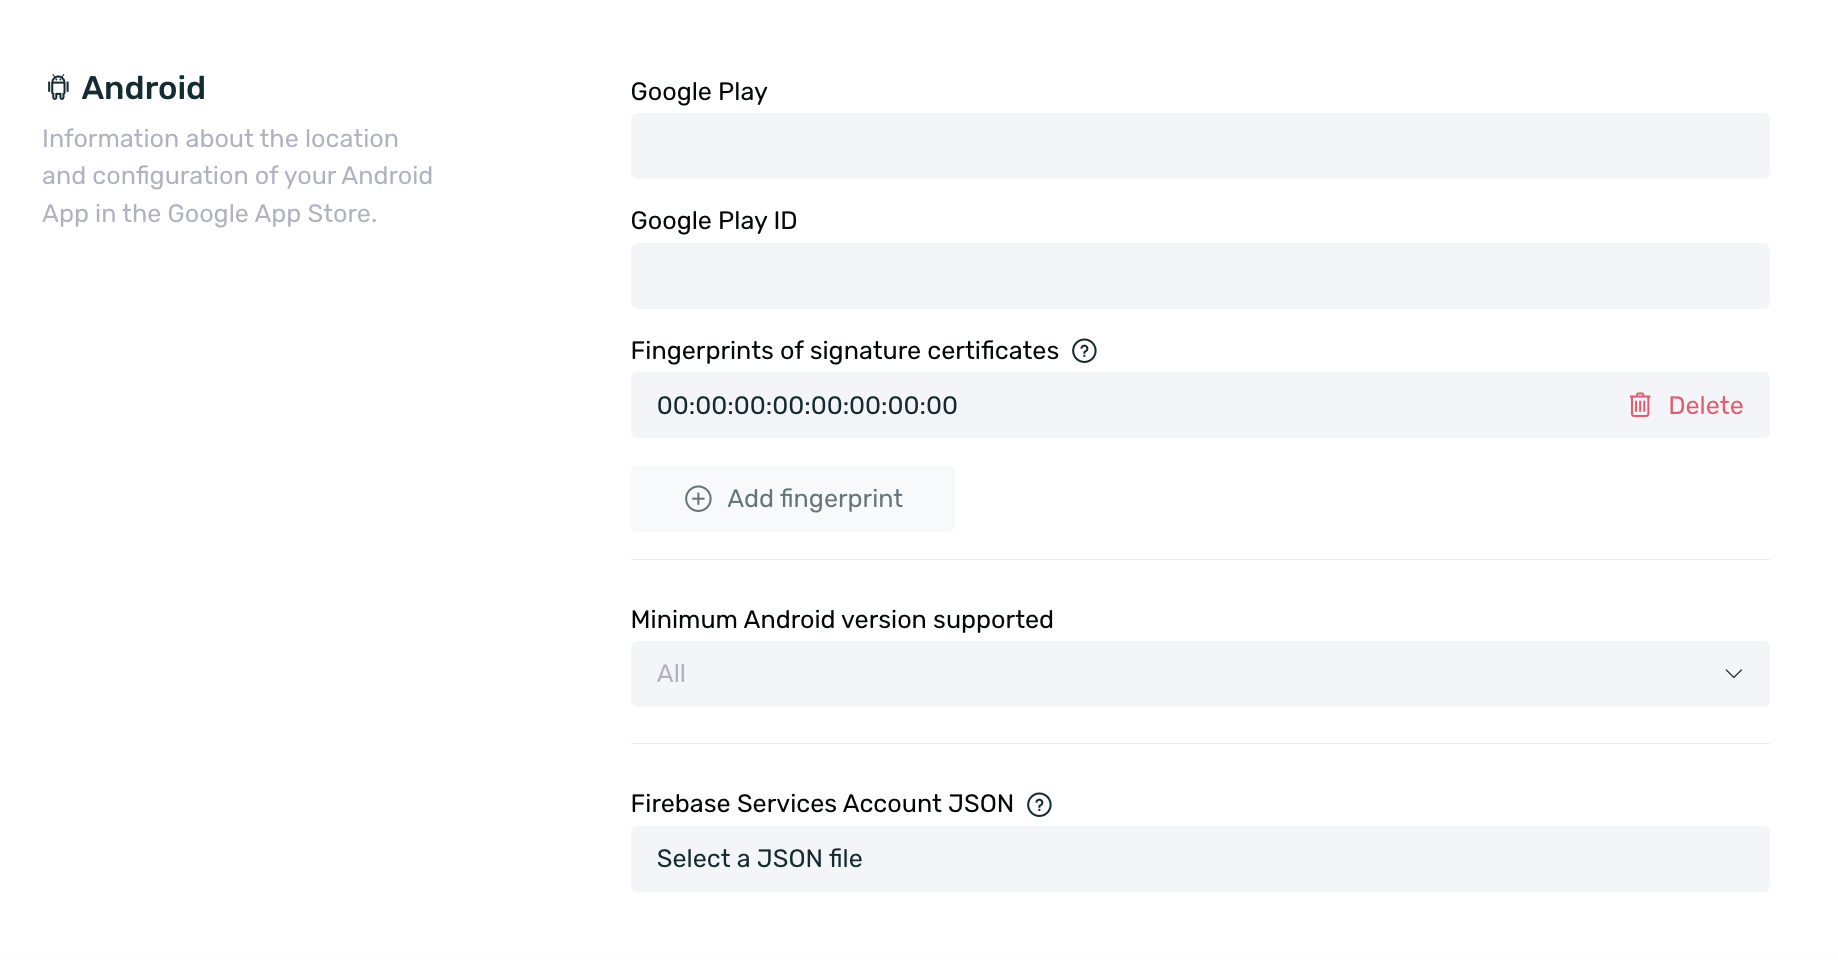
- Click on Save Configuration.
¶ How to test push notifications
To test push notifications, simply follow these steps:
-
Verify on the device that push notifications are enabled. You can find more information on how to check this here.
-
Validate in EMMA that the device is active to receive push notifications. For more detailed instructions, refer to this guide.
-
Create an internal test audience. More information can be found here.
- Create a push notification. If you need assistance with this, follow the step-by-step guide here.
¶ Enabling ush notifications on the device
To ensure that push notifications are allowed on the device and to enable them if necessary, simply follow these steps:
¶ Android
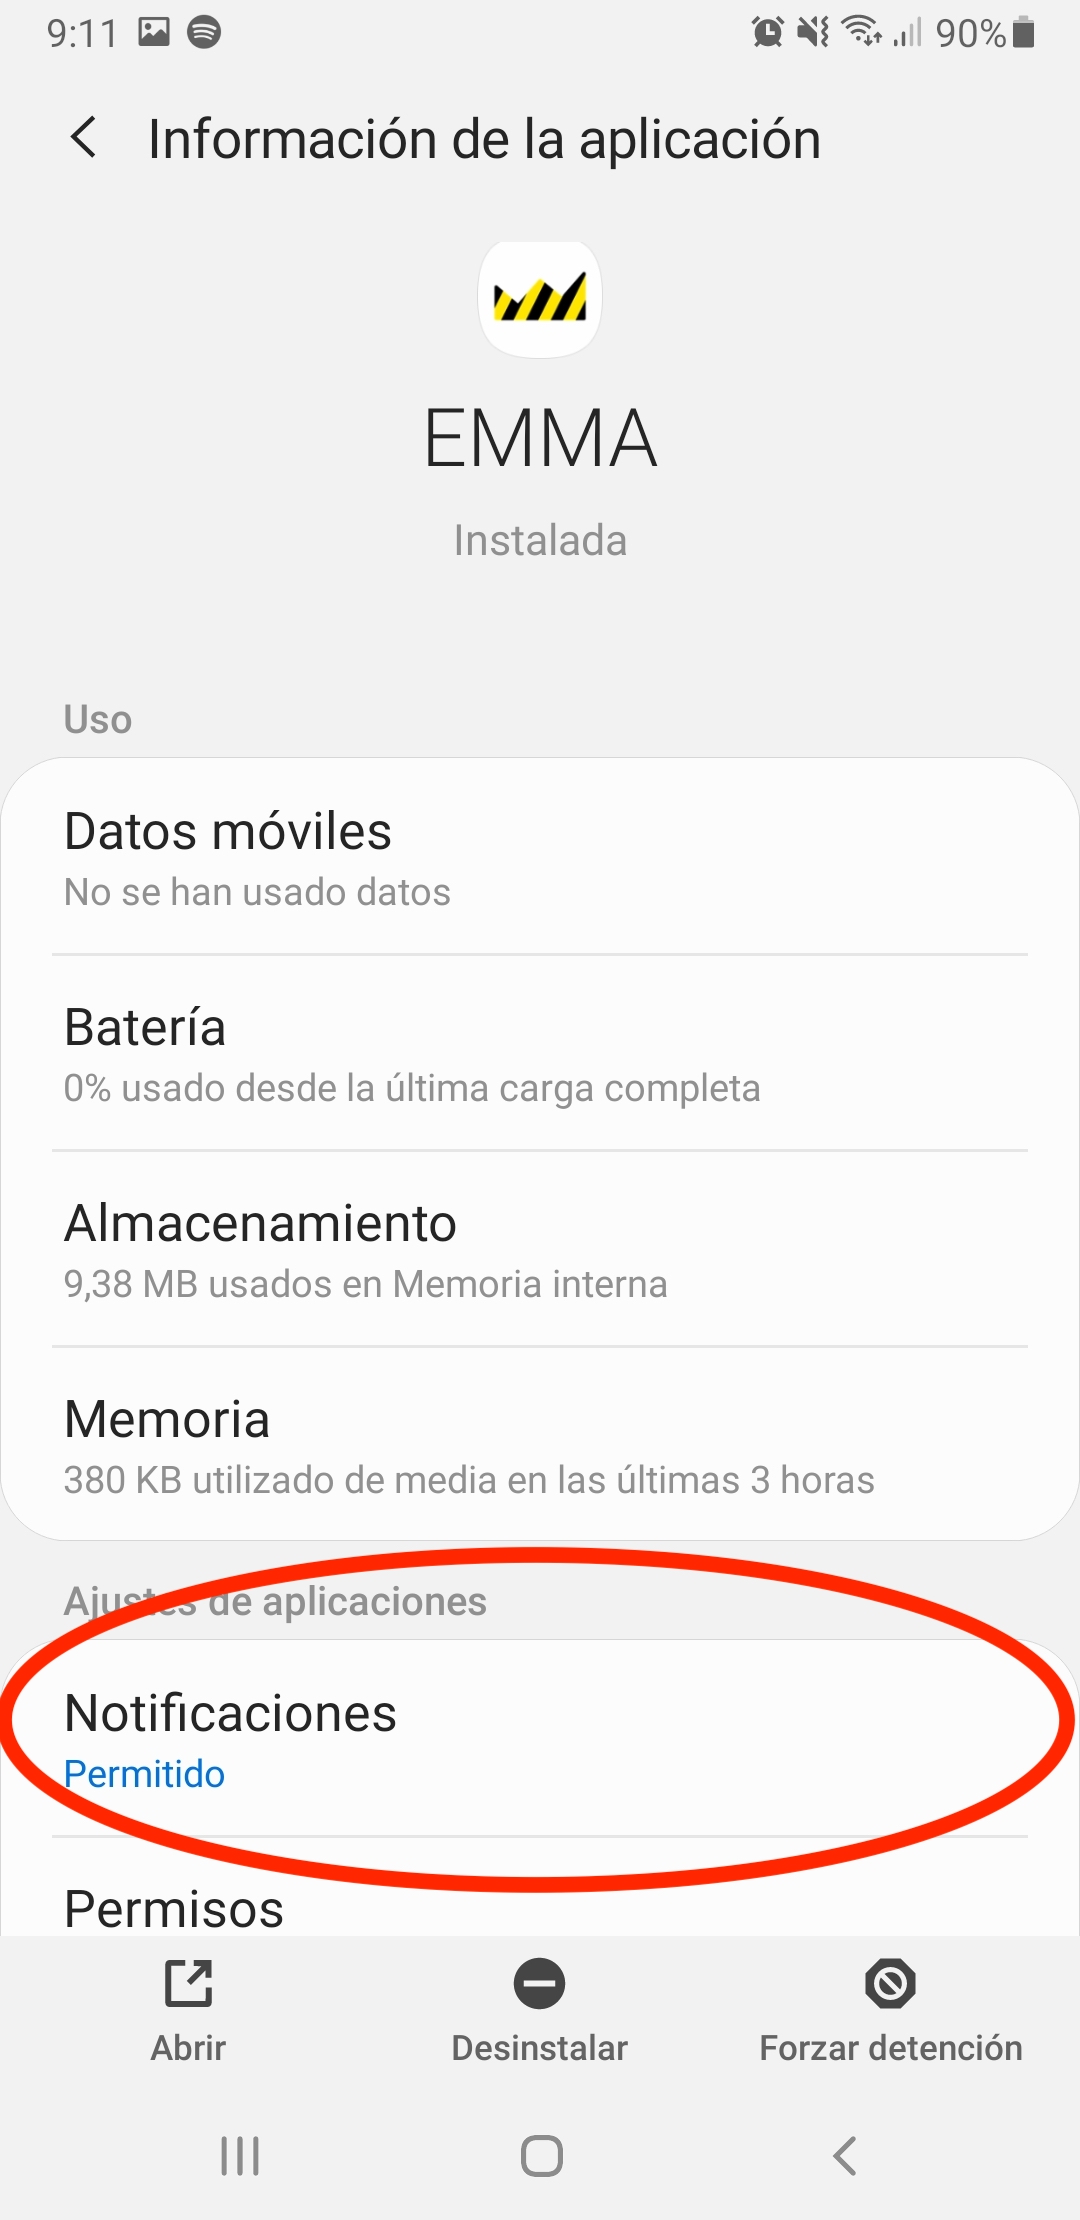
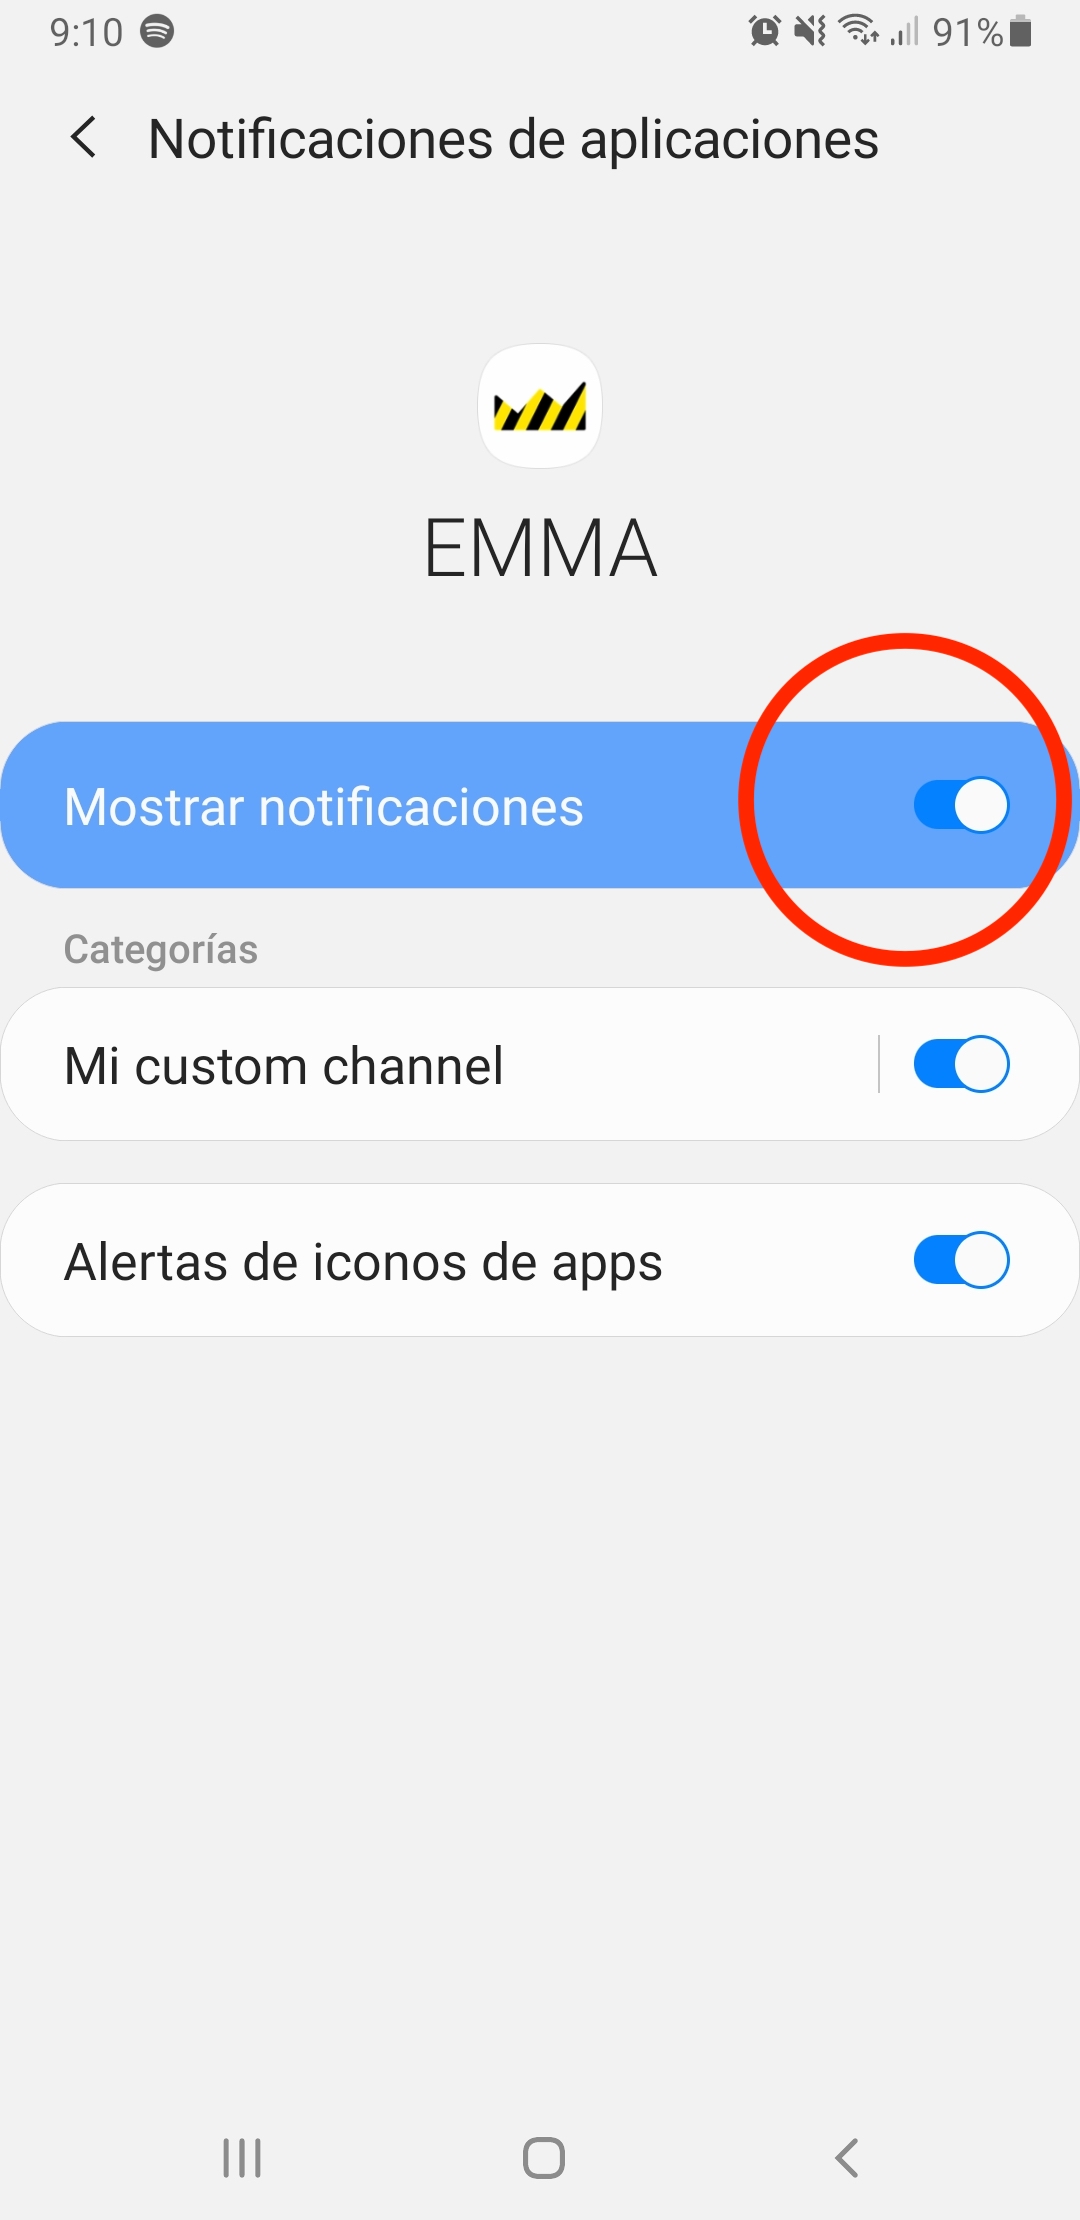
In Android, push notifications are enabled by default when the app is installed for the first time, but they can be disabled. To ensure they are active, follow these steps:
- Go to the device settings.
- Look for the Applications section.
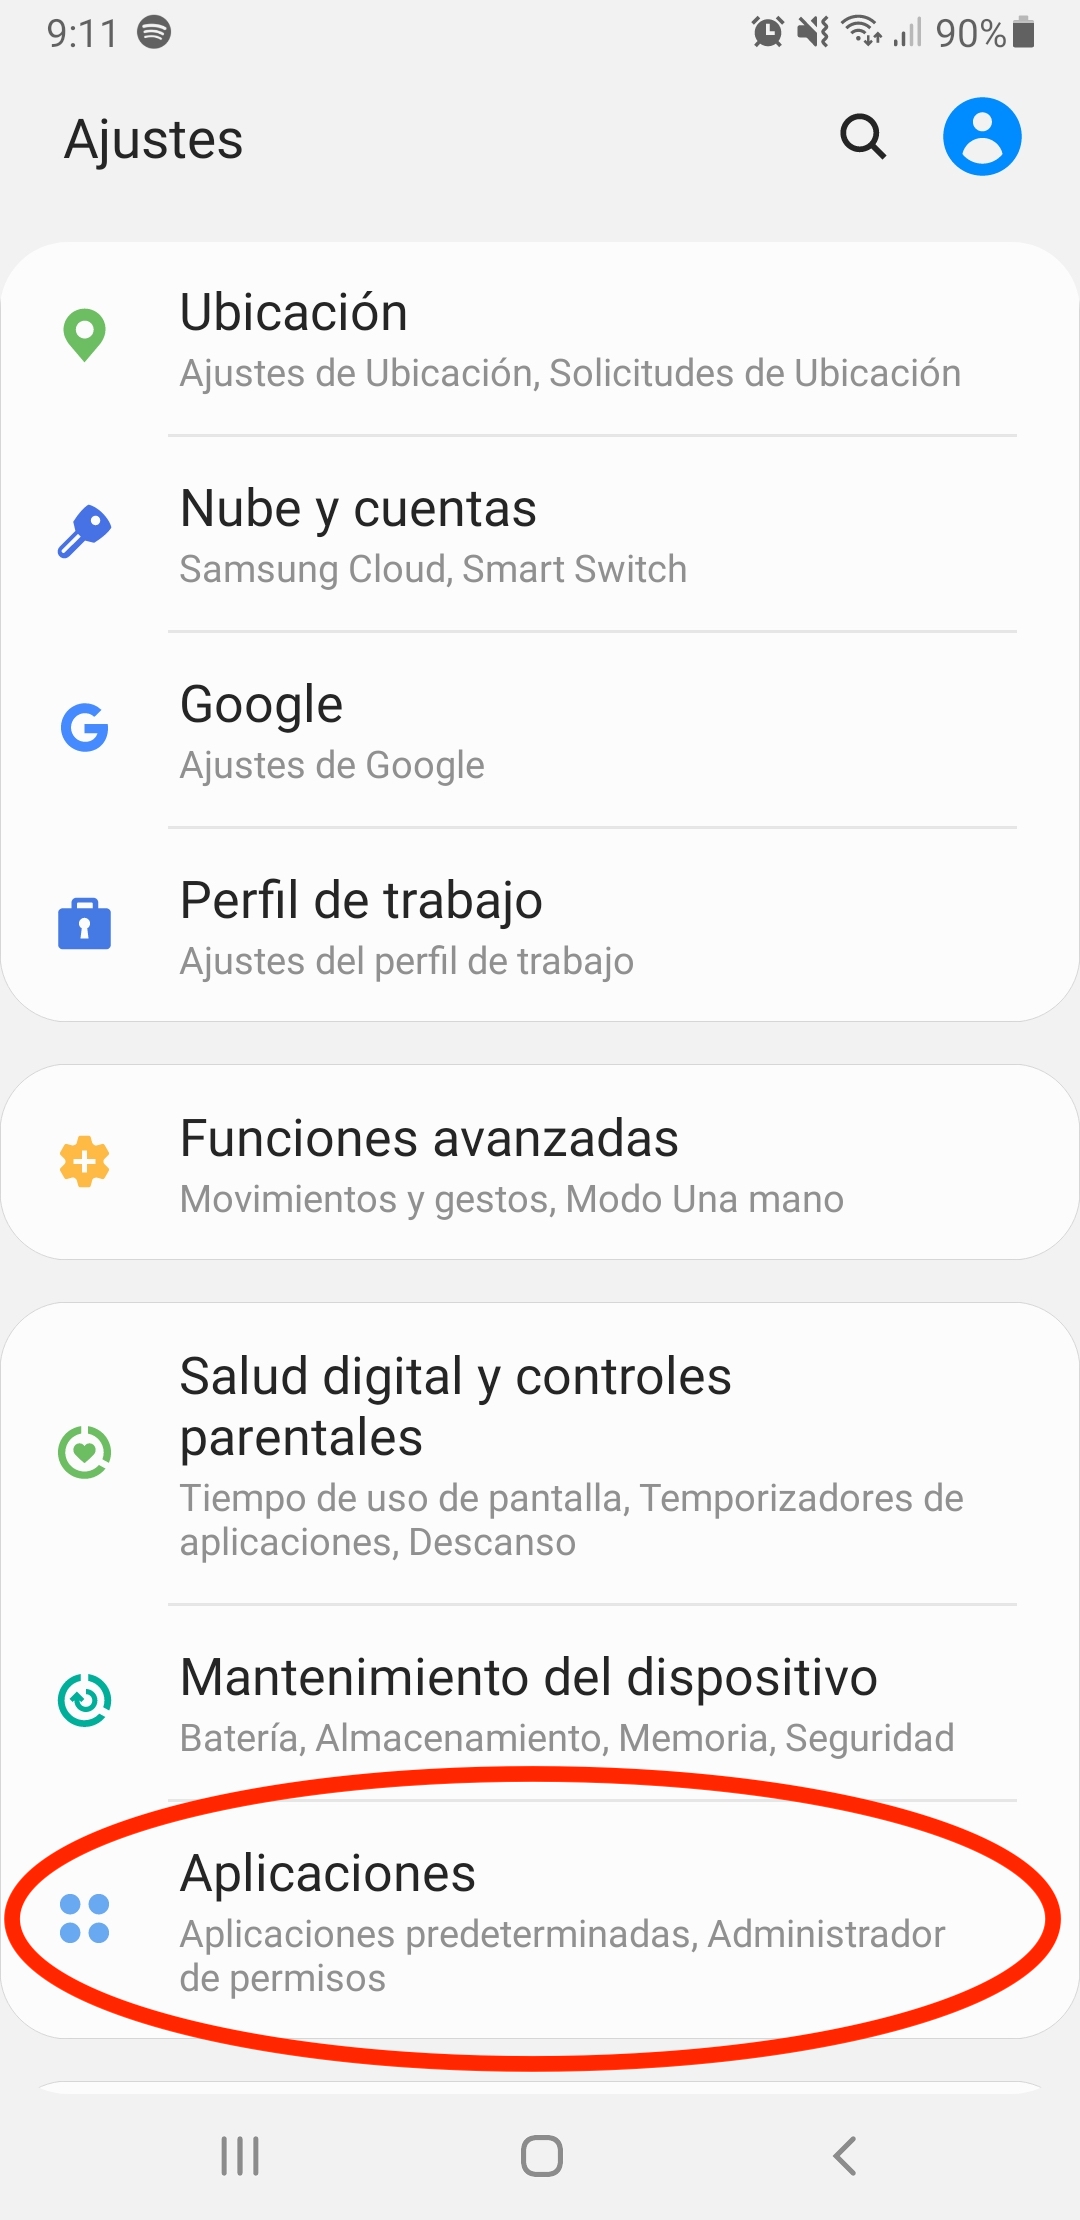
- Locate the app in question and access its details.
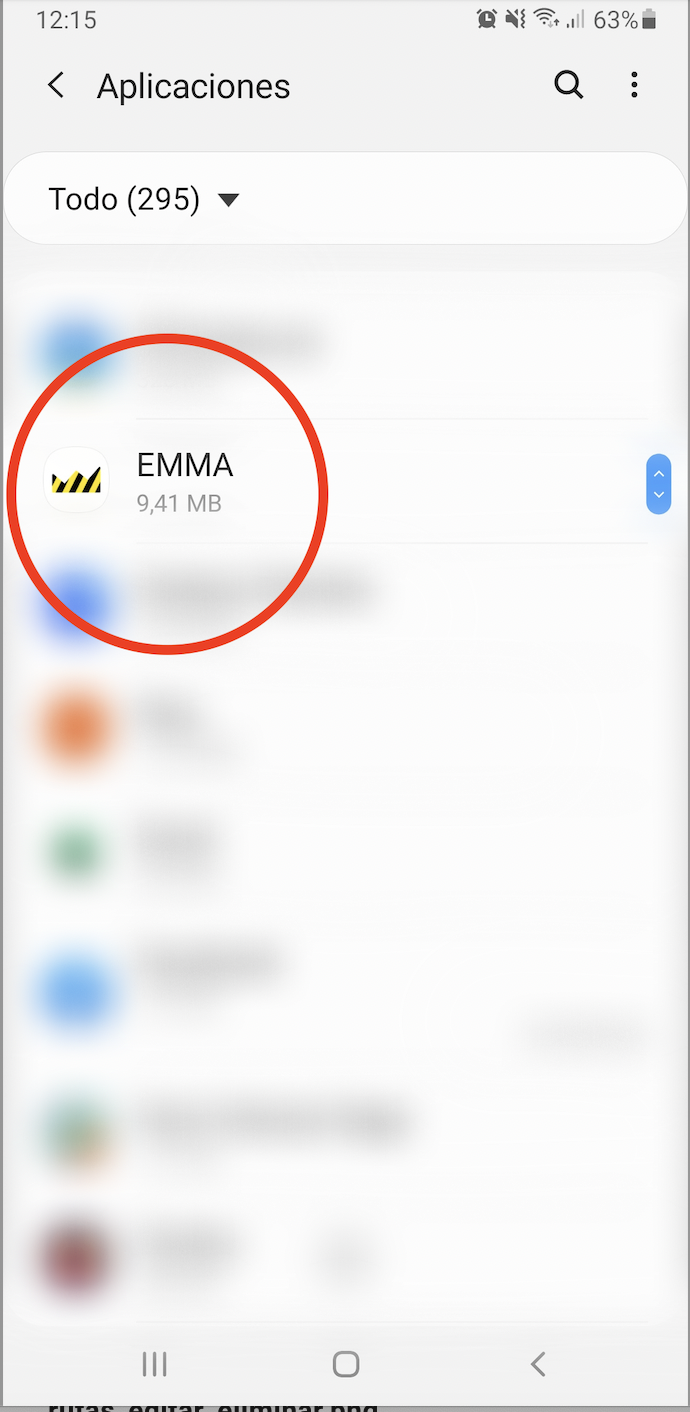
- Click on the app to access its details.
- Go to the Notifications section and make sure they are enabled.
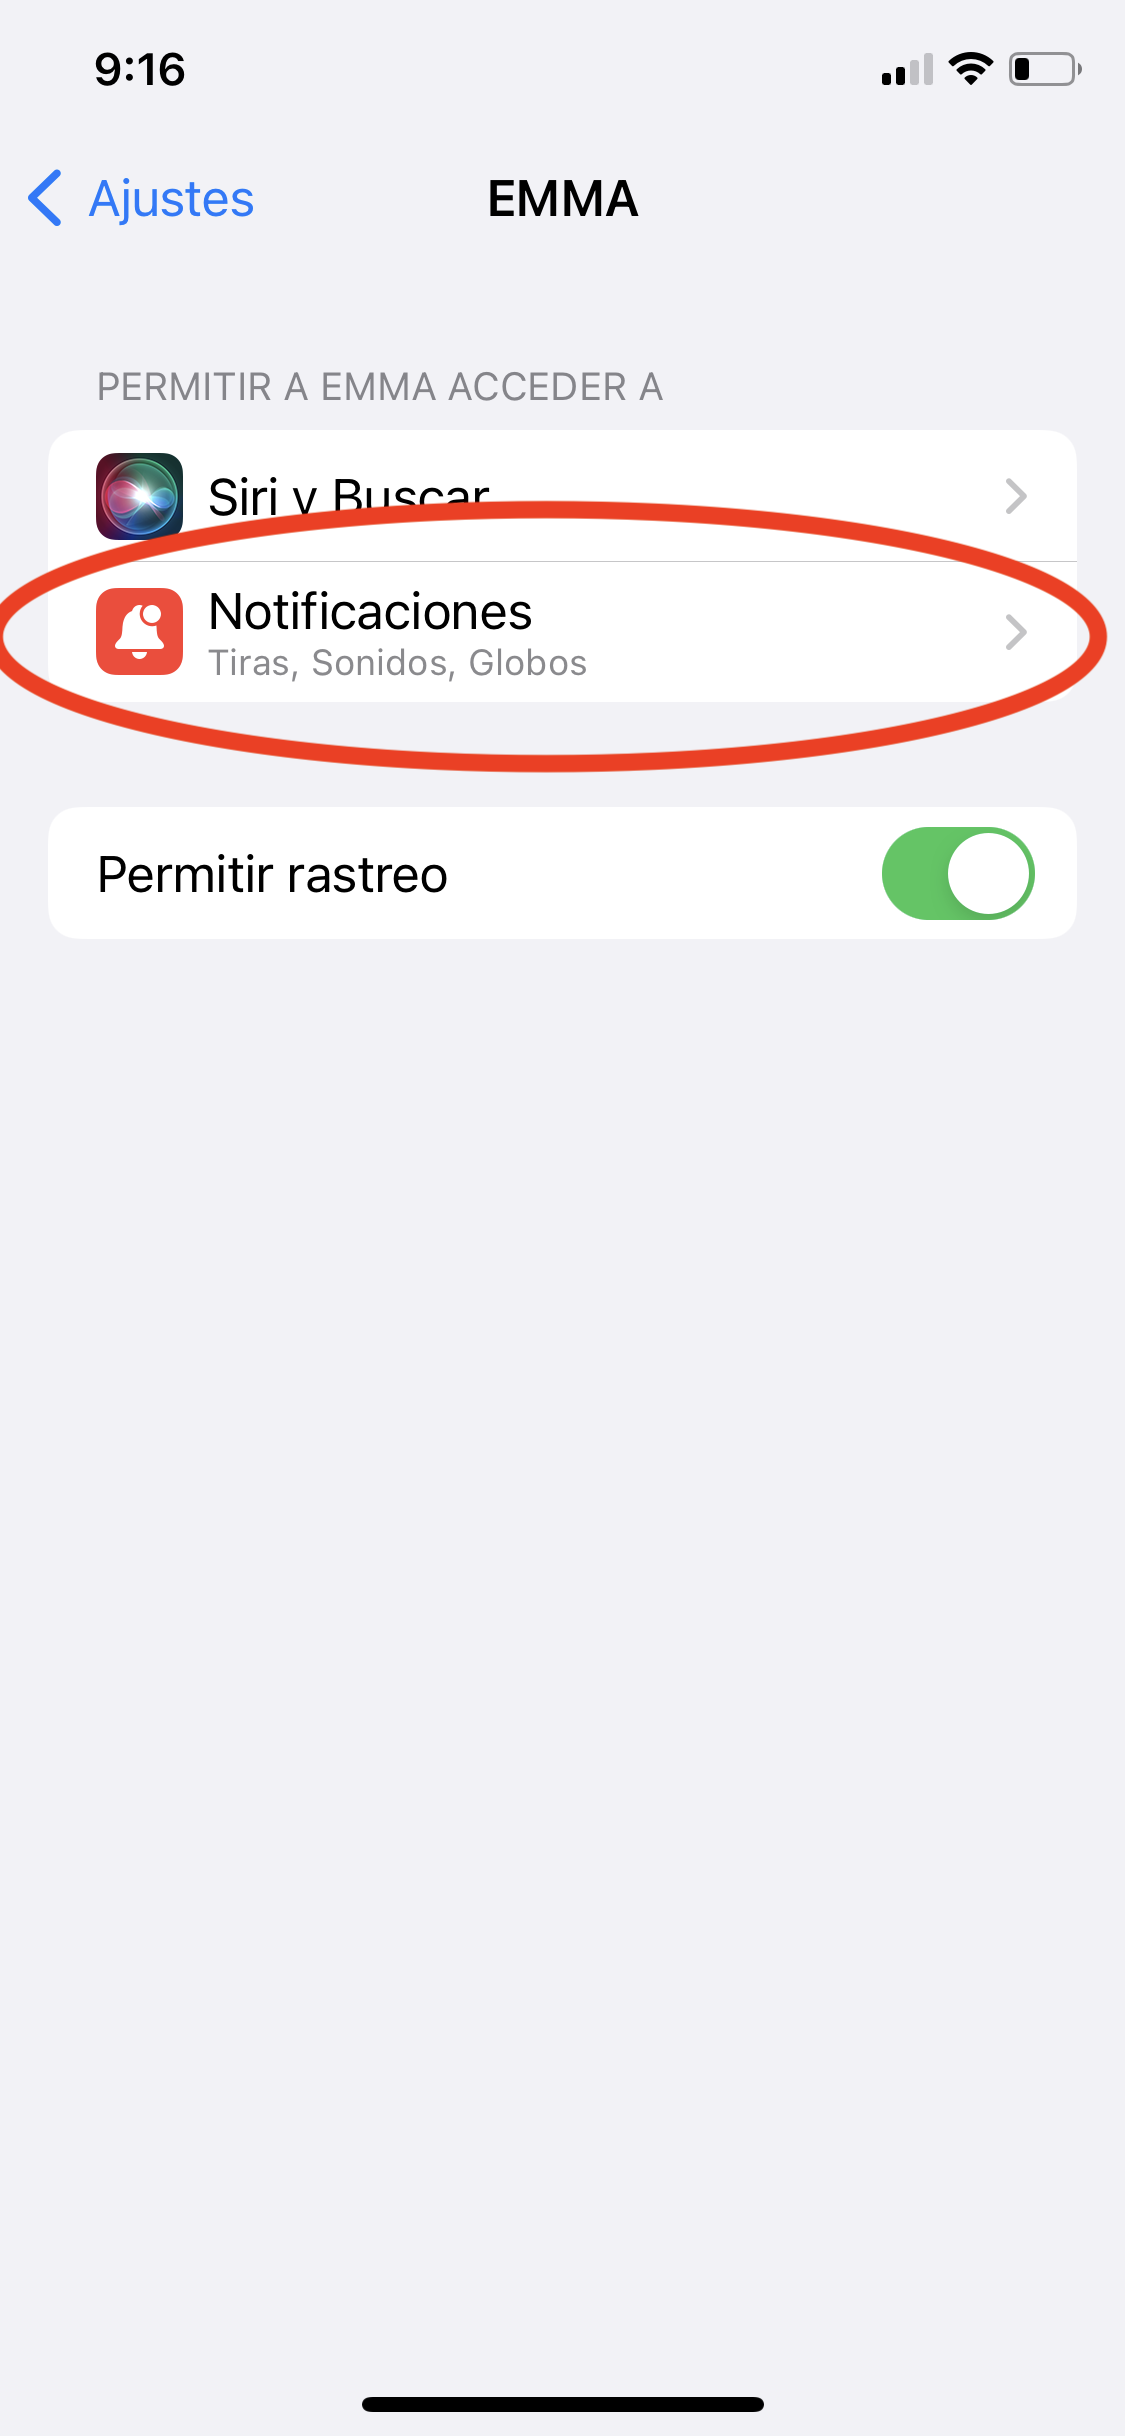
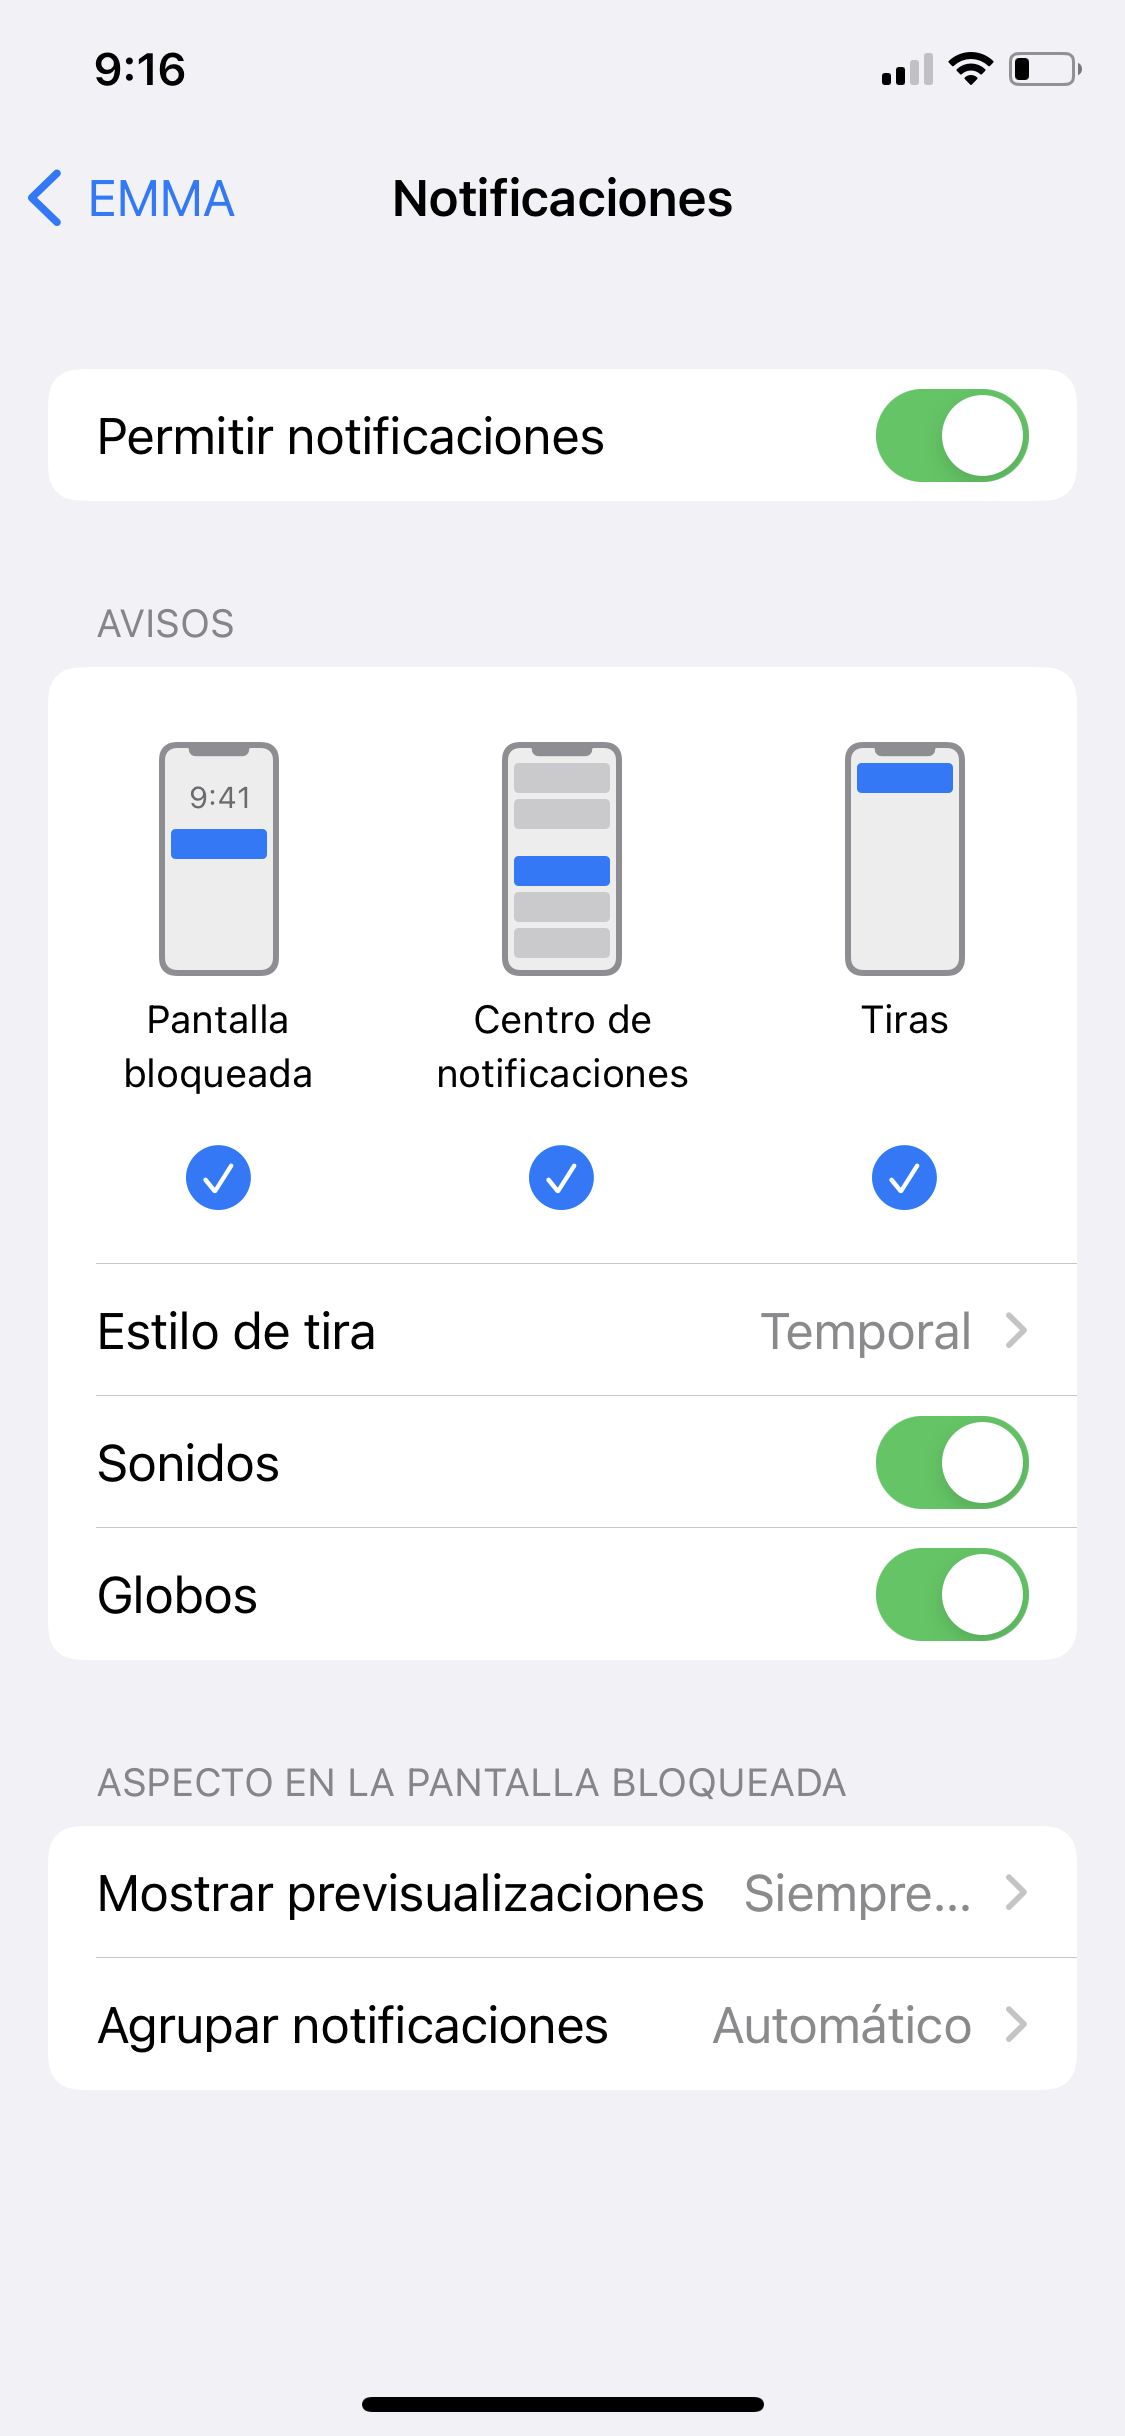
¶ iOS
On iOS, when the app is installed, a pop-up appears requesting permission to send push notifications. It is necessary to accept this permission for the device to receive notifications. If permission was not granted, the settings can be changed manually by following these steps:
- Go to the device settings.
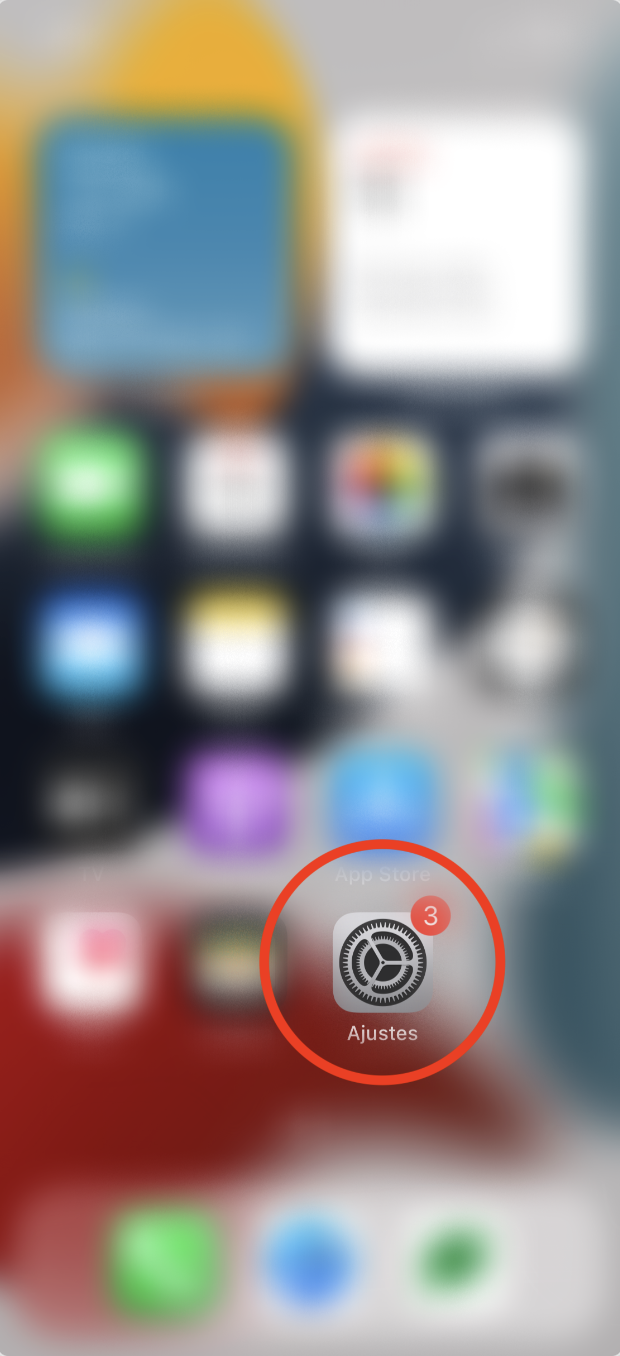
- Scroll down to find the list of installed applications.
- Select the app in question.
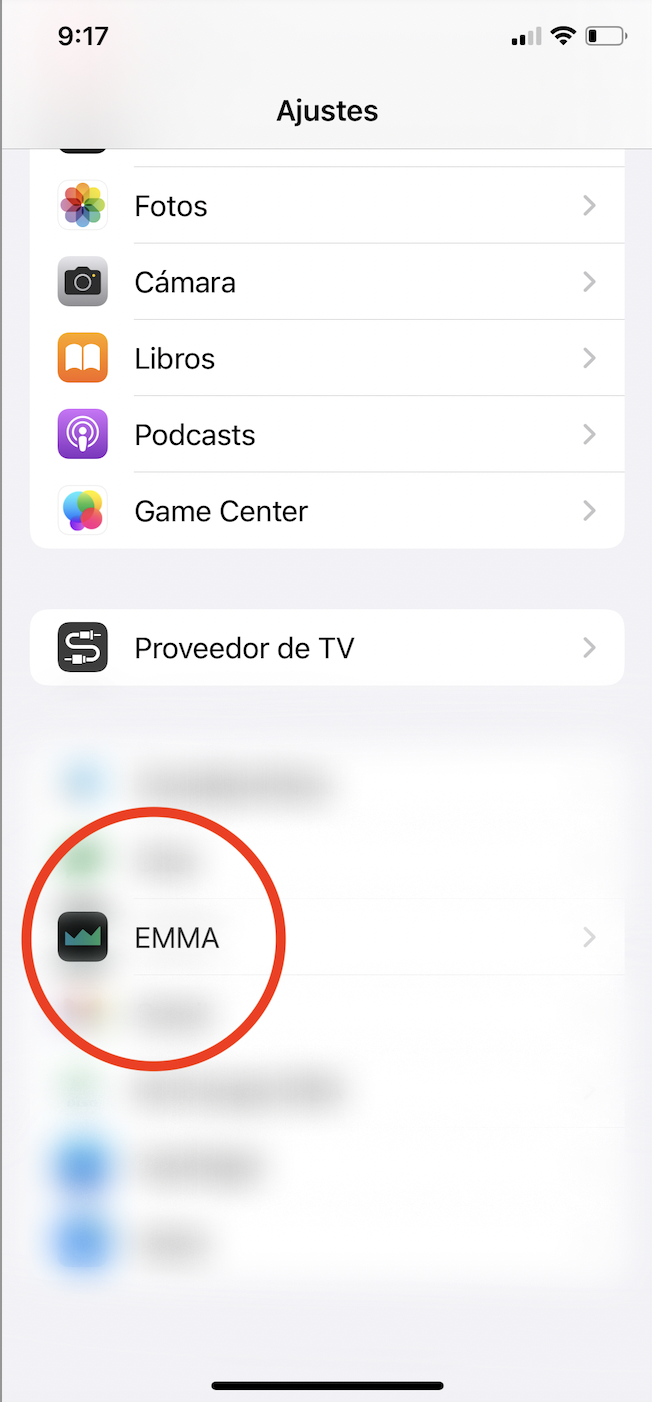
- Tap on the "Notifications" option.
- Enable the "Allow Notifications" toggle.
¶ Validate device status in EMMA
Once push notifications are enabled on the device, it is important to validate in EMMA the status of the devices that will be used to send test push notifications.
For push notifications to be sent from EMMA, the app must send a unique push identifier for each device, called a token. If this token is not sent to EMMA, the device will never appear in our system as active for push notifications, even if notifications have been enabled on the device itself.
To check if a device is registered in EMMA as active for push notifications, there are two options:
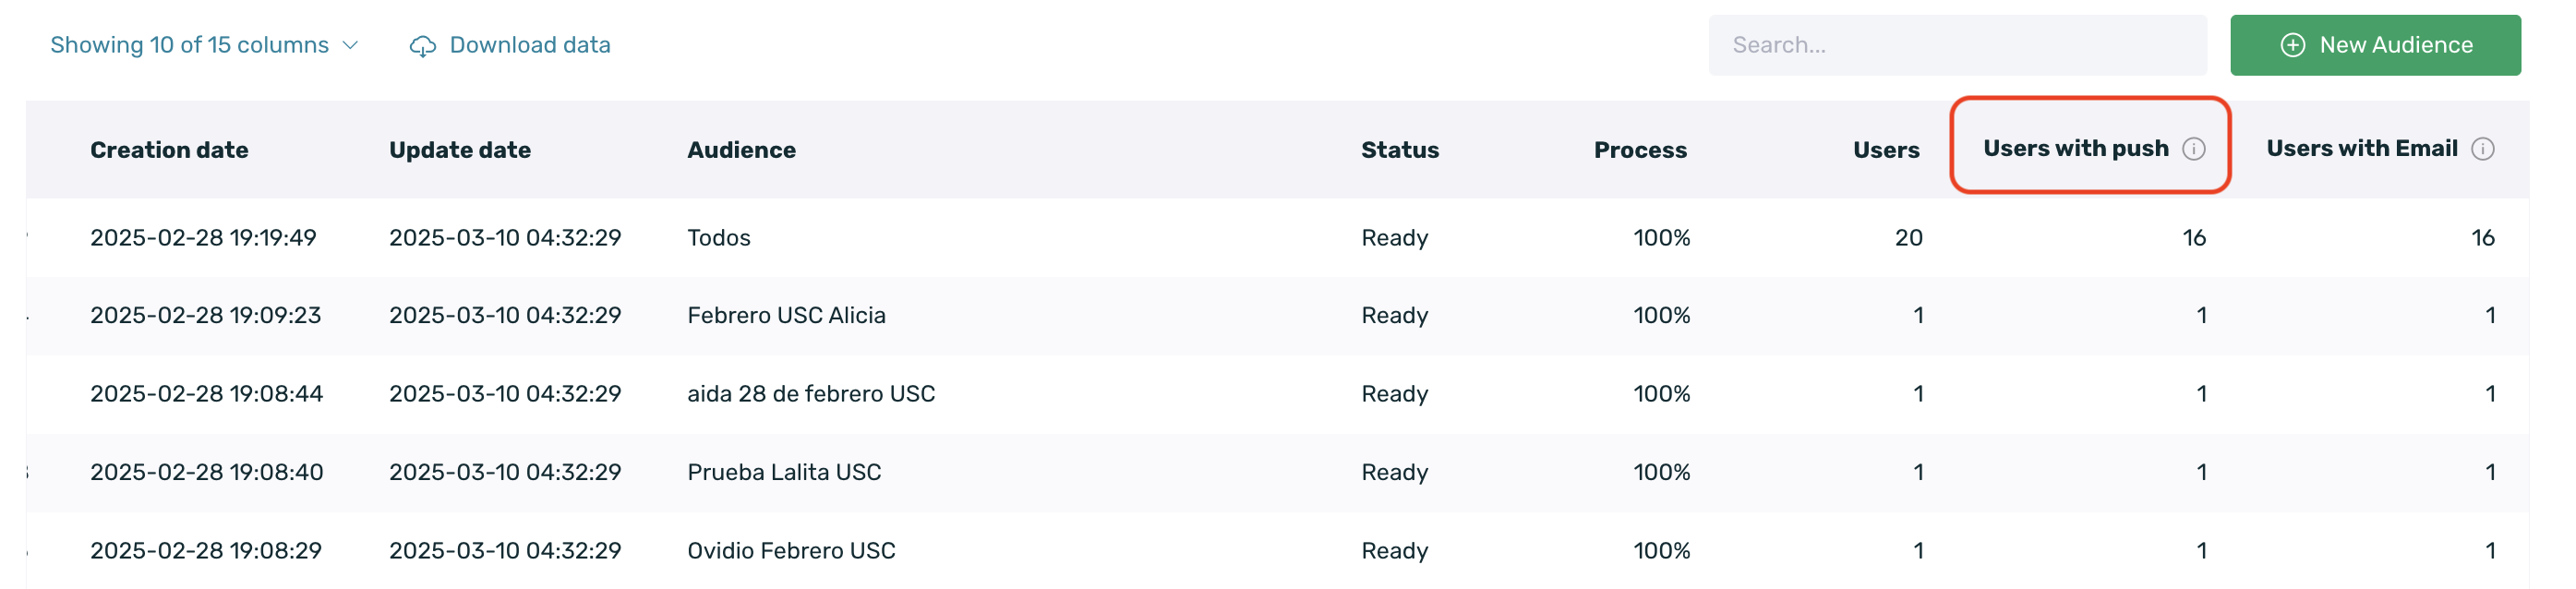
- Audiences: When creating an audience (Behavior > Audiences), you can enable a column called With Push in the audience table. This column shows how many of the total devices in the audience have push notifications enabled.
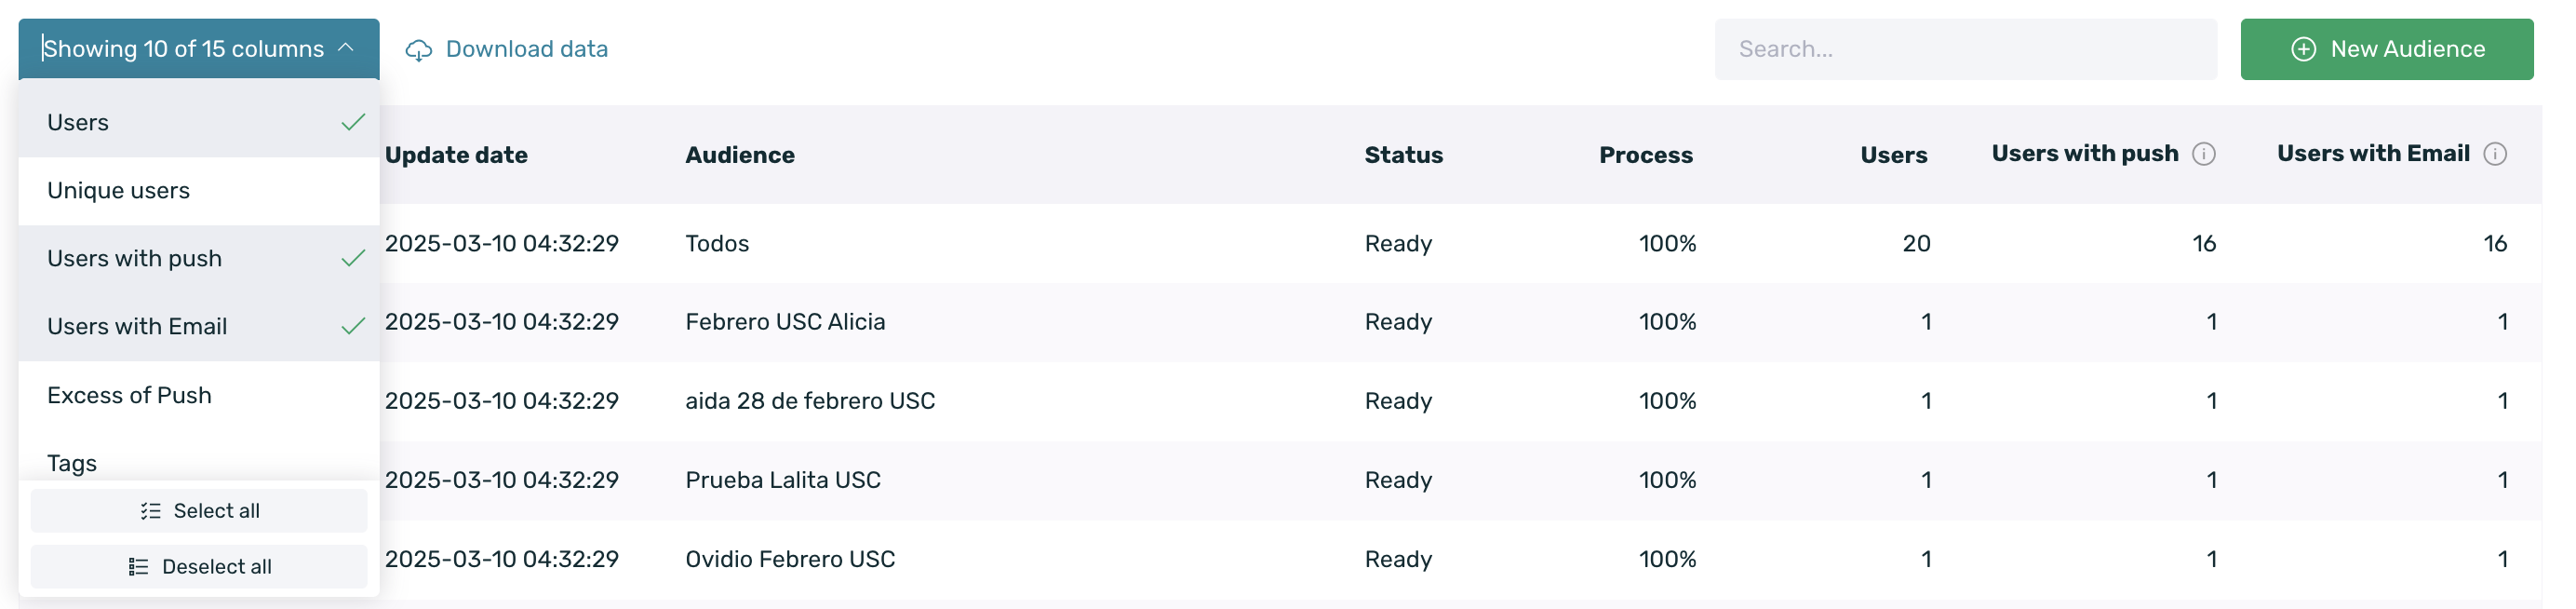
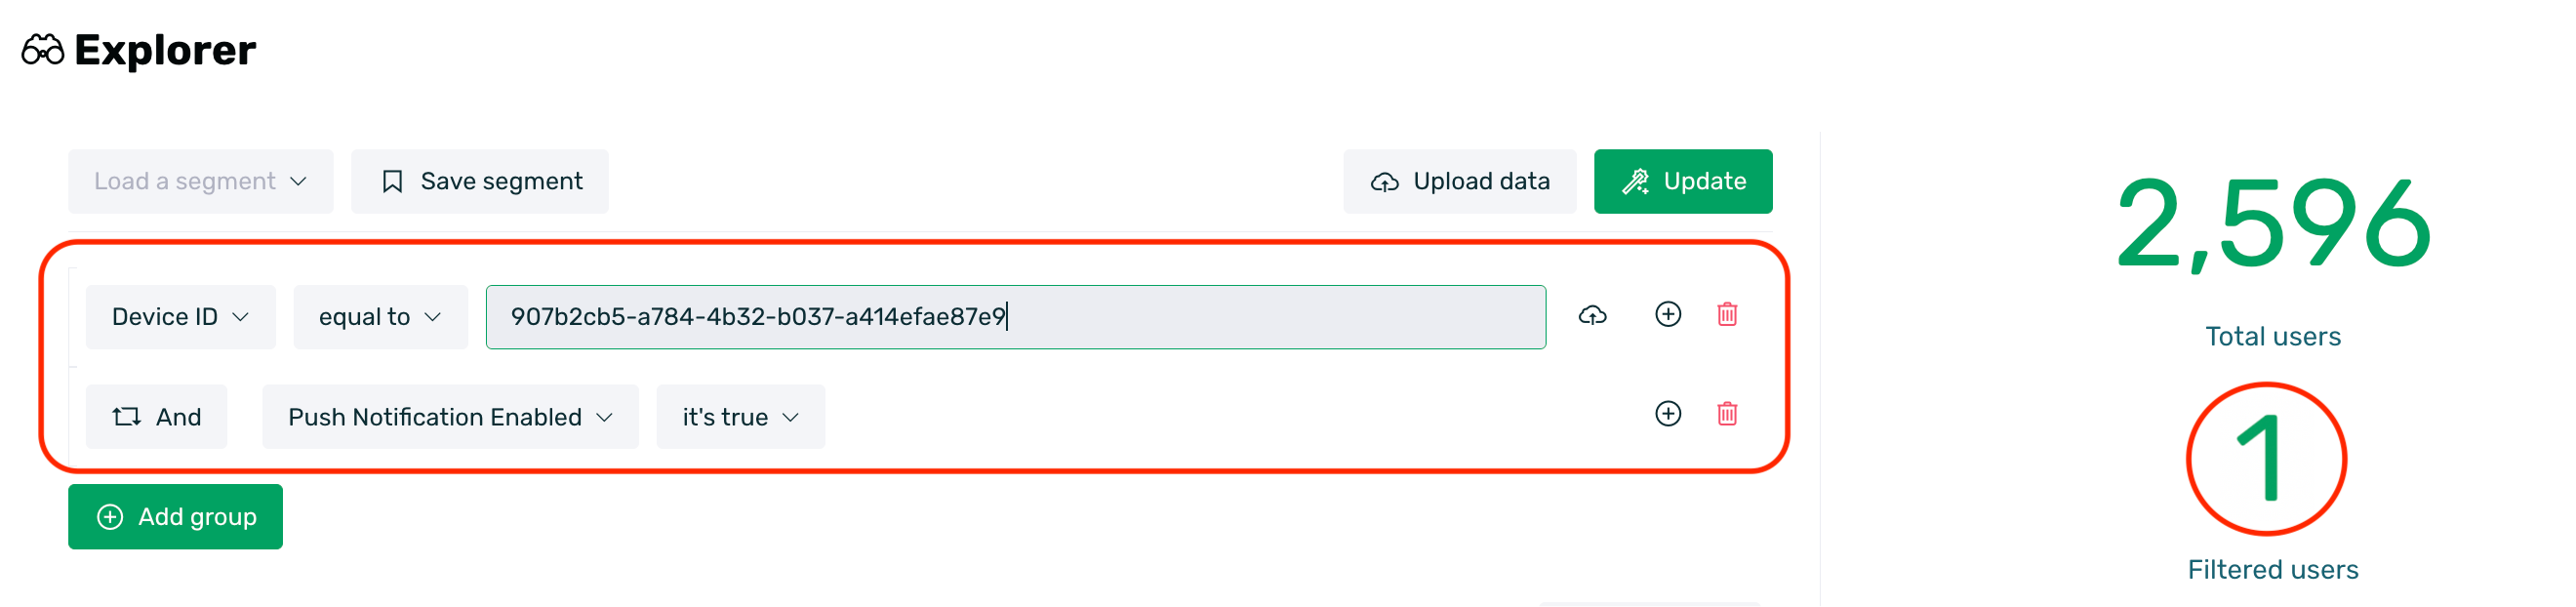
- Explorer/People: From Explorer, it is also possible to check through a simple segment whether a device has push notifications enabled or not.
To do this, we must create a segment with a unique identifier of the specific device (device ID, client ID, or any tag, as mentioned in point 1 of this guide) and add a specific filter for push notifications (Push Notification Enabled).
This will allow you to verify whether the device is active for push notifications in EMMA.
If you don’t know how to create segments in Explorer, you can find more information about it here.
If you are a developer, in the case of iOS, if you compile the app with cable, you must send an email to your contact in EMMA or to soporte@emma.io so that we can switch the app to development mode in EMMA. This is necessary because, by default, EMMA always uses production push certificates, meaning it is initially prepared for tests to be launched from Testflight or the store directly, and not from Sandbox. With this change, EMMA will know it needs to use development certificates, and the match of the compiled app’s token with the certificate uploaded to EMMA can be carried out.
¶ My device is marked as inactive for push
As mentioned earlier, in order to send push notifications with EMMA, it is necessary that the push token is being sent to EMMA from the app.
The first step is to ensure that push notifications are enabled on the mobile device (you can see more information about this here). If they are not enabled, we need to enable them and check the device status in EMMA again. It is recommended to wait about 15 minutes before performing the review again.
On the other hand, if push notifications are enabled on the device but EMMA says the device is not active, you need to contact the app developer to verify that the push token is being sent to EMMA.
If the push token is being sent correctly to EMMA, you should send an email to your EMMA contact or to soporte@emma.io so we can assist you.
Additionally, it is also important to check that the push configuration in the EMMA panel is correct for both Android and iOS.
¶ Create internal test audience
To create a closed test audience for push notifications, we need to create an audience in EMMA that targets only the devices we want. If you don't know how to create audiences, you can see more information here.
To create this audience, the first step is to identify the devices we want to target in the database. There are several options for this, but all involve using some unique identifier or value for each device.
For Android, you can use the device's advertising ID. In this guide, you can see how to locate this ID. For iOS, due to privacy changes made by Apple, it is not possible to access this identifier.
Alternatively, you can use client ID information or any tag sent to EMMA with unique information about each device, such as name, phone number, email, etc.
Once we know how to locate the devices in the database, we will create the audience by applying the relevant filter to locate those unique devices. For example, let's assume that to locate Android devices, we will use the advertising ID, and to locate iOS devices, we will use an internal client ID. The audience for targeting these devices would be:
Device ID is equal to afc94ed4-2987-47b1-9388-af760c0f4e17, e4062baf-b75e-4bc9-b38f-328910e484e9
OR
Client ID is equal to 393399939
If, for example, we are using the client ID to locate all devices, the audience would be:
Client ID is equal to 123456789, 111333555, 999567442
Be sure to include, separated by commas, all the client IDs you want to target with this communication.
¶ Frequently Asked Questions
- What does the message "You will impact 0 of X devices" mean?
When creating the push notification from Communication > Messages, in step 5: Confirmation, a warning message will appear showing how many users from the selected audience will be impacted by the push notification.

In the example from the screenshot, the selected audience is composed of 1 device, and that device will not be impacted by the push notification because push notifications are not enabled on the device.
Remember that NOT all users within an audience are valid for push notification delivery. Only those who have allowed push notifications will be.
If the device(s) in the audience have push notifications enabled, the message we will see will be the following:

In this case, the devices that make up the audience have push notifications enabled, and the push notification will be sent to them.
If your device does not have push notifications enabled, you must follow the steps in the section Allow push notifications on the device of this guide to enable them.
If you have confirmed that push notifications are enabled on the device, you must follow the steps detailed in the section My device is marked as inactive for push.