¶ Introduction
Thanks to EMMA's customer journeys, you can create automated communication flows with users based on their lifecycle within your app. This allows you to build different conversion flows and segment users depending on whether they perform specific key actions within the application to reach the established target events.
With EMMA’s customer journeys, you can not only create flows based on the user lifecycle but also communicate with them in the most appropriate way, considering their status at any given moment. You can leverage all EMMA’s communication tools, including both In-App and Out-App communications (StartView, NativeAd, AdBall, Push, Email, etc.).
¶ Components of Customer Journeys
Customer journeys are made up of different blocks that allow us to properly build communication flows with app users. The blocks that make up the journeys are:
- Entry Sources
- Actions
- Flow Control
- Settings
¶ Entry Sources
In this block, you can choose between two options to determine how the journey will start. This means specifying which users will enter the specific journey.
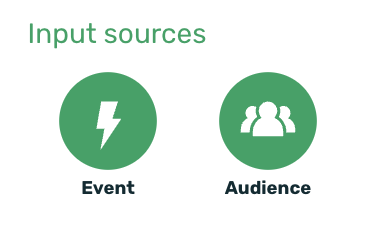
- Event > Specify the exact event that users must perform to enter the journey.
- Audience > Select users from the list who should enter the journey by choosing a pre-created audience. If you don't have an existing audience, you can create one directly using the + Create new audience button. Learn more about audiences and how to create them here. If you have selected an external audience for your journey, an input field will appear with two options to determine what happens to users sent to the external audience:
- If the user is in the journey, they return to the initial step: If a user already in the journey is sent to the audience, they will return to the start and go through the flow again. All the sent information will be reprocessed.
- If the user is in the journey, they stay in their current step: If a user already in the journey is sent to the audience, they remain at their current step and continue through the rest of the journey as usual. In this case, the second time the user is sent via API, they are discarded along with all the sent information.

If a journey has an external audience as its entry source, users will enter the journey in real time.
¶ Actions
Within the Actions block, you will select the type of communication to be sent to users. There are three options to choose from:
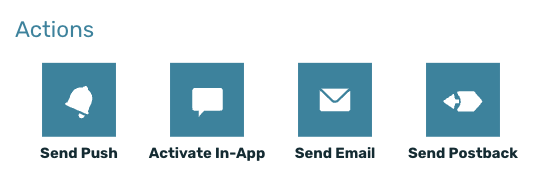
- Send push: Selecting this option will send a push notification to users, the one selected at the moment of adding this action to the flow.
- Activate In-App: Selecting this option will activate an In-App communication that will be available for users to view at the appropriate moment. The specific communication is selected when adding this action to the flow. Any communicative format available in EMMA can be used for customer routes.
- Send email: Selecting this option will send an email to users at the right moment in the flow. The specific email is selected when adding this option to the flow.
- Send postback: Allows sending postbacks to a third-party system. Originally designed to be configured after a communication (In-App or Push), but it can also be configured at another point. EMMA allows sending two types of postbacks:
- HTTPS: Allows sending postbacks to third parties using the HTTPS protocol.
- Adobe integration: Allows sending postbacks to Adobe. To use this type of postback, an integration with Adobe must be set up.
¶ Postbacks HTTPS
To configure an HTTPS postback, you simply need to complete the steps in the configuration form.
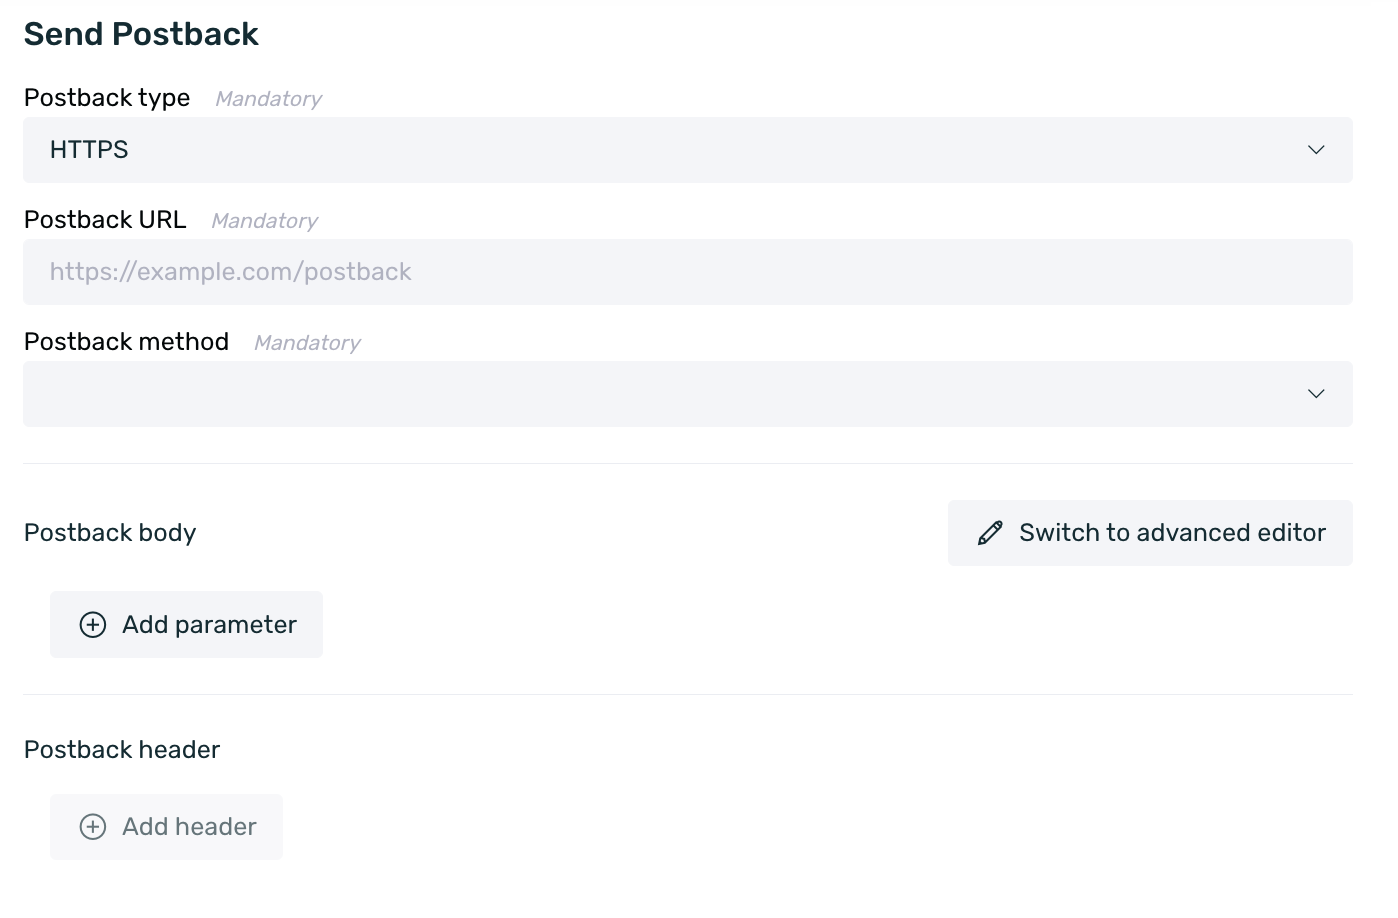
- Postback Type: Select HTTPS.
- Postback URL: Set the URL (without parameters) to which the postback notification will be sent. For example: https://emma.io:postbacks/routes.
- Postback Method: Select the method through which the postback will be sent, choosing one of the following options:
- GET
- POST
- PUT
- DELETE
- PATCH
If you're unsure which postback method to choose, you should contact the system receiving the postback to confirm which method should be used.
-
Postback Body: Set the parameter you want to send in the postback and define the value that should be linked to that parameter. Example parameters include:
- customerId: The customer ID linked to the device that performed the action in the database.
- campaignId: The campaign ID with which the user interacted.
- campaignType: The type of campaign interacted with. Options include push, email, adball, banner, coupon, native ad, prisma, startview, or strip.
- journeyId: The customer journey ID in which the postback was executed.
- unixTime: The current time in Unix format.
- isoDate: The current date in ISO format.
- uuidV4: A random identifier.
- Custom Values: You can configure a custom fixed value, for example, 3.
-
Postback Header: You can configure the value of the postback headers with a specific fixed value. The headers that can be configured are:
- Authorization
- Content-Type
- X-Requested-With
¶ Postbacks Adobe Integration
To configure a postback for Adobe Integration, simply fill in the fields specified when the integration with Adobe was set up. For example:
- InteractionResult: This field establishes the value of the interaction. For instance, if a push notification was opened or not, you could set the value to "yes" or "no" accordingly.
- InteractionType: This field establishes the type of interaction carried out. In the case of a push notification, the interaction type would be "open," while for an in-app message, it could be "impression" or "click."
For example, if you’re sending a postback after an in-app communication, the InteractionType could be impression and the InteractionResult could be yes if the impression was made, or no if not.
- For a postback after a push notification, the InteractionType would be open and the InteractionResult could be yes if the notification was opened, or no if it was not opened.
¶ Flow Control
Within the Flow Control block, you have several options available to manage the user's flow based on your specific needs for each case. This allows you to set up the following flow controls:
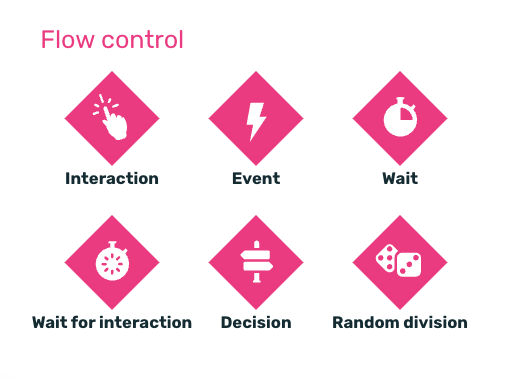
- Interaction: It is used immediately after an action (sending a push, email, or In-App) to be able to control whether users have interacted with that communication or not.
In the case of adding the interaction after an email or a push notification, the action that can be checked is whether it has been opened.
In the case of an In-App communication, it can be checked whether it has been viewed (impression) or whether it has been interacted with (click) with the specific communication.
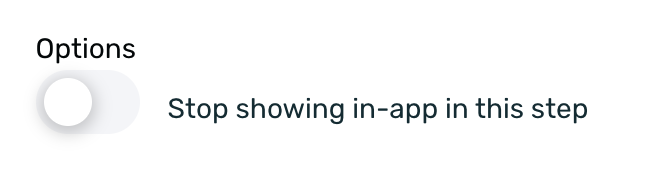
When adding an interaction after an In-App communication, we will have the option for the communication to stop being displayed once it reaches this point in the flow. If we enable this option, the communication will no longer be shown to all users at this step, regardless of whether they have performed the defined interaction (click, impression, or open).
-
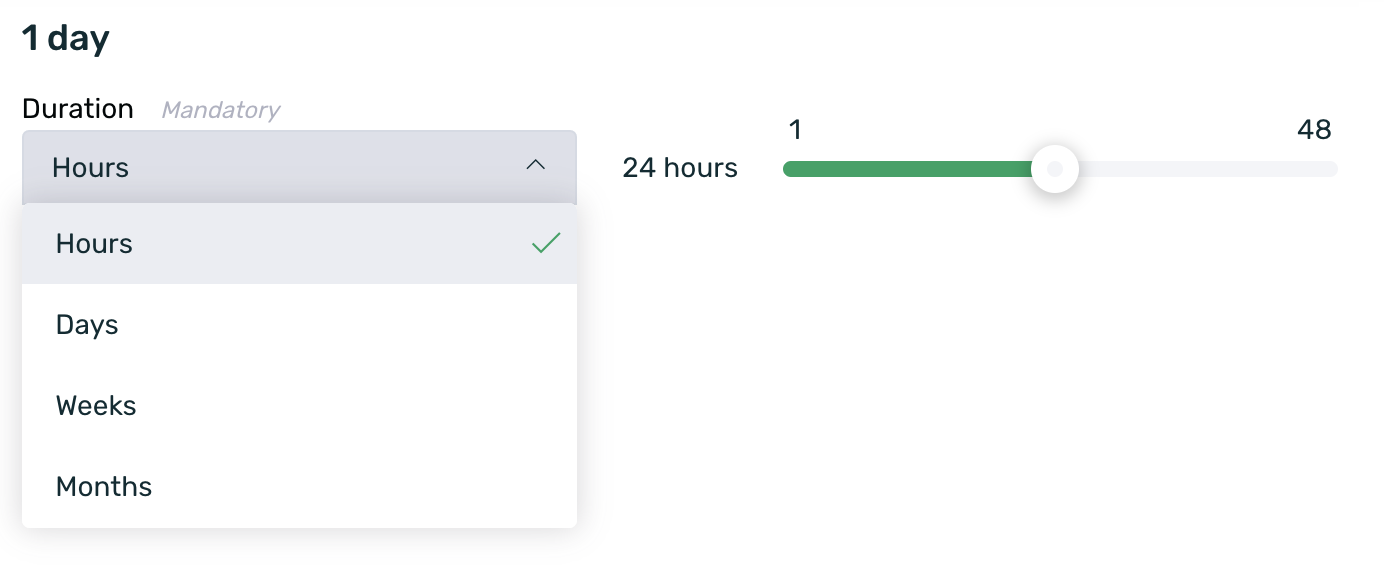
Wait: This allows us to add a delay between actions or flow controls to meet the required action timing in each case. The wait time can range from hours to months, depending on what is necessary and suitable for each specific case. The available options are:
- Hours: from 1 to 48
- Days: from 1 to 90
- Weeks: from 1 to 18
- Months: from 1 to 36
-
Random division: Adding a random division allows us to divide the audience reaching this step so that some users follow one communication flow while others follow a different one, completely randomly.
-
Event: By adding an event-based flow control, we can check whether, at a specific point in the journey, users have performed a key event within our app or not. This event control simply verifies whether the user has completed the event once inside the journey—it does not track when, how many times, or how long ago it happened.
-
Decision: By adding a decision, the communication flow can be structured based on specific user criteria, such as whether a user tag contains certain information or if the operating system attribute is a specific value (e.g., iOS). This flow control allows us to filter users and direct them through different communication flows depending on the information stored in their user tags.
-
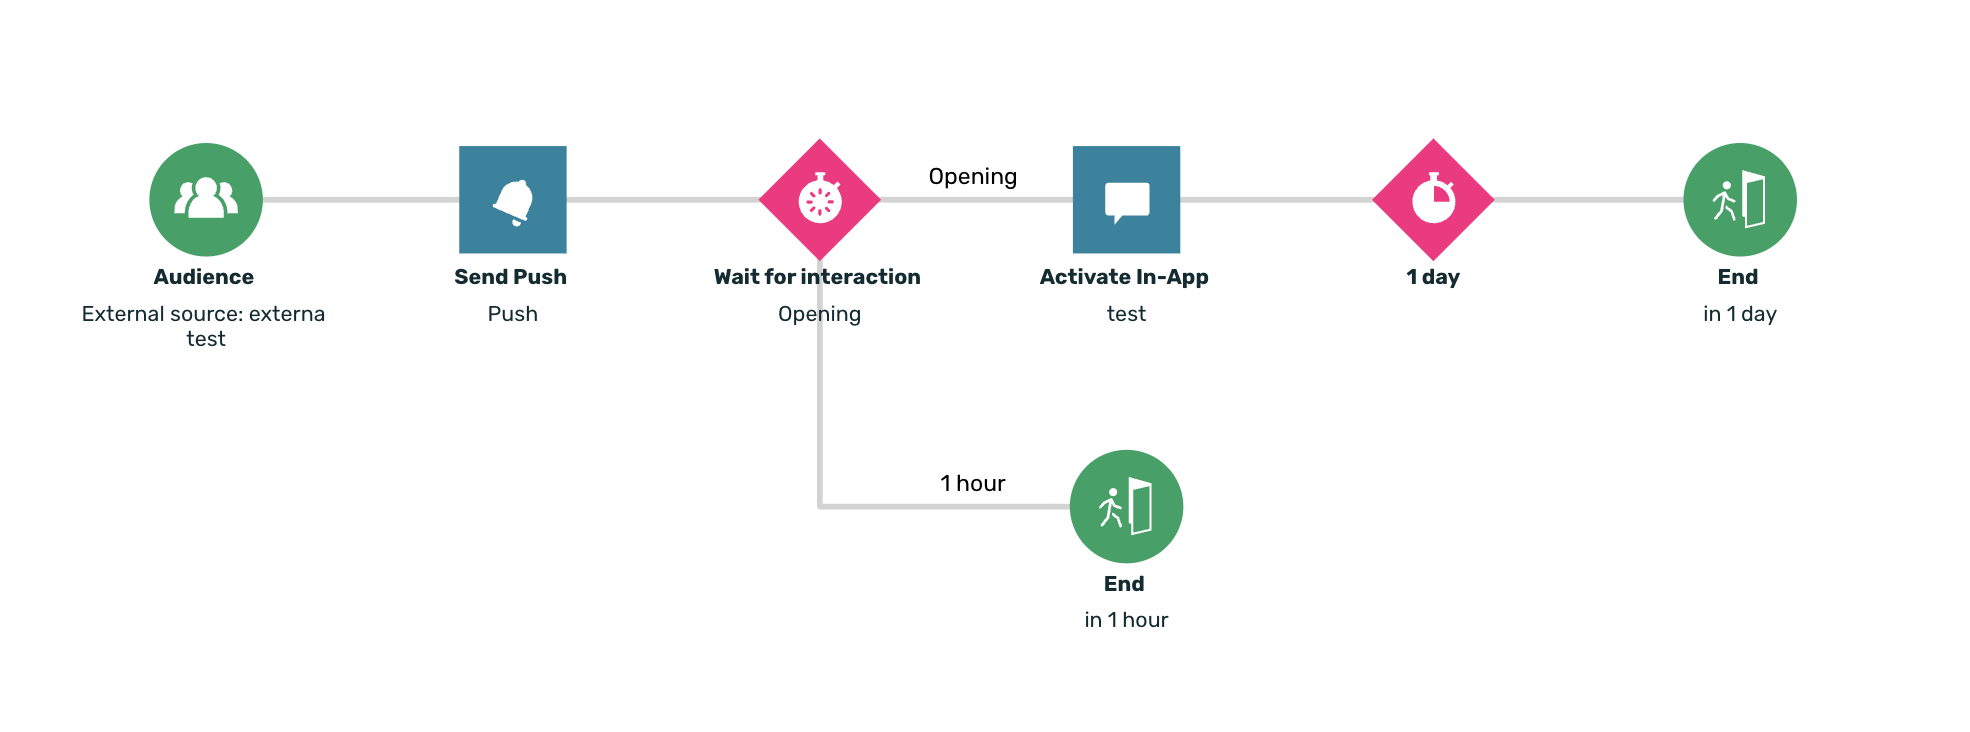
Wait for Interaction: This option is used immediately after an action (sending a push notification, email, or in-app message) and allows setting up a direct flow based on user interaction with the communication. It enables checking whether the user has interacted with the message within the maximum configured time.
The maximum wait time can be set from 1 hour up to 36 months.
If Wait for Interaction follows a push notification or email, it will check whether the user has opened the message. If Wait for Interaction follows an in-app message, it will check whether the message has been viewed (impression) or clicked (interaction).

EXAMPLE
If a Wait for Interaction is added after a push with a maximum wait time of 1 hour, if the user opens the push before the established wait time ends, they will immediately proceed through the flow.
If they do not open it within the established wait time, once this time has elapsed, they will follow the "no interaction occurred" path.
¶ Configurations
From the Configurations section in the upper block of communication management, you will be able to set a start date and an end date for the journey. This way, you can define the exact start and end of the journey.
That by default, journeys do not have a start and end date. Therefore, if you want to set one, you need to perform the specific configuration.
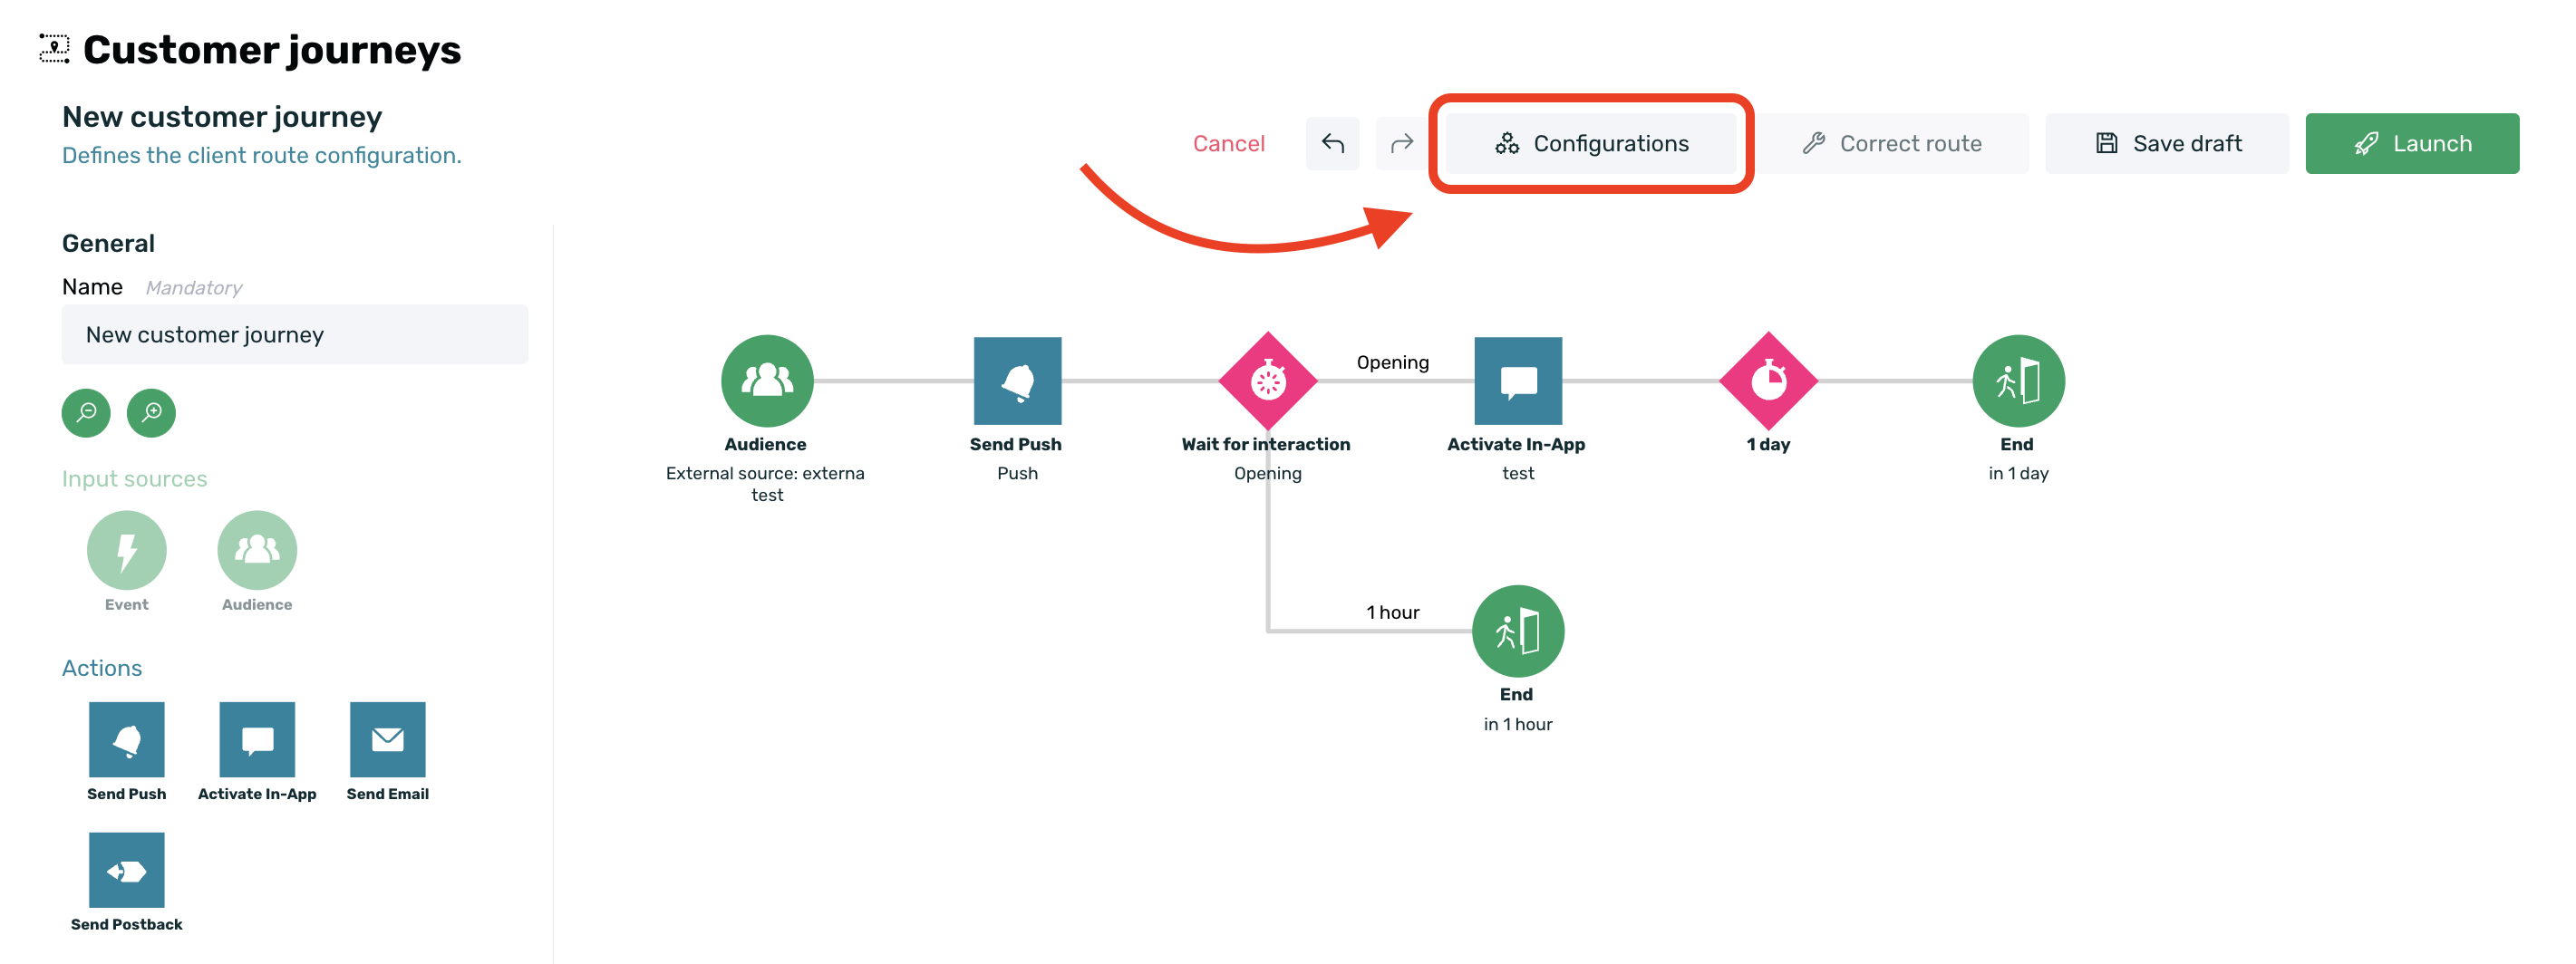
To configure a start and end date, simply click on the Configurations button, and a side window will open automatically.
To set a start date, you just need to activate the switch and select a start day and time.
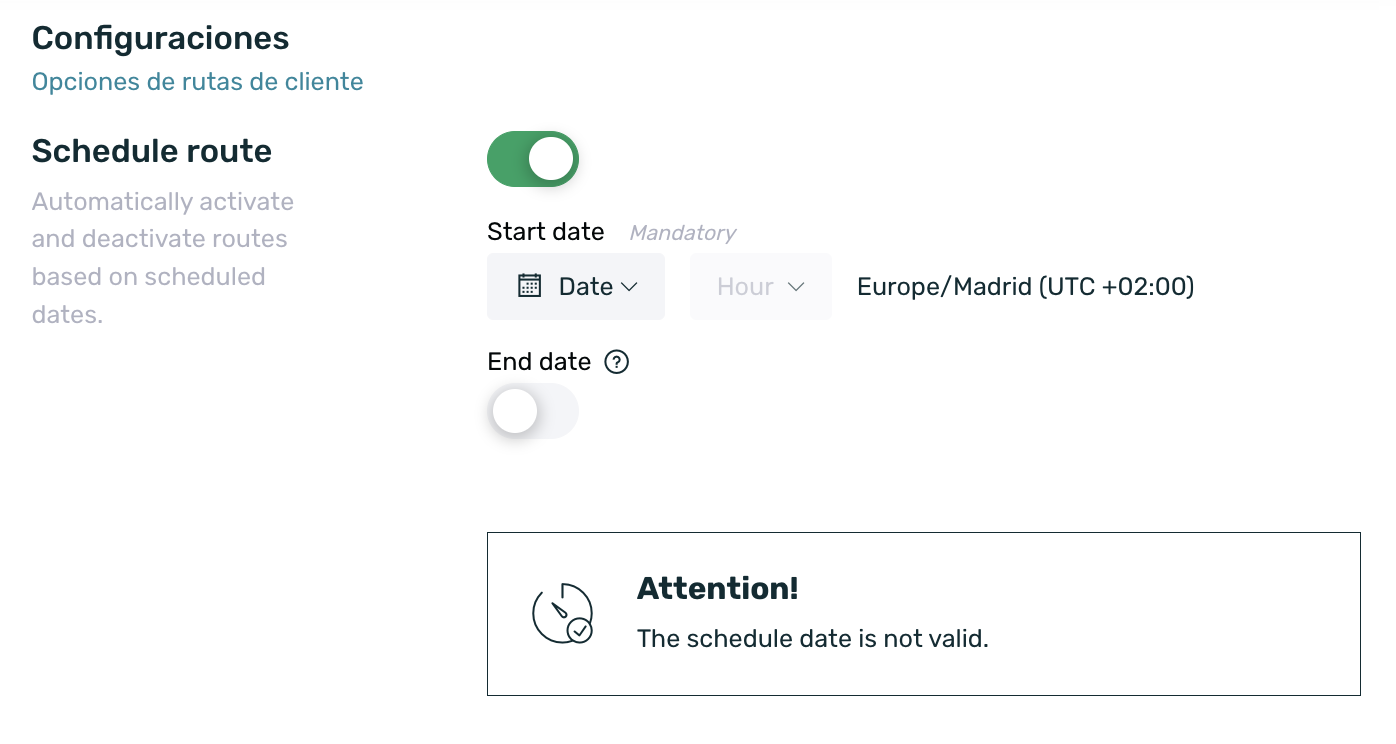
The journey can have a start date without an end date, which is the default configuration in EMMA. However, if you need to set an end date, simply activate the corresponding switch and, just like with the start date, select an end day and time.
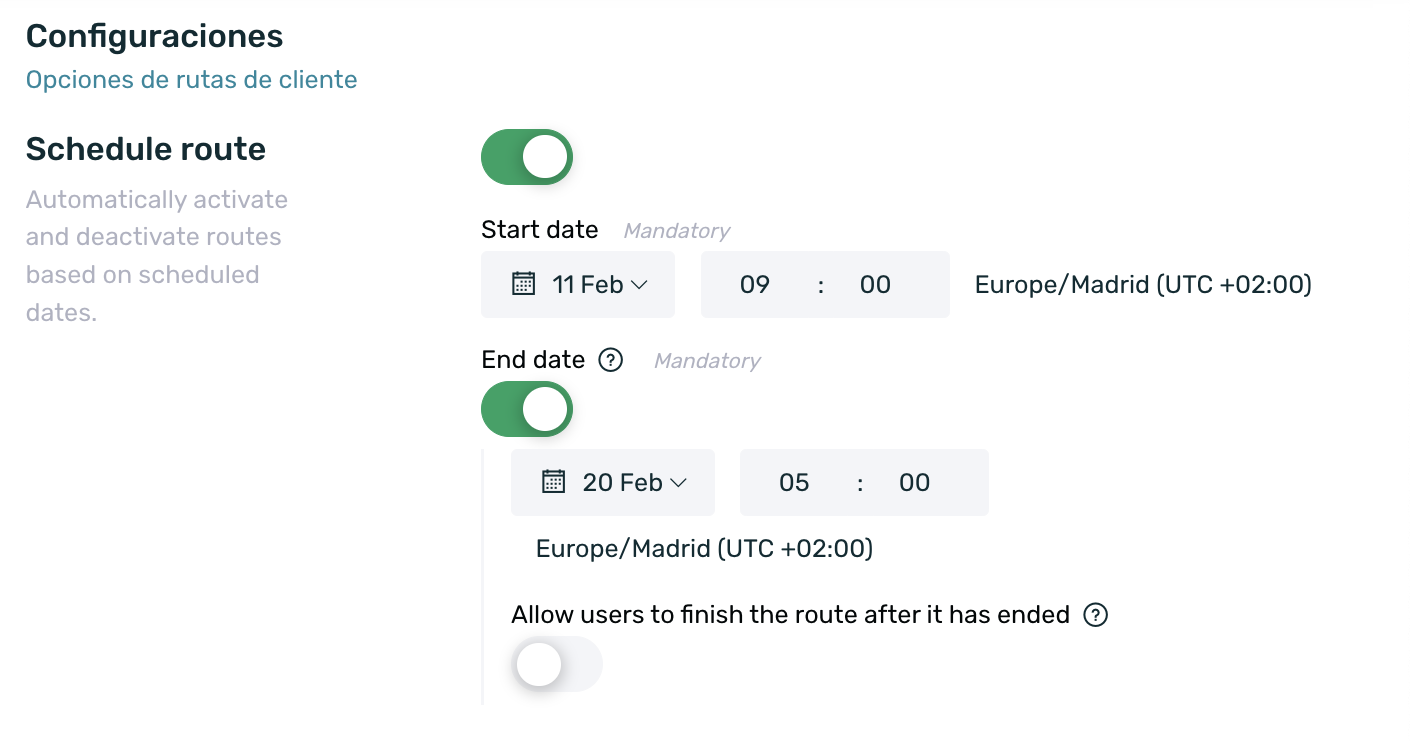
Additionally, with the Allow users to finish the journey after it has ended switch, we can determine the behavior of users who are still in the journey at the moment it ends.
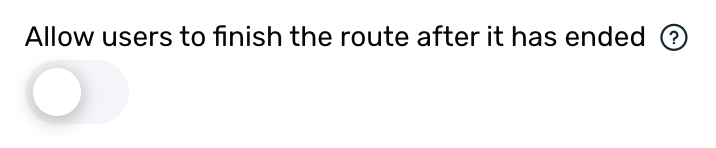
There are two possible behaviors:
-
Users who have not completed the journey before it ends will stay at the step they were on, without advancing through the journey. This is the default behavior with the switch turned off.
-
Users who have not completed the journey before it ends will be allowed to continue through the flow until they finish. This is the behavior with the switch turned on.
It is important to note that the end date only blocks access for new users to the journey. If we want to control the behavior of users who are already in the journey, we need to configure the desired behavior using the Allow users to finish the journey after it has ended switch.
¶ How to create communications for customer journeys
Creating communications for customer journeys is just as easy as creating other types of communications. You just need to make sure to select Automatic type for customer journeys when creating the communication. To learn more about how to create new communications, visit our guide on How to create a new communication.
¶ How to create customer journeys
Creating customer journeys is very simple. Once you have created all the communications you want to link to a journey, just go to Behavior > Customer Journeys (beta) and add a new journey.
To do this, simply click on the green button on the right side of the screen that says + New customer journey, and the creation form will open.
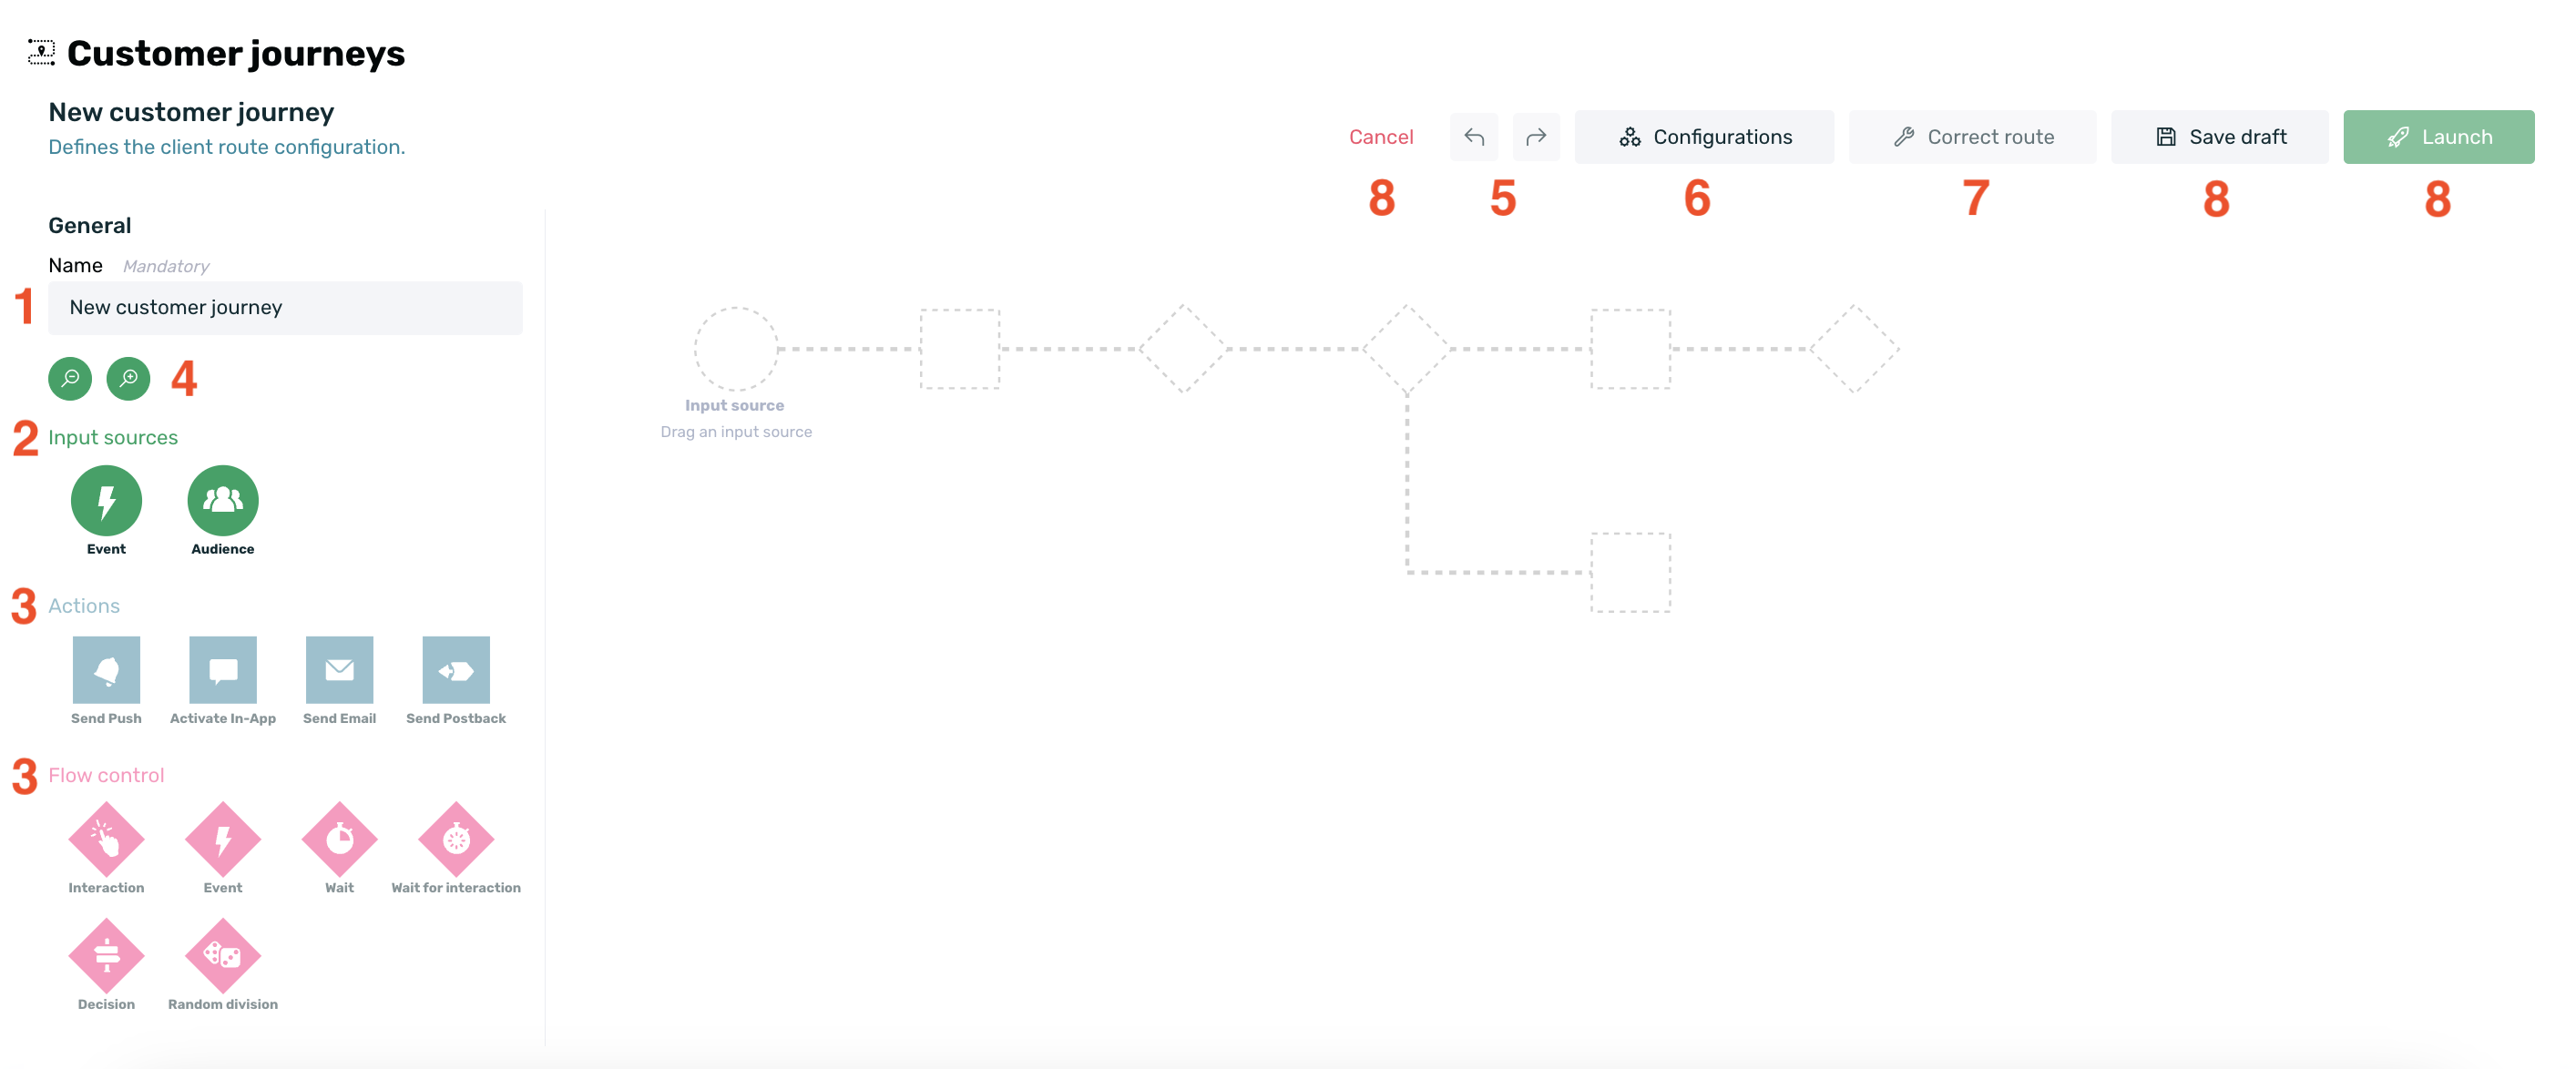
Let’s now go through each of the different fields and actions that can be performed when creating a new customer journey.
-
Name: Configure a name for the journey. If no name is set, it will default to "New Customer Journey." The system allows the use of an already existing name, so if you use an existing name, it will be your responsibility to later identify the journeys.
-
Input sources: After setting up a name, you need to define an input source, whether it's an event or an audience.
-
Actions and Flow control: Once we’ve added an input source, the "Actions and Flow Control" section will be unlocked, and we can add the necessary actions and flow controls to shape our journey.
-
Zoom in / Zoom out: There’s an option to zoom in or out on the journey to either view its details or get a global view when it’s a complex journey with many different flows.
-
Undo / Redo: Using the Undo/Redo buttons, we can undo the last action performed or redo it.
-
Configurations: Allows setting a start and/or end date for the journey. Clicking on it will open a side window where these parameters can be activated. Additionally, the switch "Allow users to finish the journey after it has ended" determines whether ongoing users can complete it or be stopped once the journey ends.
-
Correct route: If we create an incorrect flow, this button will be marked in red. Clicking on it will automatically correct the journey by adding any missing element(s) or removing the extra element(s).
-
Launch / Save as draft / Cancel: Once the journey has been created and configured, we can Cancel the journey, Save as Draft (allowing us to pre-create it to launch when needed), or Launch. With the launch option, our journey enters the activation process and users will begin accessing it.
¶ Edit, pause, delete, clone, and view customer journeys
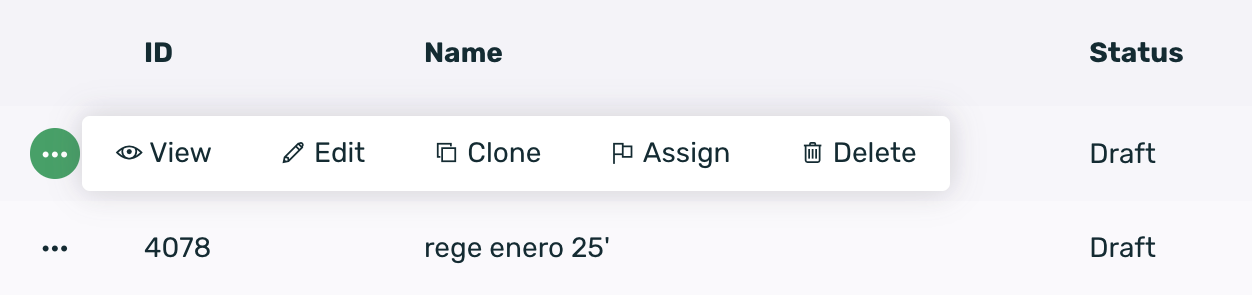
Once our customer journeys are created, we can perform various actions on them via the menu accessed through the “…” shown to the left of the summary table.
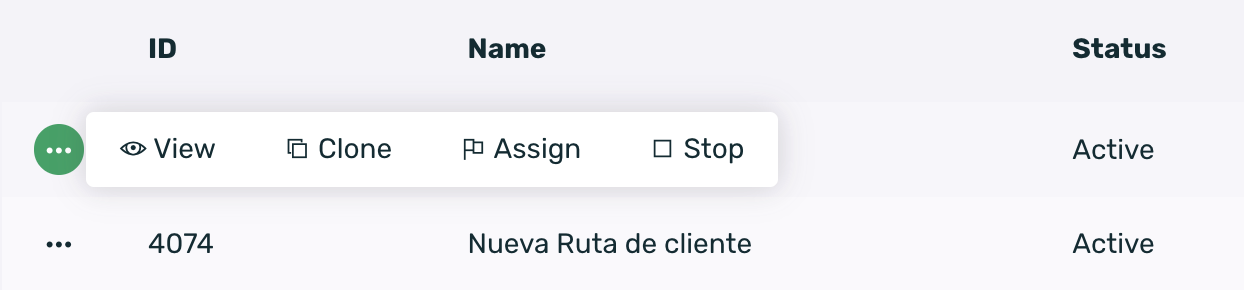
Once we have an active journey, the actions we can perform on it are:
-
View: With this action, we can preview the configuration of the journey and see the users at each step of the journey.
-
Clone: Cloning a journey will duplicate its entire configuration.
-
Assign: We can assign a new owner to the journey. By default, the owner is the user who created the journey in the platform.
-
Pause: If necessary, the journey can be paused. Once paused, its status will change from Active to Draft.
If we want to Edit or Delete a journey, we must first pause it before we can perform any of these actions. Once paused, two new options will appear in the menu:
-
Edit: This allows us to edit the journey and make any necessary modifications.
-
Delete: We can delete a journey that we no longer want to use. Deleted journeys only allow the actions of View and Clone.
¶ Reporting
In customer journeys, there are two types of reporting: one is specific to the performance of the journey itself, visible within the Customer Journey screen, and the other is for each of the communications within the journey, which can be accessed from the Communications > Communications Report section.
Customer journey reports are based on the "current" state of the journey.
When we pause a journey, it transitions to draft status and resets. At that point, it will have 0 audience users, and all reports (both the Customer Journey Report and the Communications Report) will no longer contain any data.
Therefore, if we pause a customer journey, we will lose all the reporting data up until that point.
¶ Customer journey reporting
In the customer journey reporting, we will see the following information:

-
ID: Internal ID of EMMA for each route.
-
Name: Name given to each route at the time of creation.
-
State: The state in which the route is currently. The possible states are:
- In Progress: A route will be in progress immediately after launching it for a few minutes (approximately 5) until it transitions to the Active state.
- Active: When a route is Active, it means it is ready for users to enter and follow the different communication flows created.
- Deleted: The route has been deleted.
- Draft: The route has been saved as a Draft and is not available to users.
-
Audience: Under the KPI audience, we can see all users currently at any step in the route. In other words, we will see users who are inside the route and those who have already exited. In the case of routes with a dynamic entry source, this data will update as new users enter the route.
-
Performance: Percentage of users out of the total audience who have completed the route.
-
Last Modification: The date when the last modification was made to the route.
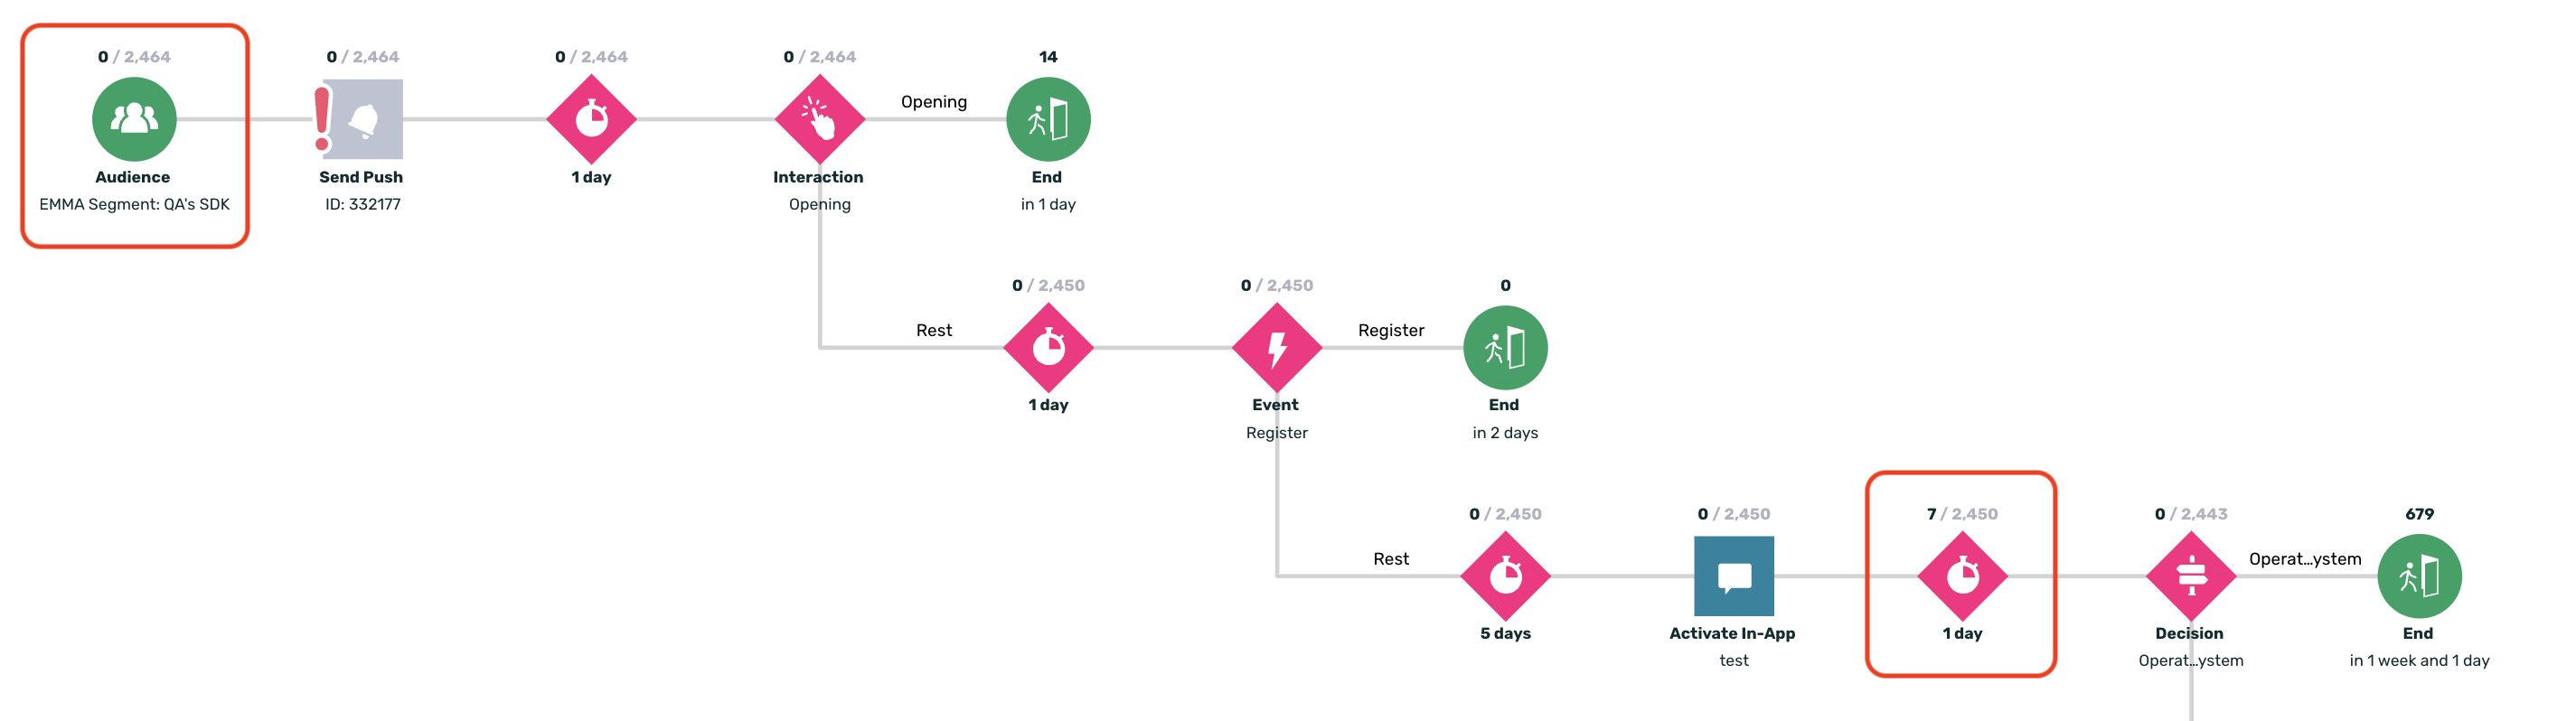
Additionally, if we click on the View option from the context menu inside the route, we will be able to see in detail how many users are currently at each step of the route and the total number of users who have passed through each of the steps.
The black number represents users currently at that specific step, and the gray number represents the total users who have passed through each of the steps that make up the route.
¶ Communication Report
Just like with other types of communications (classic or automated for rules), in the Communication > Communication Report section, you can view individual statistics for each communication used in different journeys. You will find data on impressions, unique impressions, clicks, events, and more.
Visit our Campaign reporting guide for more information on this topic.
¶ Frequently Asked Questions
-
Why can it take up to 1 hour for users to enter the route and move from one step to another?
To ensure the proper functioning of routes and prevent overloads and potential errors, EMMA's system calculates flows every hour. For this reason, the minimum wait time that can be set is 1 hour.
For example, if the route calculation runs on the hour, and one user enters the audience at 12:05 while another enters at 12:57, the second user will take longer to move to the next step because the system won't run again until 13:00. -
How long does it take for a route to launch?
Users can take up to 1 hour to enter the route and advance from one step to another once inside. -
Can the send time for push notifications within a route be scheduled?
No, the send time for push notifications within a route cannot be scheduled. The push notification's send time depends on users’ transition time between steps and the waits established in the route flow.
You can use the "Wait" flow controller to approximate the desired send time by adding delays to the route flow. However, if you need to send a push notification at an exact time, this can only be done using classic push notifications outside of routes. -
Can a user exit a route midway because they meet a criterion in another, even if no exit point is defined in Route 1?
No. A user cannot exit a route midway. They only leave a route when they reach the end through one of the defined paths. -
If a device has multiple users (different clients), which identifier determines the user’s entry into the route?
EMMA always operates based on the device ID. Therefore, the device enters the route as long as it meets the conditions of the entry source defined in the route.